Android基础教程——动脑学院-程序员宅基地
Android基础教程——动脑学院
编辑时间:2024/3/6
来源:b站动脑学院
Android发展历程
安装是一种基于Linnux内核的自由及开放源代码的操作系统。主要用于移动设备,由谷歌公司和开放收集联盟领导及开发,Android操作系统最初由Andy Rubin开发,主要支持手机。
开发语言:Kotlin 、Java
Android开发机器配置要求
硬件要求:内容要求至少8GB,CPU要求1.5GHz以上,硬盘要求剩余空间不少于10GB,要求无线网卡和USB 插槽
对操作系统的要求:以windows为例子。必须为64位系统,至少windows7
AndroidStudio与SDK下载安装
SDK:软件开发工具包(software development kit)可以将app源代码编译为可执行的App应用。
创建工程和创建模拟器
观察App的运行日志
Android采用Log工具打印日志,它将各类日志划分为5 个等级:
Log.e 表示错误插槽,比如可能导致程序崩溃的因此
log.w 表示警告信息
log.i 表示一般信息
log.d 表示调试信息,可把程序运行时的变量值打印出来方便跟踪测试
log.v 表示冗余信息
//MyActivity.java类中
        Log.d("ning","onCreate");
方法
1.logcat查看tag为ning的日志

2.查看日志,只看见了ning:onCreate

效果如图:

环境安装可能会遇到的问题
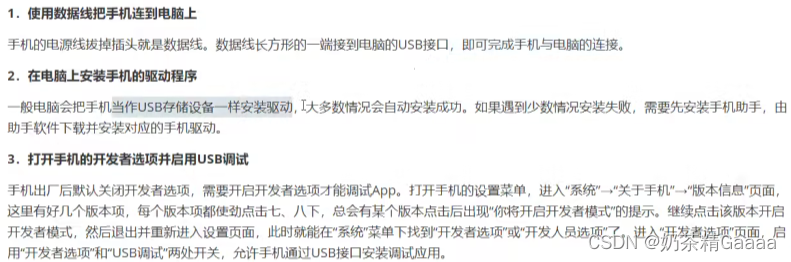
使用真机调试运行
app的运行效果实现:
方法1:模拟器上运行app应用
方法2:使用真实手机调试APP
电脑和手机连接AVD
android debug brige

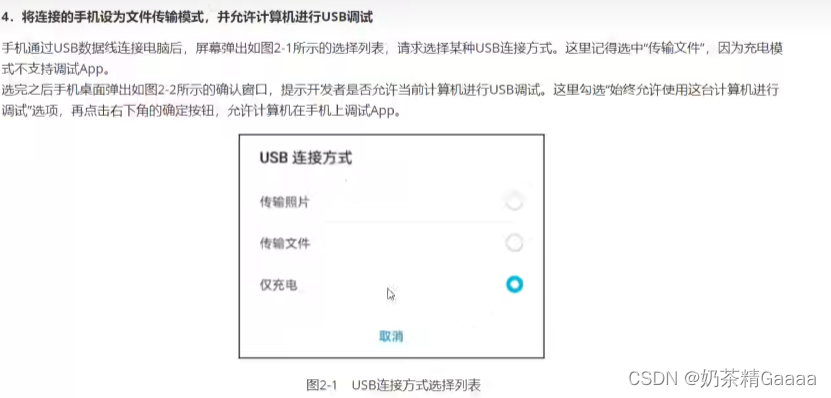
选择传输文件
Android开发涉及的编程语言
app开发主要有两大技术路线,分别原生开发和混合开发
android的官方编程语言包括java和kotlin

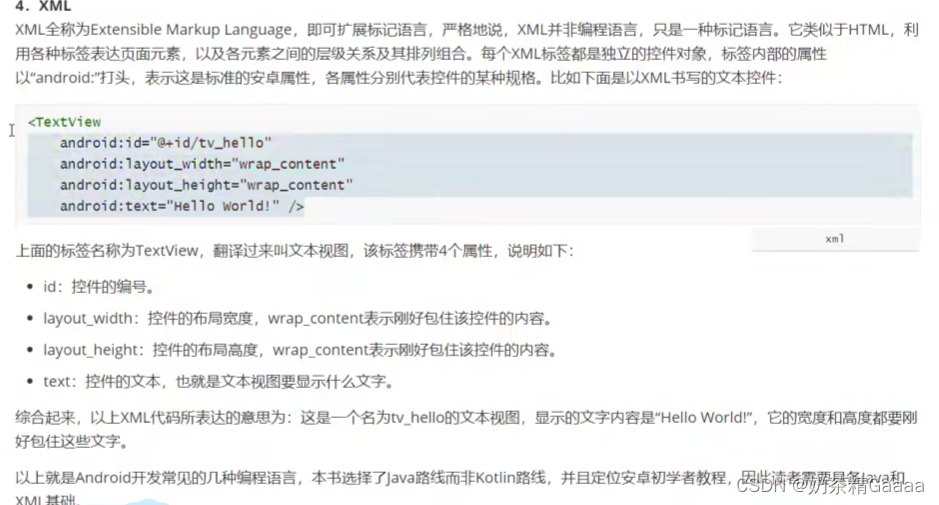
现在安卓开发中,jetpack compose逐渐替代xml,kotlin逐渐替代java

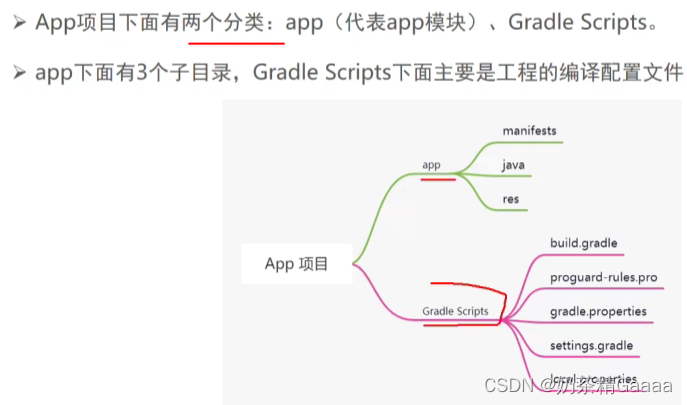
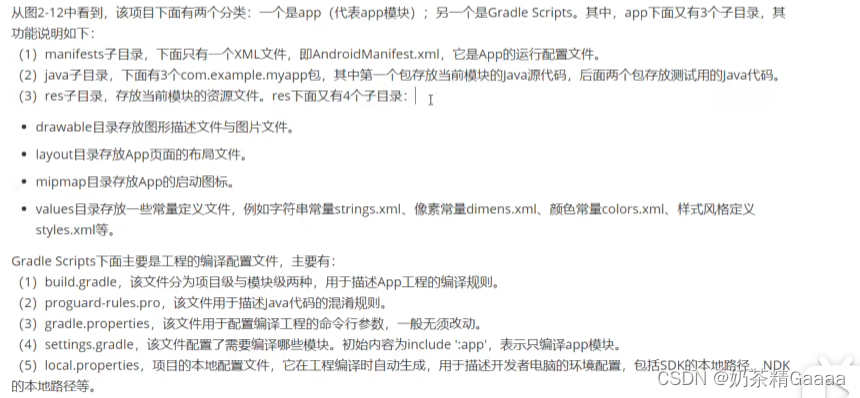
工程项目结构
app工程分为两个层次,一个是项目,外一个是模块。模块依附于项目,每个项目至少一个模块,而非运行某个项目,因为模块才对应实际的APP
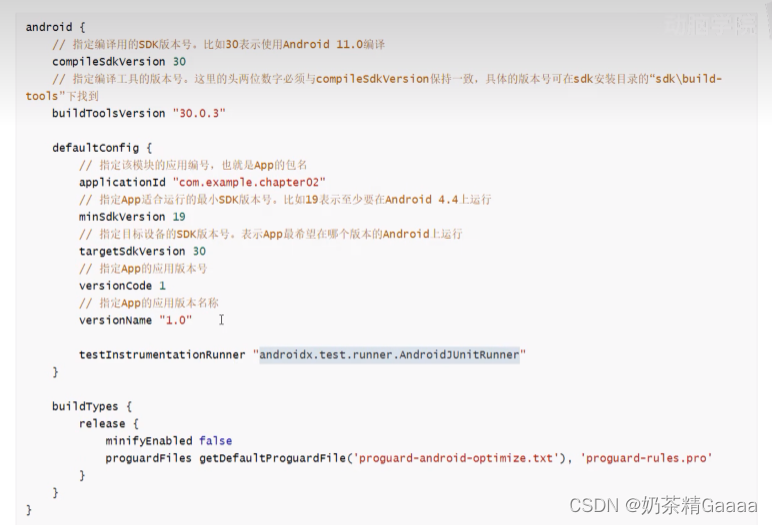
编译配置文件build.gradle
Gradle
gradle是一个项目自动化构建工具,帮我们做了依赖、打包、部署、发布、各种渠道的差异管理等工作。
项目级别的build.gradle制定了当前项目的总体编译规则
模块级 别的build.gradle对应具体模块,每个模块都要自已的build.gradle,他指定了当前模块的详细编译规则。

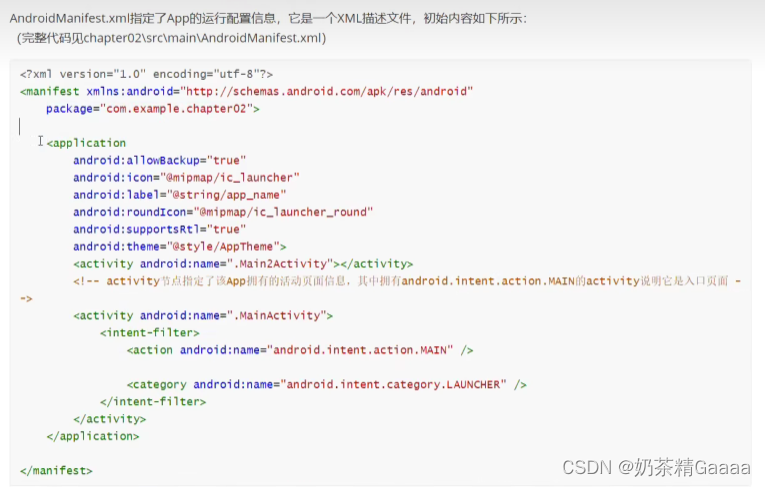
清单文件
每个应用的更目录中都必须巴哈一个AndroidManifest.xml,并且文件名必须一模一样,这个歌文件中包含了APP的配置项,系统需要根据里面的内容运行APP的代码,显示界面。
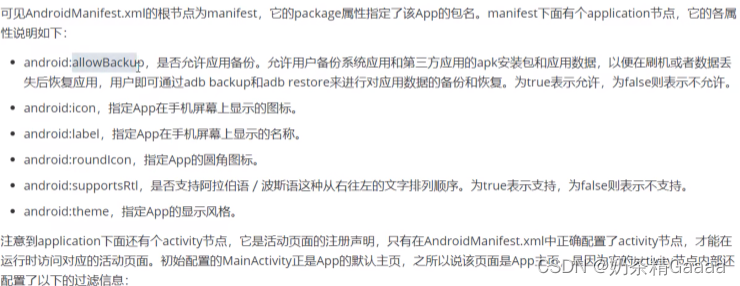


Activity:是一个应用程序,提供一个屏幕,用户可以用来交互为了完成某项任务。
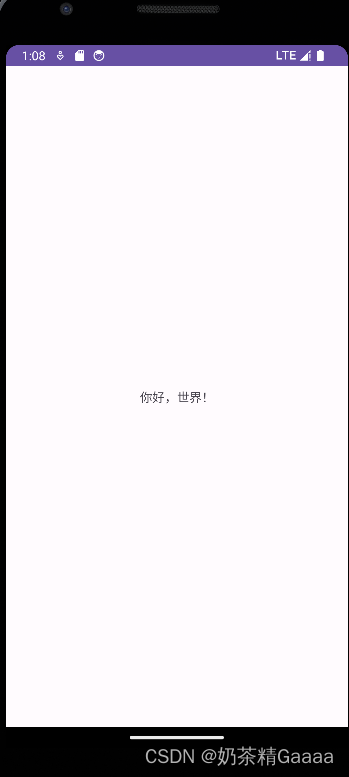
界面显示和逻辑处理
利用XML描绘应用界面,使用java代码写程序逻辑
把app的界面设计域代码逻辑分开的好处:1.使用xml文件描述app界面,可以方便的把android studio上预览界面效果2.一个界面布局可以被多重代码服用,反过来一个Java代码也可以适配多个界面布局
//MainActivity.java
package com.example.myapplication;

import android.os.Bundle;
import android.util.Log;
import android.widget.TextView;

import androidx.activity.EdgeToEdge;
import androidx.appcompat.app.AppCompatActivity;
import androidx.core.graphics.Insets;
import androidx.core.view.ViewCompat;
import androidx.core.view.WindowInsetsCompat;

public class MainActivity extends AppCompatActivity {


    @Override
    protected void onCreate(Bundle savedInstanceState) {

        super.onCreate(savedInstanceState);
           return insets;
        setContentView(R.layout.activity_main);
        TextView tv=findViewById(R.id.tv);
        tv.setText("你好,世界!");
        }
        //test log
      //  Log.d("ning","onCreate");
    }
<!-- activity_main.xml -->
<LinearLayout
    xmlns:android="http://schemas.android.com/apk/res/android"
    android:layout_width="match_parent"
    android:layout_height="match_parent"
    android:orientation="vertical"
    android:gravity="center">
    <TextView
        android:id="@+id/tv"
        android:layout_width="wrap_content"
        android:layout_height="wrap_content"
        android:text="Hello World!"/>
</LinearLayout>
Activity 创建与跳转
完整的页面创建过程包括三个步骤
- 在layout目录下创建XML文件
- 创建XML文件对应的Java代码
- 在AndroidMainfest.xml中注册页面配置

package com.example.myapplication;

import android.content.Intent;
import android.os.Bundle;
import android.util.Log;
import android.view.View;
import android.widget.Button;
import android.widget.TextView;

import androidx.activity.EdgeToEdge;
import androidx.appcompat.app.AppCompatActivity;
import androidx.core.graphics.Insets;
import androidx.core.view.ViewCompat;
import androidx.core.view.WindowInsetsCompat;

public class MainActivity extends AppCompatActivity {


    @Override
    protected void onCreate(Bundle savedInstanceState) {

        super.onCreate(savedInstanceState);

        setContentView(R.layout.activity_main);
        TextView tv=findViewById(R.id.tv);
        tv.setText("你好,世界!");

        Button button=findViewById(R.id.button);
        button.setOnClickListener(new View.OnClickListener(){


            @Override
            public void onClick(View v) {

                Intent intent=new Intent();
                intent.setClass(MainActivity.this,MainActivity2.class);
                startActivity(intent);
            }
        });
        }
        //test log
      //  Log.d("ning","onCreate");
    }
package com.example.myapplication;

import android.os.Bundle;

import androidx.annotation.Nullable;
import androidx.appcompat.app.AppCompatActivity;

public class MainActivity2 extends AppCompatActivity {

    @Override
protected  void onCreate(@Nullable Bundle savedInstanceState){

    super.onCreate(savedInstanceState);
    setContentView(R.layout.activity_main2 );
}
}
<?xml version="1.0" encoding="utf-8"?>
<!--<androidx.constraintlayout.widget.ConstraintLayout xmlns:android="http://schemas.android.com/apk/res/android"-->
<!--    xmlns:app="http://schemas.android.com/apk/res-auto"-->
<!--    xmlns:tools="http://schemas.android.com/tools"-->
<!--    android:id="@+id/main"-->
<!--    android:layout_width="match_parent"-->
<!--    android:layout_height="match_parent"-->
<!--    tools:context=".MainActivity">-->

<!--    <TextView-->
<!--        android:layout_width="wrap_content"-->
<!--        android:layout_height="wrap_content"-->
<!--        android:text="Hello World!"-->
<!--        app:layout_constraintBottom_toBottomOf="parent"-->
<!--        app:layout_constraintEnd_toEndOf="parent"-->
<!--        app:layout_constraintStart_toStartOf="parent"-->
<!--        app:layout_constraintTop_toTopOf="parent" />-->

<!--</androidx.constraintlayout.widget.ConstraintLayout>-->
<LinearLayout
    xmlns:android="http://schemas.android.com/apk/res/android"
    android:layout_width="match_parent"
    android:layout_height="match_parent"
    android:orientation="vertical"
    android:gravity="center">
    <TextView
        android:id="@+id/tv"
        android:layout_width="wrap_content"
        android:layout_height="wrap_content"
        android:text="跳转"
       />
    <Button
        android:id="@+id/button"
        android:layout_width="wrap_content"
        android:layout_height="wrap_content"
        android:text="跳转"/>

</LinearLayout>
<?xml version="1.0" encoding="utf-8"?>
<LinearLayout xmlns:android="http://schemas.android.com/apk/res/android"
    android:layout_width="match_parent"
    android:layout_height="match_parent"
    android:orientation="vertical"
    android:gravity="center">
    <TextView
        android:layout_width="wrap_content"
        android:layout_height="wrap_content"
        android:text="@string/text2"/>

</LinearLayout>
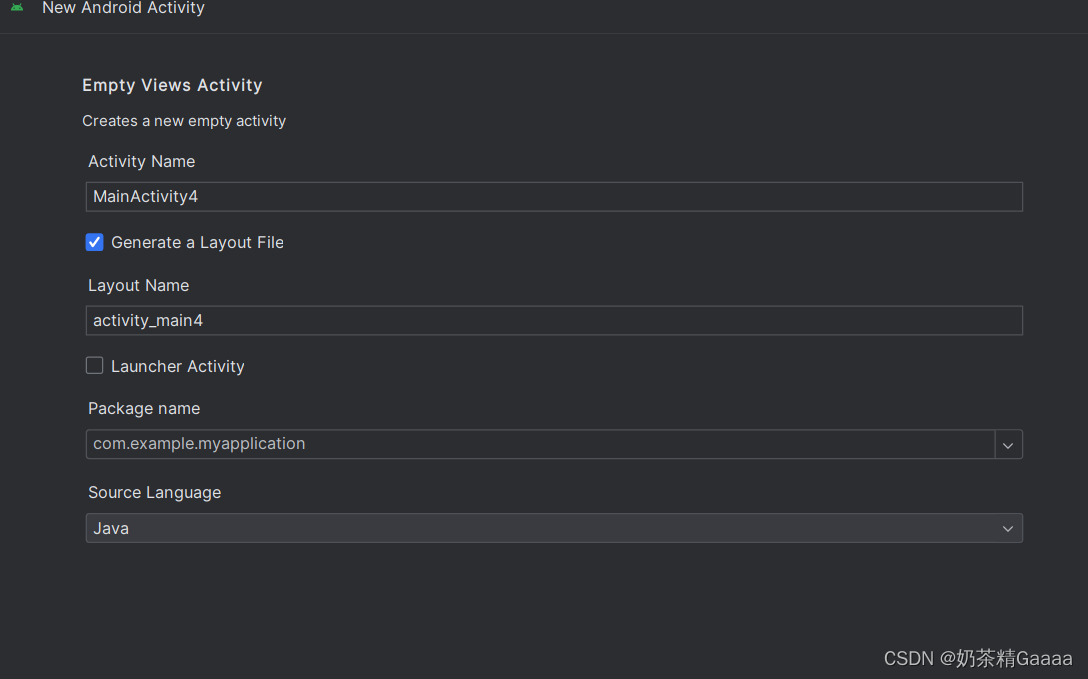
快速生成页面源码
依次选择右键菜单New——>Activity——>Empty Activity,弹出页面创建窗口
输入各项信息后,单击窗口右下角的FINISH按钮,完成新页面创建动作。
设置文本的内容
设置文本的两种方式
- 在XML文件中通过属性android.text设置文本
- 在Java代码中调用文本视图对象的setText方法设置文本
package com.example.myapplication;

import android.os.Bundle;
import android.widget.TextView;

import androidx.annotation.Nullable;
import androidx.appcompat.app.AppCompatActivity;

public class TextViewActivity extends AppCompatActivity {

    @Override
    protected void onCreate(@Nullable Bundle savedInstanceState){

        super.onCreate(savedInstanceState);
        setContentView(R.layout.activity_text_view);
        TextView tv_hello=findViewById(R.id.tv_hello);
        tv_hello.setText(R.string.hello);
    }

}
<resources>
    <string name="app_name">My Application</string>
    <string name="text2">Activity Main 2</string>
    <string name="hello">你好 世界</string>
</resources>
<?xml version="1.0" encoding="utf-8"?>
<LinearLayout xmlns:android="http://schemas.android.com/apk/res/android"
    android:layout_width="match_parent"
    android:layout_height="match_parent">
    <TextView
        android:id="@+id/tv_hello"
        android:layout_width="wrap_content"
        android:layout_height="wrap_content"
        android:text="@string/hello"/>

</LinearLayout>
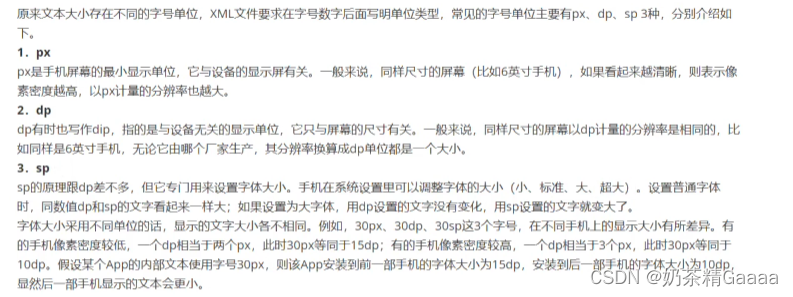
设置文本的字体大小
在Java代码中调用setTextSize方法,即可指定文本大小
在XML文件中则通过属性android:textSize指定文本大小,此时需要指定字号单位
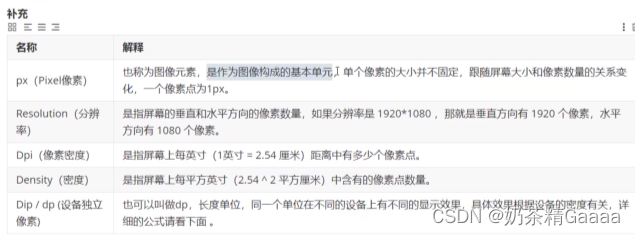
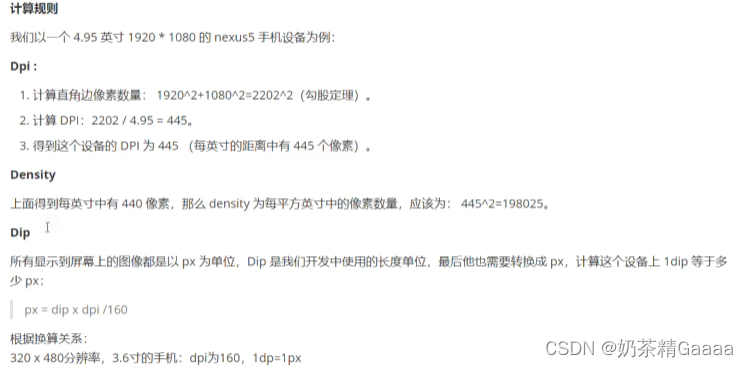
- px:他是手机屏幕最小的显示单位,与设备的显示屏有关
- dp:它是与设备无关的显示单位,只与屏幕的尺寸有关
- sp:它专门用来设置字体的大小,在系统设置中可以设置字体的大小
设置文本的颜色
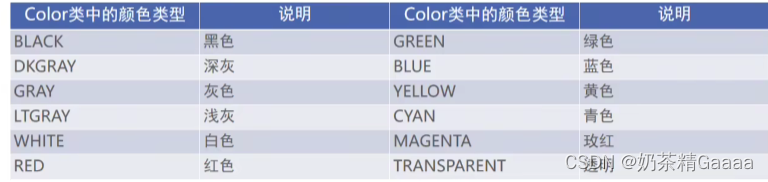
在Java代码中调用setTextColor方法即可设置文本颜色,具体色值可从Color类取。
RGB颜色定义
1.在xml文件中则通过属性android:textColor指定文本颜色,色值由透明度alpha和RGB三原色(红色red、绿色green、蓝色blue)联合定义
2.色值有八位十六进制与六位十六进制两种表达方式,例如八位编码FFEEDDCC中,FF表示透明度,EE表示红色浓度,DD表示绿色浓度,CC表示蓝色浓度。
3.透明度为FF表示完全不透明,为00表示完全透明越浓。RGB三色的数值越大,表示的颜色浓度越浓,也就越亮;数值越小,表示颜色越淡,也就越暗。

package com.example.myapplication;

import android.graphics.Color;
import android.os.Bundle;
import android.widget.TextView;

import androidx.appcompat.app.AppCompatActivity;

public class TextColorActivity extends AppCompatActivity {

    @Override
    protected void onCreate(Bundle savedInstanceState){

        super.onCreate(savedInstanceState);
        setContentView(R.layout.activity_text_color);
       TextView tv_code_system= findViewById(R.id.tv_code_system);
        tv_code_system.setTextColor(Color.BLUE);
    }
}
<?xml version="1.0" encoding="utf-8"?>
<LinearLayout xmlns:android="http://schemas.android.com/apk/res/android"
    xmlns:tools="http://schemas.android.com/tools"

    android:layout_width="match_parent"
    android:layout_height="match_parent"
    tools:context=".TextColorActivity">
    <TextView
        android:id="@+id/tv_code_system"
        android:layout_width="wrap_content"
        android:layout_height="wrap_content"
        android:text="代码设置文本颜色"
        android:textSize="17sp"/>

</LinearLayout>
设置视图的宽高
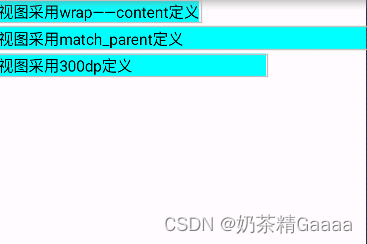
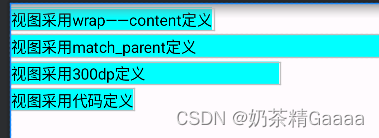
视图的宽度通过属性androd:layout_width表达,视图高度通过属性android:layout_height 表达,宽高的取值主要有下列三种
- match_parent:表示与上级视图保持一致
- wrap_content:表示与内容自适应
- 以dp为单位的具体尺寸
<?xml version="1.0" encoding="utf-8"?>
<LinearLayout xmlns:android="http://schemas.android.com/apk/res/android"
    android:layout_width="match_parent"
    android:layout_height="match_parent"
    android:orientation="vertical">

    <TextView

        android:layout_width="wrap_content"
        android:layout_height="wrap_content"
        android:layout_marginTop="5dp"
        android:background="#00ffff"
        android:text="视图采用wrap——content定义"
        android:textColor="#000000"
        android:textSize="17sp"/>
    <TextView
        android:layout_width="match_parent"
        android:layout_height="wrap_content"
        android:layout_marginTop="5dp"
        android:background="#00ffff"
        android:text="视图采用match_parent定义"
        android:textColor="#000000"
        android:textSize="17sp"/>
    <TextView
        android:layout_width="300dp"
        android:layout_height="wrap_content"
        android:layout_marginTop="5dp"
        android:background="#00ffff"
        android:text="视图采用300dp定义"
        android:textColor="#000000"
        android:textSize="17sp"/>


</LinearLayout>
在代码中设置视图宽高
首先确保消灭了中宽高属性值为wrap_content,接着打开该页面对应的Java代码,依序执行以下三个步骤:
- 调用控件对象的getLayoutParams方法,获取控件的布局参数
- 布局参数的width属性表示宽度,height属性表示高度,修改这两个属性值
- 调用控件对象的setLayoutParams方法,填入修改后布局参数使之生效
<?xml version="1.0" encoding="utf-8"?>
<LinearLayout xmlns:android="http://schemas.android.com/apk/res/android"
    android:layout_width="match_parent"
    android:layout_height="match_parent"
    android:orientation="vertical">

    <TextView

        android:layout_width="wrap_content"
        android:layout_height="wrap_content"
        android:layout_marginTop="5dp"
        android:background="#00ffff"
        android:text="视图采用wrap——content定义"
        android:textColor="#000000"
        android:textSize="17sp"/>
    <TextView
        android:layout_width="match_parent"
        android:layout_height="wrap_content"
        android:layout_marginTop="5dp"
        android:background="#00ffff"
        android:text="视图采用match_parent定义"
        android:textColor="#000000"
        android:textSize="17sp"/>
    <TextView
        android:layout_width="300dp"
        android:layout_height="wrap_content"
        android:layout_marginTop="5dp"
        android:background="#00ffff"
        android:text="视图采用300dp定义"
        android:textColor="#000000"
        android:textSize="17sp"/>
    <TextView
        android:id="@+id/tv_code"
        android:layout_width="wrap_content"
        android:layout_height="wrap_content"
        android:layout_marginTop="5dp"
        android:background="#00ffff"
        android:text="视图采用代码定义"
        android:textColor="#000000"
        android:textSize="17sp"/>


</LinearLayout>
package com.example.myapplication.util;

import android.content.Context;

public class Utils {

    //根据分辨率dp转换为px
    public static  int dip2px(Context context,float dpValue){

        //根据当前手机像素密度(1个dp对应几个px)
        float scale= context.getResources().getDisplayMetrics().density;
        return (int)(dpValue*scale+0.5f);
    }
}
package com.example.myapplication;

import android.os.Bundle;
import android.view.ViewGroup;
import android.widget.TextView;

import androidx.appcompat.app.AppCompatActivity;

import com.example.myapplication.util.Utils;

public class ViewBorderActivity extends AppCompatActivity {

    @Override
    protected void onCreate(Bundle savedInstanceState){

        super.onCreate(savedInstanceState);
        setContentView(R.layout.activity_view_border);
        TextView tv_code=findViewById(R.id.tv_code);
        //获取tv_code的布局参数
        ViewGroup.LayoutParams params=tv_code.getLayoutParams();
        // 注意px的的那位,需要把dp转为px数值
        params.width= Utils.dip2px(this,300);
        tv_code.setLayoutParams(params);
    }
}
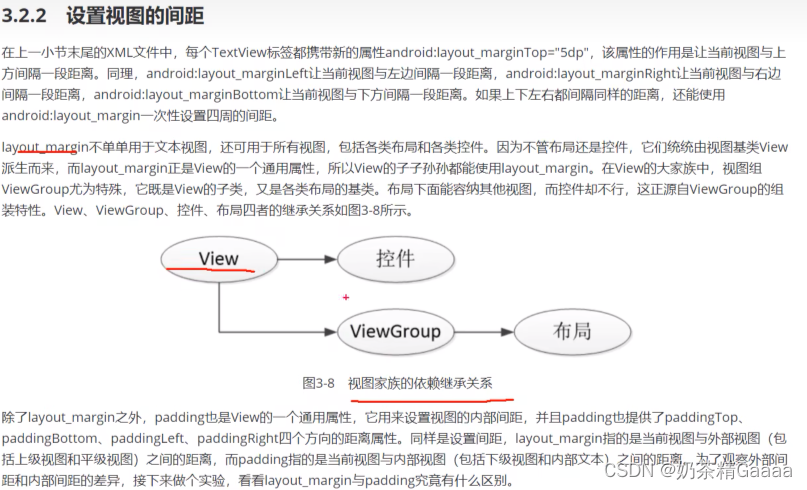
设置视图间距
设置视图间距的两种方式:
- 采用layout_margin属性,它指定了当前视图与周围平级视图之间的距离。包括layout_margin、layout_marginLeftlayout_marginTop、layout_marginRight、layout_marginBottom
- 采用padding属性、指定了当前视图与内部下级视图之间的距离。包括padding、paddingLeft、padding Top、padding Right、paddingBottom

<?xml version="1.0" encoding="utf-8"?>
<LinearLayout xmlns:android="http://schemas.android.com/apk/res/android"
    xmlns:app="http://schemas.android.com/apk/res-auto"
    xmlns:tools="http://schemas.android.com/tools"
    android:id="@+id/main"
    android:layout_width="match_parent"
    android:layout_height="300dp"
    android:orientation="vertical"
    android:background="#00AAFF">
<!--    middle yellow-->
    <LinearLayout
        android:layout_width="match_parent"
        android:layout_height="match_parent"
        android:layout_margin="20dp"
        android:background="#FFFF99"
        android:padding="60dp">
<!--        inner red-->
        <VideoView
            android:layout_width="match_parent"
            android:layout_height="match_parent"
            android:background="#FF0000">

        </VideoView>
    </LinearLayout>

</LinearLayout>
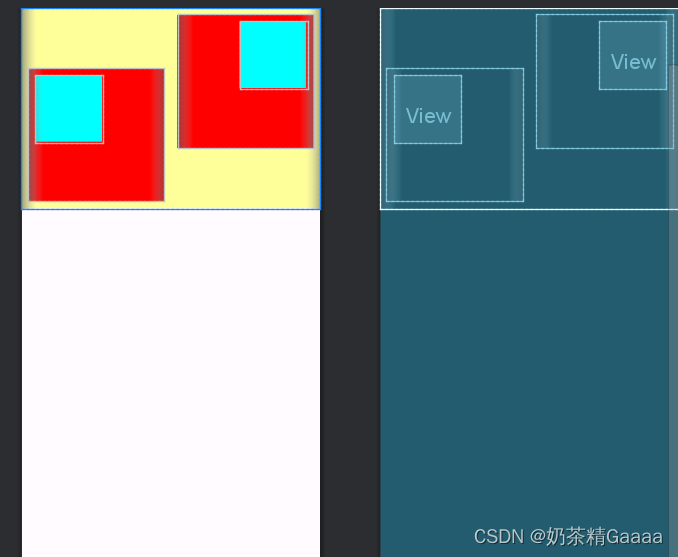
设置是视图的对齐方式
设置视图的对齐方式的两种途径:
- 采用layout_gravity属性,它指定当前视图相对于上级试图的对齐方式
- 采用gravity属性,它指定下级视图相对于当前视图的对齐方式。
layout_gravity与gravity的取值包括left、top、right、bottom还可以竖线连接各取值,例如“left|top”表示即靠左又靠上,也就是朝左上角对齐
注意:layout_gravity是自已的布局 gravity是子组件view布局
<?xml version="1.0" encoding="utf-8"?>
<LinearLayout xmlns:android="http://schemas.android.com/apk/res/android"
      android:layout_width="match_parent"
    android:layout_height="300dp"
    android:background="#ffff99"
    android:orientation="horizontal">
    <LinearLayout
        android:layout_width="0dp"
        android:layout_height="200dp"
        android:layout_weight="1"
        android:layout_margin="10dp"
        android:background="#ff0000"
        android:padding="10dp"
        android:layout_gravity="bottom"
        android:gravity="left"
        >
<View
    android:layout_width="100dp"
    android:layout_height="100dp"
    android:background="#00ffff"/>
    </LinearLayout>

    <LinearLayout
        android:layout_width="0dp"
        android:layout_height="200dp"
        android:layout_weight="1"
        android:layout_margin="10dp"
        android:layout_gravity="top"
        android:padding="10dp"
        android:background="#ff0000"
        android:gravity="right">
        <View
            android:layout_width="100dp"
            android:layout_height="100dp"
            android:background="#00ffff"/>

    </LinearLayout>

</LinearLayout>
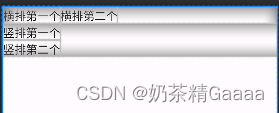
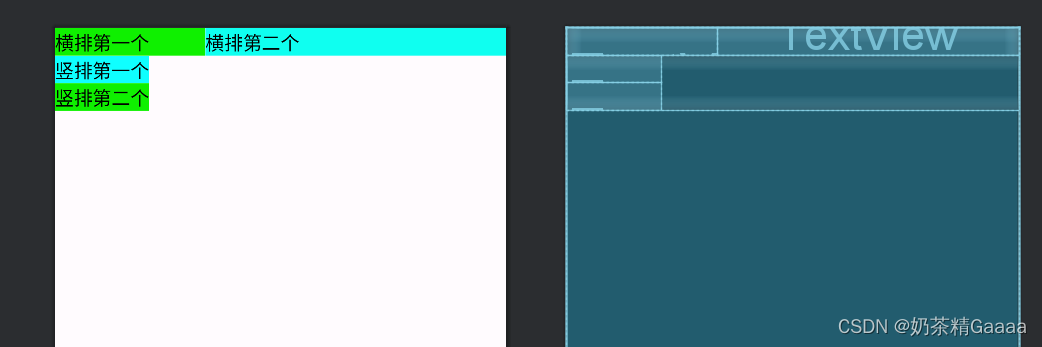
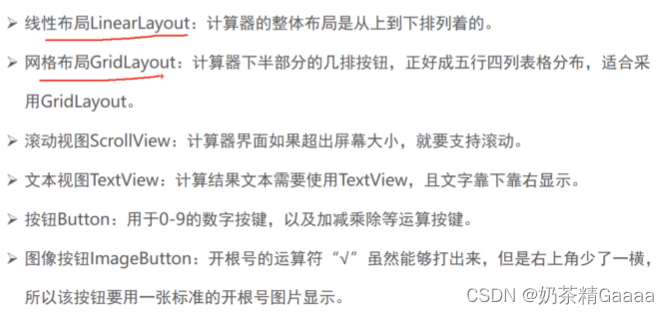
LinearLayout
线性布局内部的各视图的两种排列方式:
- orientation属性值为horizontal时,内部视图在水平方向从左到右排列
- orientation属性值为vertical时内部视图在垂直方向上从上往下排列
如果不指定orientation属性,则LinearLayout默认水平方向排列
<?xml version="1.0" encoding="utf-8"?>
<LinearLayout xmlns:android="http://schemas.android.com/apk/res/android"
   xmlns:app="http://schemas.android.com/apk/res-auto"
   xmlns:tools="http://schemas.android.com/tools"
   android:id="@+id/main"
   android:layout_width="match_parent"
   android:layout_height="match_parent"
   android:orientation="vertical"
   >
<LinearLayout
   android:layout_width="match_parent"
   android:layout_height="wrap_content"
   android:orientation="horizontal">

   <TextView
       android:layout_width="wrap_content"
       android:layout_height="wrap_content"
       android:text="横排第一个"
       android:textSize="17sp"
       android:textColor="#000000">

   </TextView>
   <TextView
       android:layout_width="wrap_content"
       android:layout_height="wrap_content"
       android:text="横排第二个"
       android:textSize="17sp"
       android:textColor="#000000">

   </TextView>
</LinearLayout>

   <LinearLayout
       android:layout_width="match_parent"
       android:layout_height="wrap_content"
       android:orientation="vertical">

       <TextView
           android:layout_width="wrap_content"
           android:layout_height="wrap_content"
           android:text="竖排第一个"
           android:textSize="17sp"
           android:textColor="#000000">

       </TextView>
       <TextView
           android:layout_width="wrap_content"
           android:layout_height="wrap_content"
           android:text="竖排第二个"
           android:textSize="17sp"
           android:textColor="#000000">

       </TextView>
   </LinearLayout>
</LinearLayout>
线性布局的权重概念,指的是线性布局的下级视图各自拥有多大比例的宽高。
权重属性名叫做layout_weight,但该属性不在LinearLayout节点设置,而在线性布局的直接下级视图设置,表示下级视图占据宽高比例。
- layout_width填0dp时,layout_weight表示水平方向的宽度比例
- layout_height填0dp时,layout_weight表示垂直方向的高度比例
<?xml version="1.0" encoding="utf-8"?>
<LinearLayout xmlns:android="http://schemas.android.com/apk/res/android"
    xmlns:app="http://schemas.android.com/apk/res-auto"
    xmlns:tools="http://schemas.android.com/tools"
    android:id="@+id/main"
    android:layout_width="match_parent"
    android:layout_height="match_parent"
    android:orientation="vertical"
    >
<LinearLayout
    android:layout_width="match_parent"
    android:layout_height="wrap_content"
    android:orientation="horizontal">

    <TextView
        android:layout_width="0dp"
        android:layout_height="wrap_content"
        android:layout_weight="1"
        android:text="横排第一个"
        android:textSize="17sp"
        android:background="#0ff000"
        android:textColor="#000000">

    </TextView>
    <TextView
        android:layout_width="0dp"
        android:layout_height="wrap_content"
        android:layout_weight="2"
        android:text="横排第二个"
        android:textSize="17sp"
        android:background="#0ffff0"

        android:textColor="#000000">

    </TextView>
</LinearLayout>

    <LinearLayout
        android:layout_width="match_parent"
        android:layout_height="wrap_content"
        android:orientation="vertical">

        <TextView
            android:layout_width="wrap_content"
            android:layout_height="wrap_content"
            android:text="竖排第一个"
            android:textSize="17sp"
            android:background="#0fffff"

            android:textColor="#000000">

        </TextView>
        <TextView
            android:layout_width="wrap_content"
            android:layout_height="wrap_content"
            android:text="竖排第二个"
            android:textSize="17sp"
            android:background="#0ff000"

            android:textColor="#000000">

        </TextView>
    </LinearLayout>
</LinearLayout>
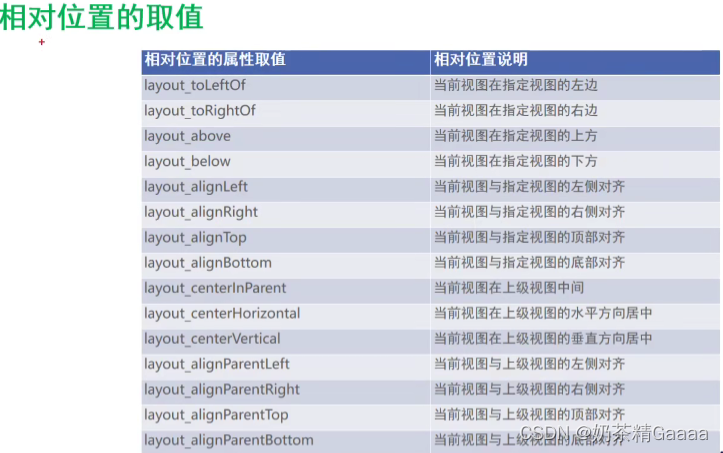
RelativeLayout
相对布局下级视图位置由其他视图决定。用于确定下级视图位置的参照物分为两种:
- 与该视图自身平级的视图
- 该视图的上级视图(也就是它归属的RelativeLayout)
如果不设定下级视图的参照物,那么下级视图默认显示在RelativeLayout内部的左上角

<?xml version="1.0" encoding="utf-8"?>
<RelativeLayout xmlns:android="http://schemas.android.com/apk/res/android"
    xmlns:app="http://schemas.android.com/apk/res-auto"
    xmlns:tools="http://schemas.android.com/tools"
    android:id="@+id/main"
    android:layout_width="match_parent"
    android:layout_height="150dp"
    tools:context=".util.RelativeLayoutActivity">
<TextView
    android:id="@+id/tv_center"
    android:layout_width="wrap_content"
    android:layout_height="wrap_content"
    android:layout_centerInParent="true"
    android:background="#ffffff"
    android:text="我在中间"
    android:textSize="11sp"
    android:textColor="#000000"/>
    <TextView
        android:id="@+id/tv_center_horizontal"
        android:layout_width="wrap_content"
        android:layout_height="wrap_content"
        android:background="#ffffff"
        android:layout_centerHorizontal="true"

        android:text="我在水平中间"
        android:textSize="11sp"
        android:textColor="#000000"/>
    <TextView
        android:id="@+id/tv_center_vertical"
        android:layout_width="wrap_content"
        android:layout_height="wrap_content"
        android:background="#ffffff"
        android:layout_centerVertical="true"

        android:text="我在垂直中间"
        android:textSize="11sp"
        android:textColor="#000000"/>
    <TextView
        android:id="@+id/tv_parent_left"
        android:layout_width="wrap_content"
        android:layout_height="wrap_content"
        android:background="#ffffff"
        android:layout_alignParentLeft="true"

        android:text="我在上级左边对齐"
        android:textSize="11sp"
        android:textColor="#000000"/>
    <TextView
        android:id="@+id/tv_parent_right"
        android:layout_width="wrap_content"
        android:layout_height="wrap_content"
        android:background="#ffffff"
        android:layout_alignParentRight="true"

        android:text="我在上级右边对齐"
        android:textSize="11sp"
        android:textColor="#000000"/>
    <TextView
        android:id="@+id/tv_parent_top"
        android:layout_width="wrap_content"
        android:layout_height="wrap_content"
        android:background="#ffffff"
        android:layout_alignParentTop="true"

        android:text="我在上级顶部对齐"
        android:textSize="11sp"
        android:textColor="#000000"/>
    <TextView
        android:id="@+id/tv_parent_bottom"
        android:layout_width="wrap_content"
        android:layout_height="wrap_content"
        android:background="#ffffff"
        android:layout_alignParentBottom="true"

        android:text="我在上级底部对齐"
        android:textSize="11sp"
        android:textColor="#000000"/>
    <TextView
        android:id="@+id/tv_left_center"
        android:layout_width="wrap_content"
        android:layout_height="wrap_content"

        android:layout_toLeftOf="@id/tv_center"
        android:layout_alignTop="@id/tv_center"
        android:background="#ffffff"

        android:text="我在中间左边"
        android:textSize="11sp"
        android:textColor="#000000"/>
    <TextView
        android:id="@+id/tv_right_center"
        android:layout_width="wrap_content"
        android:layout_height="wrap_content"
        android:layout_toRightOf="@id/tv_center"
        android:layout_alignBottom="@id/tv_center"
        android:background="#ffffff"
        android:text="我在中间右边"
        android:textSize="11sp"
        android:textColor="#000000"/>
    <TextView
        android:id="@+id/tv_above_center"
        android:layout_width="wrap_content"
        android:layout_height="wrap_content"
        android:layout_above="@id/tv_center"
        android:layout_alignLeft="@id/tv_center"
        android:background="#ffffff"
        android:text="我在中间上面"
        android:textSize="11sp"
        android:textColor="#000000"/>
    <TextView
        android:id="@+id/tv_below_center"
        android:layout_width="wrap_content"
        android:layout_height="wrap_content"
        android:layout_below="@id/tv_center"
        android:layout_alignRight="@id/tv_center"
        android:background="#ffffff"
        android:text="我在中间下面"
        android:textSize="11sp"
        android:textColor="#000000"/>

</RelativeLayout>
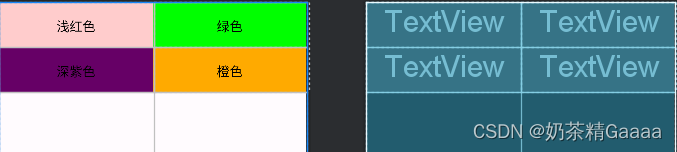
GirdLayout
网格布局支持多行多列的表格排列
网格布局默认从左到右、从上到下排列,他新增加两个属性:
- columnCount属性,它指定网格的列数,即每行能放多少个视图
- rowCount属性,它指定了网络的行数,即每列能放多少个视图
<?xml version="1.0" encoding="utf-8"?>
<GridLayout xmlns:android="http://schemas.android.com/apk/res/android"
    xmlns:app="http://schemas.android.com/apk/res-auto"
    xmlns:tools="http://schemas.android.com/tools"
    android:id="@+id/main"
    android:layout_width="match_parent"
    android:layout_height="match_parent"
    android:columnCount="2"
    android:rowCount="2"
    tools:context=".GridLayoutActivity">
    <TextView
        android:layout_width="0dp"
        android:layout_columnWeight="1"
        android:layout_height="60dp"
        android:background="#ffcccc"
        android:text="浅红色"
        android:gravity="center"

        android:textColor="#000000"
        android:textSize="17sp" />
    <TextView
        android:layout_width="0dp"
        android:layout_columnWeight="1"
        android:layout_height="60dp"
        android:background="#00ff00"
        android:text="绿色"
        android:gravity="center"
        android:textColor="#000000"
        android:textSize="17sp" />
    <TextView
        android:layout_width="0dp"
        android:layout_columnWeight="1"
        android:layout_height="60dp"
        android:background="#660066"
        android:text="深紫色"
        android:gravity="center"

        android:textColor="#000000"
        android:textSize="17sp" />
    <TextView
        android:layout_width="0dp"
        android:layout_columnWeight="1"
        android:layout_height="60dp"
        android:background="#ffaa00"
        android:text="橙色"
        android:gravity="center"

        android:textColor="#000000"
        android:textSize="17sp" />


</GridLayout>
ScrollView
滚动视图有两种:
- ScrollView,它是垂直方向的滚动视图,垂直方向滚动时,layout_width属性值设置为match_parent,layout_height属性值设置为wrap_content
- HorizontalScrollView,它是水平方向的滚动视图,水平方向滚蛋时,layout_width属性值设置为wrap_content,layout_height设置为match_parent

<?xml version="1.0" encoding="utf-8"?>
<LinearLayout xmlns:android="http://schemas.android.com/apk/res/android"
    xmlns:app="http://schemas.android.com/apk/res-auto"
    xmlns:tools="http://schemas.android.com/tools"
    android:id="@+id/main"
    android:layout_width="match_parent"
    android:layout_height="match_parent"

    android:orientation="vertical">
    <HorizontalScrollView
        android:layout_width="wrap_content"
        android:layout_height="200dp">
        <LinearLayout
            android:layout_width="wrap_content"
            android:layout_height="match_parent"
            android:orientation="horizontal">
            <View
                android:layout_width="300dp"
                android:layout_height="match_parent"
                android:background="#aaffff">

            </View>
            <View
                android:layout_width="300dp"
                android:layout_height="match_parent"
                android:background="#ffff00">

            </View>
        </LinearLayout>
    </HorizontalScrollView>
    <ScrollView
        android:layout_width="match_parent"
        android:layout_height="wrap_content">
        <LinearLayout
            android:layout_width="wrap_content"
            android:layout_height="match_parent"
            android:orientation="vertical">
            <View
                android:layout_width="match_parent"
                android:layout_height="400dp"
                android:background="#00ff00">

            </View>
            <View
                android:layout_width="match_parent"
                android:layout_height="400dp"
                android:background="#ffffaa">

            </View>
        </LinearLayout>
    </ScrollView>

</LinearLayout>
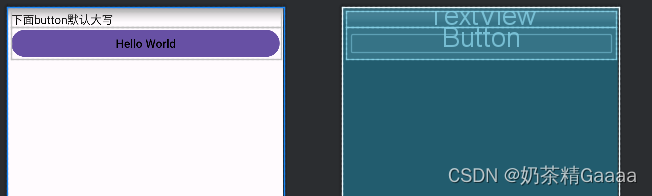
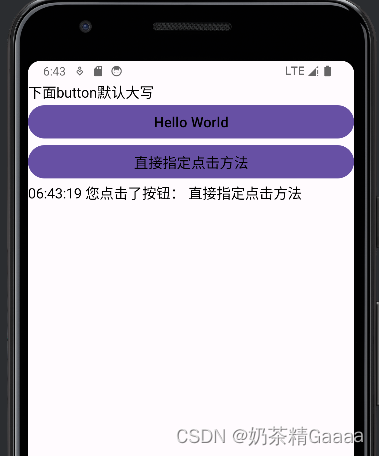
Button
按钮控件Button由TextView派生而来,他们之间的区别有
- Button拥有默认的按钮北京,而TextView默认无背景
- Button的内部文本默认居中对齐,而TextView的内部文本默认靠左对齐
- Button会默认将英文字母转为大写,而TextView保持原始的英文大小写
<?xml version="1.0" encoding="utf-8"?>
<LinearLayout xmlns:android="http://schemas.android.com/apk/res/android"
    xmlns:app="http://schemas.android.com/apk/res-auto"
    xmlns:tools="http://schemas.android.com/tools"
    android:id="@+id/main"
    android:layout_width="match_parent"
    android:layout_height="match_parent"
    tools:context=".ButtonStyleActivity"
    android:orientation="vertical"
    android:padding="5dp">
<TextView
    android:layout_width="match_parent"
    android:layout_height="wrap_content"
    android:text="下面button默认大写"
    android:textColor="@color/black"
    android:textSize="17sp"/>
    <Button
        android:layout_width="match_parent"
        android:layout_height="wrap_content"
        android:text="Hello World"
        android:textAllCaps="false"
        android:textColor="@color/black"
        android:textSize="17sp"/>

</LinearLayout>
按钮控件的新增加属性
与TextView相比,Button增加了两个新属性
- textAllCaps属性,它指定了是否将英文字母转为大写,为true食表示自动转为大写,为false是表示不自动转为大写
- onClick属性,它用力啊接管用户的点击动作,指定了点击按钮时要触发哪个方法
package com.example.myapplication;

import android.os.Bundle;

import androidx.activity.EdgeToEdge;
import androidx.appcompat.app.AppCompatActivity;
import androidx.core.graphics.Insets;
import androidx.core.view.ViewCompat;
import androidx.core.view.WindowInsetsCompat;
import android.view.View;
import android.widget.Button;
import android.widget.TextView;

import com.example.myapplication.util.DateUtil;

public class ButtonStyleActivity extends AppCompatActivity {


    private TextView tv_result;

    @Override
    protected void onCreate(Bundle savedInstanceState) {

        super.onCreate(savedInstanceState);
        EdgeToEdge.enable(this);
        setContentView(R.layout.activity_button_style);
        tv_result = findViewById(R.id.tv_result);

        ViewCompat.setOnApplyWindowInsetsListener(findViewById(R.id.main), (v, insets) -> {

            Insets systemBars = insets.getInsets(WindowInsetsCompat.Type.systemBars());
            v.setPadding(systemBars.left, systemBars.top, systemBars.right, systemBars.bottom);
            return insets;
        });


    }
    public void doClick(View view){

        String desc=String.format("%s 您点击了按钮: %s", DateUtil.getNowTime(),((Button)view).getText());
        tv_result.setText(desc);
    }
}
package com.example.myapplication.util;

import java.text.SimpleDateFormat;
import java.util.Date;
import java.util.logging.SimpleFormatter;

public class DateUtil {

    public static String getNowTime(){

        SimpleDateFormat sdf=new SimpleDateFormat("HH:mm:ss");
        return sdf.format(new Date());
    }
}
<?xml version="1.0" encoding="utf-8"?>
<LinearLayout xmlns:android="http://schemas.android.com/apk/res/android"
    xmlns:app="http://schemas.android.com/apk/res-auto"
    xmlns:tools="http://schemas.android.com/tools"
    android:id="@+id/main"
    android:layout_width="match_parent"
    android:layout_height="match_parent"
    tools:context=".ButtonStyleActivity"
    android:orientation="vertical"
    android:padding="5dp">
<TextView
    android:layout_width="match_parent"
    android:layout_height="wrap_content"
    android:text="下面button默认大写"
    android:textColor="@color/black"
    android:textSize="17sp"/>
    <Button
        android:layout_width="match_parent"
        android:layout_height="wrap_content"
        android:text="Hello World"
        android:textAllCaps="false"
        android:textColor="@color/black"
        android:textSize="17sp"
       />
    <Button
        android:layout_width="match_parent"
        android:layout_height="wrap_content"
        android:text="直接指定点击方法"
        android:textAllCaps="false"
        android:textColor="@color/black"
        android:textSize="17sp"
        android:onClick="doClick"/>
    <TextView
        android:id="@+id/tv_result"
        android:layout_width="match_parent"
        android:layout_height="wrap_content"
        android:text="显示点击按钮后的结果"
        android:textColor="@color/black"
        android:textSize="17sp"/>
</LinearLayout>
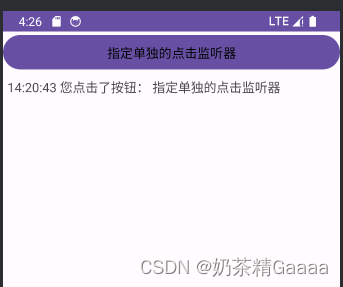
点击事件
监听器,意思就是专门监听控件的动作行为。只有控件发生了指定的动作,监听器才会触发开关去执行对于的代码逻辑
按钮控件有两种常用的监听器
- 点击监听器,通过setOnClickListener方法设置。按钮被按住少于500毫米时,会触发点击事件
- 长按监听器,通过setOnLongClickListener方法设置。按钮被按住超过500毫秒时,会触发长按事件

package com.example.myapplication;

import android.os.Bundle;
import android.view.View;
import android.widget.Button;
import android.widget.TextView;

import androidx.activity.EdgeToEdge;
import androidx.appcompat.app.AppCompatActivity;
import androidx.core.graphics.Insets;
import androidx.core.view.ViewCompat;
import androidx.core.view.WindowInsetsCompat;

import com.example.myapplication.util.DateUtil;

public class BttonClickActivity extends AppCompatActivity implements  View.OnClickListener {

private TextView tv_result;
    @Override
    protected void onCreate(Bundle savedInstanceState) {

        super.onCreate(savedInstanceState);
        setContentView(R.layout.activity_btton_click);
        tv_result=findViewById(R.id.tv_result);
        Button btn_click_single=findViewById(R.id.btn_click_single);
        btn_click_single.setOnClickListener(new MyOnClickListener(tv_result));

        Button btn_click_public=findViewById(R.id.btn_click_public);
        btn_click_public.setOnClickListener(this);


    }

    @Override
    public void onClick(View v) {

        if(v.getId()==R.id.btn_click_public){

            String desc=String.format("%s 您点击了按钮: %s", DateUtil.getNowTime(),((Button)v).getText());
            tv_result.setText(desc);
        }
    }

    static class MyOnClickListener implements View.OnClickListener{

        private final TextView tv_result;
        public MyOnClickListener(TextView tv_result){

            this.tv_result=tv_result;
        }
        @Override
        public void onClick(View v){

            String desc=String.format("%s 您点击了按钮: %s", DateUtil.getNowTime(),((Button)v).getText());
            tv_result.setText(desc);

        }
    }
}
<?xml version="1.0" encoding="utf-8"?>
<LinearLayout xmlns:android="http://schemas.android.com/apk/res/android"
    xmlns:app="http://schemas.android.com/apk/res-auto"
    xmlns:tools="http://schemas.android.com/tools"
    android:id="@+id/main"
    android:layout_width="match_parent"
    android:layout_height="match_parent"
    tools:context=".BttonClickActivity"
    android:orientation="vertical">
<Button
    android:id="@+id/btn_click_single"
    android:layout_width="match_parent"
    android:layout_height="wrap_content"
    android:text="指定单独的点击监听器"
    android:textColor="#000000"
    android:textSize="15sp"/>
    <Button
        android:id="@+id/btn_click_public"
        android:layout_width="match_parent"
        android:layout_height="wrap_content"
        android:text="指定公共的点击监听器"
        android:textColor="#000000"
        android:textSize="15sp"/>
    <TextView
        android:id="@+id/tv_result"
        android:layout_width="match_parent"
        android:layout_height="wrap_content"
        android:padding="5dp"
        android:textSize="15sp"
        android:text="这里查看按钮的点击结果"/>

</LinearLayout>
长按点击事件
package com.example.myapplication;

import android.os.Bundle;
import android.view.View;
import android.widget.Button;
import android.widget.TextView;

import androidx.activity.EdgeToEdge;
import androidx.appcompat.app.AppCompatActivity;
import androidx.core.graphics.Insets;
import androidx.core.view.ViewCompat;
import androidx.core.view.WindowInsetsCompat;

import com.example.myapplication.util.DateUtil;

public class activity_button_long_click extends AppCompatActivity {


    @Override
    protected void onCreate(Bundle savedInstanceState) {

        super.onCreate(savedInstanceState);
        setContentView(R.layout.activity_button_long_click);
        TextView tv_result=findViewById(R.id.tv_result);
        Button btn_long_click=findViewById(R.id.btn_long_click);
        btn_long_click.setOnLongClickListener(v -> {

            String desc=String.format("%s 您点击了按钮: %s", DateUtil.getNowTime(),((Button)v).getText());
            tv_result.setText(desc);
            return true;
        });
    }
}
<?xml version="1.0" encoding="utf-8"?>
<LinearLayout xmlns:android="http://schemas.android.com/apk/res/android"
    xmlns:tools="http://schemas.android.com/tools"
    android:id="@+id/main"
    android:layout_width="match_parent"
    android:layout_height="match_parent"
    tools:context=".BttonClickActivity"
    android:orientation="vertical">
    <Button
        android:id="@+id/btn_long_click"
        android:layout_width="match_parent"
        android:layout_height="wrap_content"
        android:text="指定长按的点击监听器"
        android:textColor="#000000"
        android:textSize="15sp"/>

    <TextView
        android:id="@+id/tv_result"
        android:layout_width="match_parent"
        android:layout_height="wrap_content"
        android:padding="5dp"
        android:textSize="15sp"
        android:text="这里查看按钮的点击结果"/>

</LinearLayout>
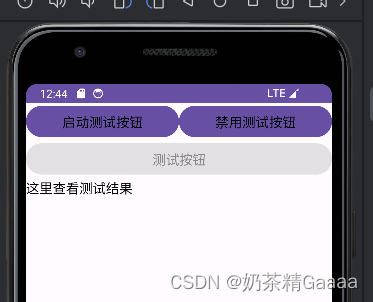
禁用恢复按钮
在实际业务中,按钮弹出拥有两种状态,即不可用状态和可用状态,他们在外观上和功能上的区别如下:
- 不可用按钮:按钮不允许点击,即使点击也没反应,同时按钮文字为灰色
- 可用按钮:按钮允许点击,点击按钮会粗发点击事件,同时按钮文字为正常的黑色;
是否允许点击由enabled属性控制,属性值为true表示允许点击,为false表示不允许点击
package com.example.myapplication;

import android.graphics.Color;
import android.os.Bundle;
import android.view.View;
import android.widget.Button;
import android.widget.TextView;

import androidx.appcompat.app.AppCompatActivity;

import com.example.myapplication.util.DateUtil;


public class ButtonEnableActivity extends AppCompatActivity implements View.OnClickListener {


    private  Button btn_test;
    private  TextView tv_result;


    @Override
    protected void onCreate(Bundle savedInstanceState) {

        super.onCreate(savedInstanceState);
        setContentView(R.layout.activity_button_enable);

        Button btn_enable = findViewById(R.id.btn_enable);
        Button btn_disable=findViewById(R.id.btn_disable);
       btn_test =findViewById(R.id.btn_test);
        tv_result=findViewById(R.id.tv_result);


        btn_enable.setOnClickListener(this);
        btn_disable.setOnClickListener(this);
        btn_test.setOnClickListener(this);

    }
    @Override
    public void onClick(View v){

        switch (v.getId()){

            case R.id.btn_enable:
                btn_test.setEnabled(true);
                btn_test.setTextColor(Color.BLACK);
                break;
            case R.id.btn_disable:
                btn_test.setEnabled(false);
                btn_test.setTextColor(Color.GRAY);
                break;
            case R.id.btn_test:
                String desc=String.format("%s 您点击了按钮: %s", DateUtil.getNowTime(),((Button)v).getText());
                tv_result.setText(desc);
                break;
        }

    }


}
<?xml version="1.0" encoding="utf-8"?>
<LinearLayout xmlns:android="http://schemas.android.com/apk/res/android"
    android:id="@+id/main"
    android:layout_width="match_parent"
    android:layout_height="match_parent"
    android:orientation="vertical">
<LinearLayout
  android:layout_width="match_parent"
    android:layout_height="wrap_content"
    android:orientation="horizontal">
    <Button
        android:id="@+id/btn_enable"
        android:layout_width="0dp"
        android:layout_weight="1"
        android:layout_height="wrap_content"
        android:textColor="#000000"
        android:textSize="17sp"
        android:text="启动测试按钮"/>
    <Button
        android:id="@+id/btn_disable"
        android:layout_width="0dp"
        android:layout_weight="1"
        android:layout_height="wrap_content"
        android:textColor="#000000"
        android:textSize="17sp"
        android:text="禁用测试按钮"/>
</LinearLayout>
    <Button
        android:id="@+id/btn_test"
        android:layout_width="match_parent"
        android:layout_height="wrap_content"
        android:textColor="#888888"
        android:textSize="17sp"
        android:text="测试按钮"
        android:enabled="false"/>
    <TextView
        android:id="@+id/tv_result"
        android:layout_width="match_parent"
        android:layout_height="wrap_content"
        android:textColor="#000000"
        android:textSize="17sp"
        android:text="这里查看测试结果"/>
</LinearLayout>
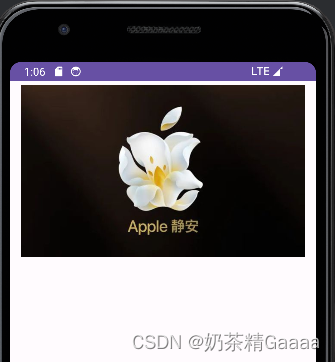
ImageView
图像视图展示的图片通常位于res/drawable***目录,设置图像视图的显示图片的显示图片有两种方式:
- 在XML文件中,通过属性android:src设置图片资源,属性格式形式为“@drawable/不含拓展名的图片名称”
- 在java代码中,调用setImageResource方法设置图片资源,方法参数格式形如“R.drawable.不含拓展名的图片名称”
<?xml version="1.0" encoding="utf-8"?>
<LinearLayout xmlns:android="http://schemas.android.com/apk/res/android"
    xmlns:app="http://schemas.android.com/apk/res-auto"
    xmlns:tools="http://schemas.android.com/tools"
    android:id="@+id/main"
    android:layout_width="match_parent"
    android:layout_height="match_parent"
    tools:context=".ImageScaleActivity"
    android:orientation="vertical">
    <ImageView
        android:id="@+id/iv_scale"
        android:layout_width="match_parent"
        android:layout_height="220dp"
        android:layout_marginTop="5dp"
        android:src="@drawable/apple"
       />
<!-- 如果用java方式显示,不用android:src="@drawable/apple"   -->

</LinearLayout>
package com.example.myapplication;

import android.os.Bundle;
import android.widget.ImageView;

import androidx.activity.EdgeToEdge;
import androidx.appcompat.app.AppCompatActivity;
import androidx.core.graphics.Insets;
import androidx.core.view.ViewCompat;
import androidx.core.view.WindowInsetsCompat;

public class ImageScaleActivity extends AppCompatActivity {


    @Override
    protected void onCreate(Bundle savedInstanceState) {

        super.onCreate(savedInstanceState);
        setContentView(R.layout.activity_image_scale);
        ImageView iv_scale=findViewById(R.id.iv_scale);
        iv_scale.setImageResource(R.drawable.apple);

    }
}


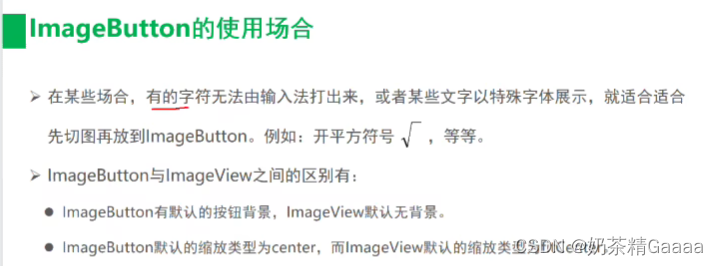
ImageButton
ImageButton是显示图片的图像按钮,但它继承ImageView,而非Button
ImageButton和Button之间区别有:
- Button既可以显示文本也可以显示图片,Imagebutton只能显示图片不能显示文本
- ImageButton上的图像可按比例缩放,而Button通过背景设置的图像会拉伸变形
- Button只能靠背景显示一张图片,而ImageButton可分别在前景和背景显示图片,从而实现两张图片的叠加效果
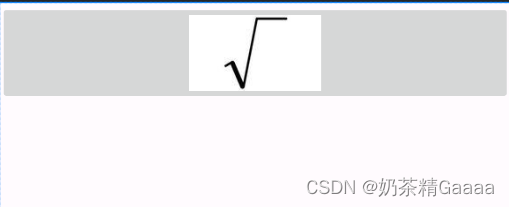
<?xml version="1.0" encoding="utf-8"?>
<LinearLayout xmlns:android="http://schemas.android.com/apk/res/android"
    xmlns:app="http://schemas.android.com/apk/res-auto"
    xmlns:tools="http://schemas.android.com/tools"
    android:id="@+id/main"
    android:layout_width="match_parent"
    android:layout_height="match_parent"
    tools:context=".ImageButtonActivity"
    android:orientation="vertical">
    <ImageButton
        android:layout_width="match_parent"
        android:layout_height="80dp"
        android:src="@drawable/sqrt"
        android:scaleType="fitCenter"/>

</LinearLayout>
同时展现文本和图像
同时展示文本与图像可能途径包括:
- 利用LinearLayout对ImageView和TextView组合布局
- 通过按钮控件Button的drawable***属性设置文本周围的图标
- drawableTop:指定文字上方的图片
- drawableBottom:指定文字下方的图片
- drawableLeft:指定文字左边的图片
- drawableRight:指定文字右边的图片
- drawablePadding:指定文字与图片的间距

<?xml version="1.0" encoding="utf-8"?>
<LinearLayout xmlns:android="http://schemas.android.com/apk/res/android"
    xmlns:app="http://schemas.android.com/apk/res-auto"
    xmlns:tools="http://schemas.android.com/tools"
    android:id="@+id/main"
    android:layout_width="match_parent"
    android:layout_height="match_parent"
    tools:context=".ImageTextActivity"
    android:orientation="vertical">
    <Button
        android:layout_width="wrap_content"
        android:layout_height="wrap_content"
        android:text="图标在左边"
        android:drawableLeft="@drawable/ali"
        android:background="#FFFFFF"
        android:drawablePadding="5dp"/>

</LinearLayout>
案例-计算器-界面编码

案例-计算器-逻辑处理编码
练习题
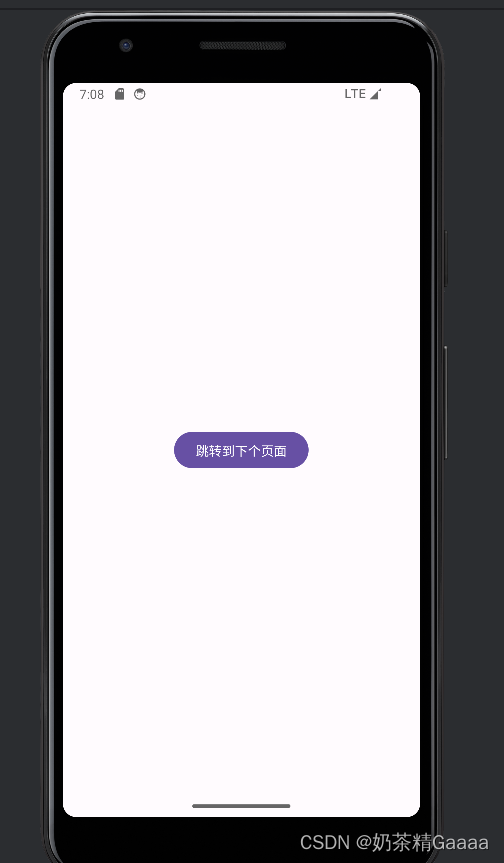
Activity启动和结束
从当前页面跳到新页面,跳转代码如下
- startActivity(new Intent(源页面.this,目标页面.class));
从当前页面回到上一页面,相当于关闭当前页面,返回代码如下
- finish();//结束当前的活动页面
package com.example.myapplication;

import android.content.Intent;
import android.os.Bundle;
import android.view.View;

import androidx.activity.EdgeToEdge;
import androidx.appcompat.app.AppCompatActivity;
import androidx.core.graphics.Insets;
import androidx.core.view.ViewCompat;
import androidx.core.view.WindowInsetsCompat;

public class ActStartActivity extends AppCompatActivity implements View.OnClickListener {


    @Override
    protected void onCreate(Bundle savedInstanceState) {

        super.onCreate(savedInstanceState);
        EdgeToEdge.enable(this);
        setContentView(R.layout.activity_act_start);

        findViewById(R.id.btn_act_next).setOnClickListener(this);
    }

    @Override
    public void onClick(View v) {

        startActivity(new Intent(this,ActFinishActivity.class));
    }
}
package com.example.myapplication;

import android.os.Bundle;
import android.view.View;

import androidx.activity.EdgeToEdge;
import androidx.appcompat.app.AppCompatActivity;
import androidx.core.graphics.Insets;
import androidx.core.view.ViewCompat;
import androidx.core.view.WindowInsetsCompat;

public class ActFinishActivity extends AppCompatActivity implements View.OnClickListener {


    @Override
    protected void onCreate(Bundle savedInstanceState) {

        super.onCreate(savedInstanceState);
        EdgeToEdge.enable(this);
        setContentView(R.layout.activity_act_finish);
      findViewById(R.id.iv_back).setOnClickListener(this);
      findViewById(R.id.btn_finish).setOnClickListener(this);

    }

    @Override
    public void onClick(View v) {

        if(v.getId()==R.id.iv_back||v.getId()==R.id.btn_finish){

            finish();
        }
    }
}
<?xml version="1.0" encoding="utf-8"?>
<LinearLayout xmlns:android="http://schemas.android.com/apk/res/android"
    xmlns:app="http://schemas.android.com/apk/res-auto"
    xmlns:tools="http://schemas.android.com/tools"
    android:id="@+id/main"
    android:layout_width="match_parent"
    android:layout_height="match_parent"
    tools:context=".ActFinishActivity"
    android:orientation="vertical">
    <ImageButton
        android:id="@+id/iv_back"
        android:layout_width="40dp"
        android:layout_height="40dp"
        android:padding="5dp"
        android:src="@drawable/ic_back"/>
    <Button
        android:id="@+id/btn_finish"
        android:layout_width="match_parent"
        android:layout_height="wrap_content"
        android:gravity="center"
        android:text="完成"/>
    <TextView
        android:layout_width="match_parent"
        android:layout_height="wrap_content"
        android:gravity="center"
        android:text="按返回键,或者点击左上角的箭头图标,或者点击完成按钮,均可关闭当前页面,返回上个页面"/>


</LinearLayout>
<?xml version="1.0" encoding="utf-8"?>
<LinearLayout xmlns:android="http://schemas.android.com/apk/res/android"
    xmlns:tools="http://schemas.android.com/tools"
    android:id="@+id/main"
    android:layout_width="match_parent"
    android:layout_height="match_parent"
    android:orientation="vertical"
    android:gravity="center">
<Button
    android:id="@+id/btn_act_next"
    android:layout_width="wrap_content"
    android:layout_height="wrap_content"
    android:text="跳转到下个页面"/>
</LinearLayout>
Activity 生命周期

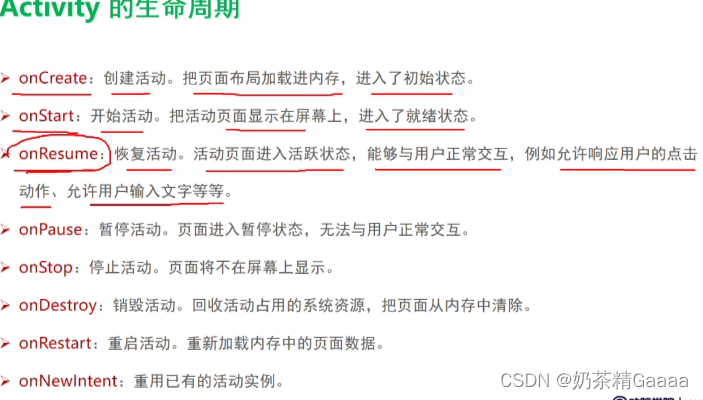
各状态之间的切换过程
打开新页面的方法调用顺序为:
- onCreate——>onStart——>onResume
关闭旧页面的方法调用顺序为:
- onPause——>onStop——>onDestory

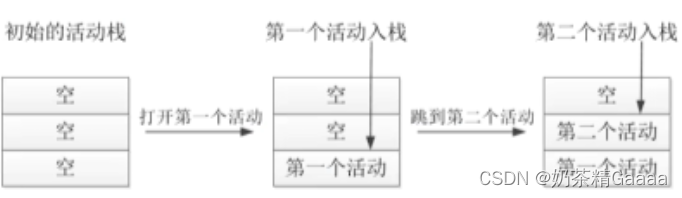
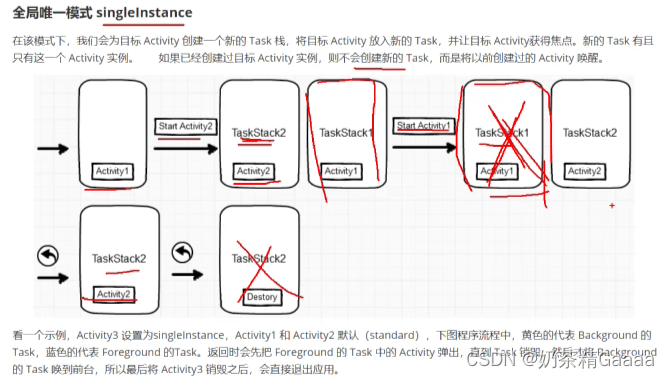
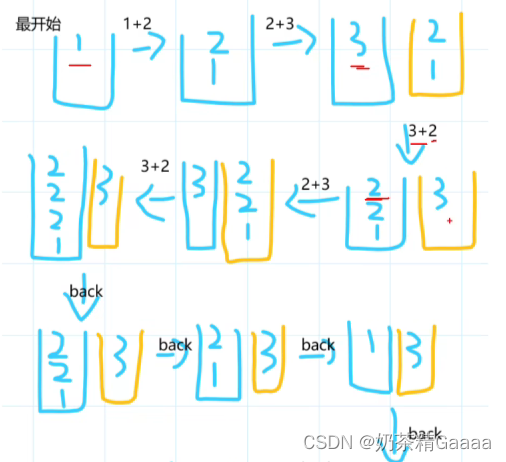
Activity 启动模式
某App先后打开两个活动,此时活动栈的变动情况如下图所示
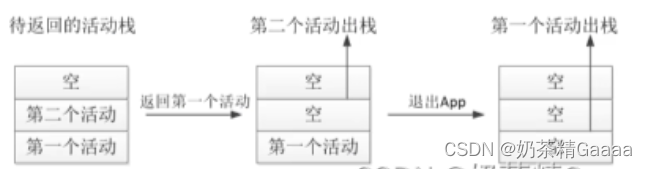
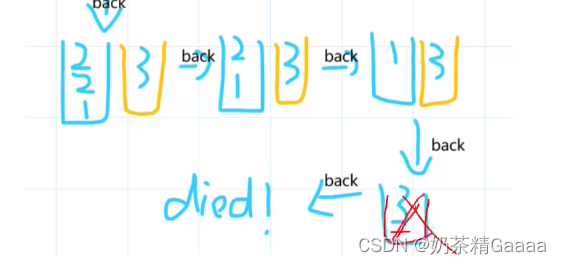
依次结束已打开的两个活动,此时活动栈的变动情况如下图所示
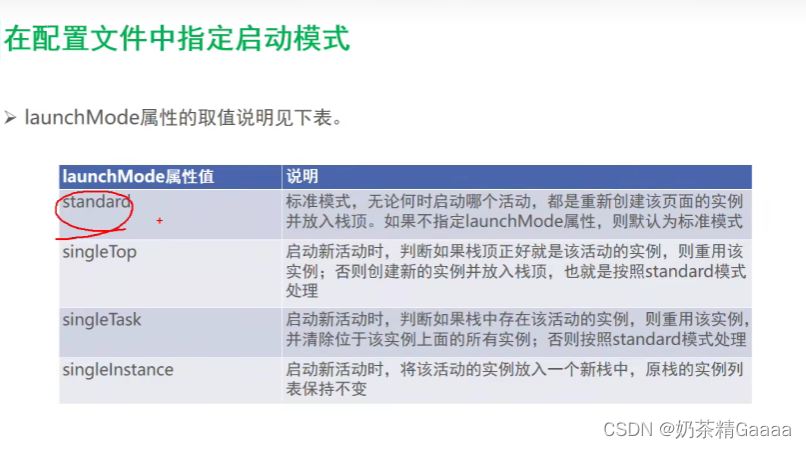
默认启动模式standard
该模式可以被设定,不在manifest设定的时候,Activity的默认模式就是standard。在该模式下,启动的activity会依照启动顺序被依次压入Task栈中

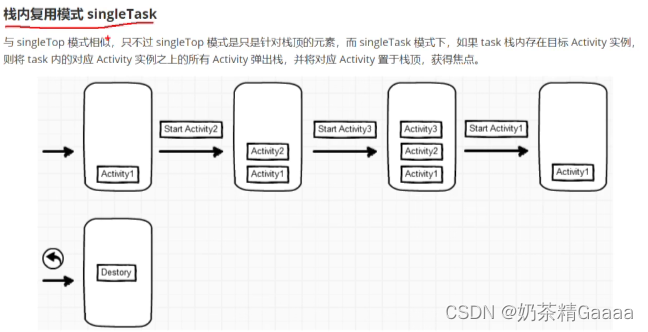
栈内复用singleTask


package com.example.myapplication;

import android.content.Intent;
import android.os.Bundle;
import android.view.View;

import androidx.activity.EdgeToEdge;
import androidx.appcompat.app.AppCompatActivity;
import androidx.core.graphics.Insets;
import androidx.core.view.ViewCompat;
import androidx.core.view.WindowInsetsCompat;

public class JumpFirstActivity extends AppCompatActivity implements View.OnClickListener {


    @Override
    protected void onCreate(Bundle savedInstanceState) {

        super.onCreate(savedInstanceState);
        EdgeToEdge.enable(this);
        setContentView(R.layout.activity_jump_first);
        findViewById(R.id.btn_jump_second).setOnClickListener(this);

    }

    @Override
    public void onClick(View v) {

        //、创建意图
        Intent intent=new Intent(this,JumpSecondActivity.class);
        intent.setFlags(Intent.FLAG_ACTIVITY_CLEAR_TOP);
startActivity(intent);
    }
}
package com.example.myapplication;

import android.content.Intent;
import android.os.Bundle;
import android.view.View;

import androidx.activity.EdgeToEdge;
import androidx.appcompat.app.AppCompatActivity;
import androidx.core.graphics.Insets;
import androidx.core.view.ViewCompat;
import androidx.core.view.WindowInsetsCompat;

public class JumpSecondActivity extends AppCompatActivity implements View.OnClickListener {


    @Override
    protected void onCreate(Bundle savedInstanceState) {

        super.onCreate(savedInstanceState);
        EdgeToEdge.enable(this);
        setContentView(R.layout.activity_jump_second);
        findViewById(R.id.btn_jump_first).setOnClickListener(this);


    }

    @Override
    public void onClick(View v) {

        Intent intent =new Intent(this, JumpFirstActivity.class);
        intent.setFlags(Intent.FLAG_ACTIVITY_CLEAR_TOP);
        startActivity(intent);

    }
}
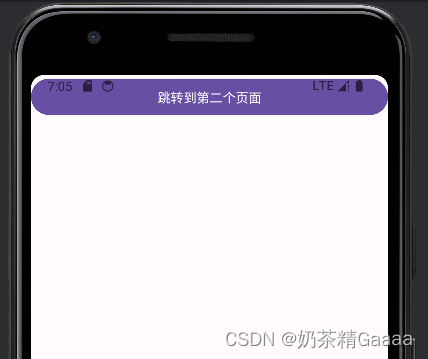
<?xml version="1.0" encoding="utf-8"?>
<LinearLayout xmlns:android="http://schemas.android.com/apk/res/android"
    xmlns:app="http://schemas.android.com/apk/res-auto"
    xmlns:tools="http://schemas.android.com/tools"
    android:id="@+id/main"
    android:layout_width="match_parent"
    android:layout_height="match_parent"
    tools:context=".JumpFirstActivity"
    android:orientation="vertical">


    <Button
        android:id="@+id/btn_jump_second"

        android:layout_width="match_parent"
        android:layout_height="wrap_content"
        android:text="跳转到第二个页面"/>

</LinearLayout>
<?xml version="1.0" encoding="utf-8"?>
<LinearLayout xmlns:android="http://schemas.android.com/apk/res/android"
xmlns:app="http://schemas.android.com/apk/res-auto"
xmlns:tools="http://schemas.android.com/tools"
android:id="@+id/main"
android:layout_width="match_parent"
android:layout_height="match_parent"
tools:context=".JumpSecondActivity"
android:orientation="vertical">
<Button
android:id="@+id/btn_jump_first"
android:layout_width="match_parent"
android:layout_height="wrap_content"
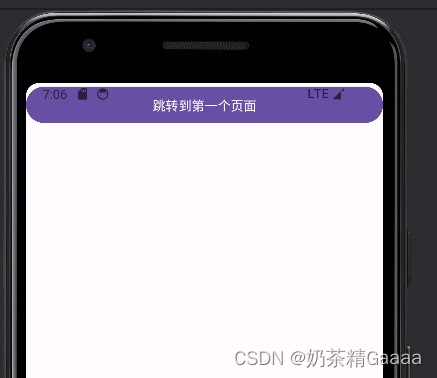
android:text="跳转到第一个页面"/>
</LinearLayout>
<?xml version="1.0" encoding="utf-8"?>
<manifest xmlns:android="http://schemas.android.com/apk/res/android"
    xmlns:tools="http://schemas.android.com/tools">

    <application
        android:allowBackup="true"
        android:dataExtractionRules="@xml/data_extraction_rules"
        android:fullBackupContent="@xml/backup_rules"
        android:icon="@mipmap/ic_launcher"
        android:label="@string/app_name"
        android:roundIcon="@mipmap/ic_launcher_round"
        android:supportsRtl="true"
        android:theme="@style/Theme.MyApplication"
        tools:targetApi="31">

        <activity
            android:name=".JumpSecondActivity"
            android:exported="false" />
        <activity
            android:name=".GridLayoutActivity"
            android:exported="false" />
        <activity
            android:name=".util.RelativeLayoutActivity"
            android:exported="false" />
        <activity
            android:name=".LinearLayoutActivity"
            android:exported="false" />
        <activity
            android:name=".ViewGravityActivity"
            android:exported="false" />
        <activity
            android:name=".ViewMarginActivity"
            android:exported="false" />
        <activity
            android:name=".TextColorActivity"
            android:exported="true">
            <intent-filter>
                <action android:name="android.intent.action.MAIN" />

                <category android:name="android.intent.category.LAUNCHER" />
            </intent-filter>
        </activity>
        <activity
            android:name=".ScrollViewActivity"
            android:exported="true">
            <intent-filter>
                <action android:name="android.intent.action.MAIN" />

                <category android:name="android.intent.category.LAUNCHER" />
            </intent-filter>
        </activity>
        <activity
            android:name=".ButtonStyleActivity"
            android:exported="true">
            <intent-filter>
                <action android:name="android.intent.action.MAIN" />

                <category android:name="android.intent.category.LAUNCHER" />
            </intent-filter>
        </activity>
        <activity
            android:name=".ActStartActivity"
            android:exported="true">
            <intent-filter>
                <action android:name="android.intent.action.MAIN" />

                <category android:name="android.intent.category.LAUNCHER" />
            </intent-filter>
        </activity> <!-- ActFinishActivity -->
        <activity
            android:name=".JumpFirstActivity"
            android:exported="true">
            <intent-filter>
                <action android:name="android.intent.action.MAIN" />

                <category android:name="android.intent.category.LAUNCHER" />
            </intent-filter>
        </activity>
    </application>

</manifest>

package com.example.myapplication;
import android.content.Intent;
import android.os.Bundle;
import android.view.View;
import androidx.activity.EdgeToEdge;
import androidx.appcompat.app.AppCompatActivity;
import androidx.core.graphics.Insets;
import androidx.core.view.ViewCompat;
import androidx.core.view.WindowInsetsCompat;
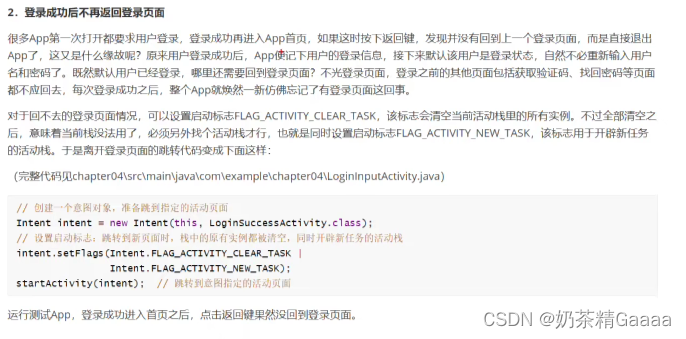
public class LogininputActivity extends AppCompatActivity implements View.OnClickListener {
@Override
protected void onCreate(Bundle savedInstanceState) {
super.onCreate(savedInstanceState);
setContentView(R.layout.activity_logininput);
findViewById(R.id.btn_jump_success).setOnClickListener(this);
}
@Override
public void onClick(View v) {
Intent intent=new Intent(this,LogininputActivity.class);
intent.setFlags(Intent.FLAG_ACTIVITY_CLEAR_TASK|Intent.FLAG_ACTIVITY_NEW_TASK);
startActivity(intent);
}
}
package com.example.myapplication;

import android.os.Bundle;

import androidx.activity.EdgeToEdge;
import androidx.appcompat.app.AppCompatActivity;
import androidx.core.graphics.Insets;
import androidx.core.view.ViewCompat;
import androidx.core.view.WindowInsetsCompat;

public class LoginSuccessActivity extends AppCompatActivity {


    @Override
    protected void onCreate(Bundle savedInstanceState) {

        super.onCreate(savedInstanceState);
        setContentView(R.layout.activity_login_success);

    }
}
<?xml version="1.0" encoding="utf-8"?>
<LinearLayout xmlns:android="http://schemas.android.com/apk/res/android"
    xmlns:app="http://schemas.android.com/apk/res-auto"
    xmlns:tools="http://schemas.android.com/tools"
    android:id="@+id/main"
    android:layout_width="match_parent"
    android:layout_height="match_parent"
    tools:context=".LoginSuccessActivity"
    android:orientation="vertical">
<TextView
    android:layout_width="wrap_content"
    android:layout_height="wrap_content"
    android:text="这里是登录成功界面,登录成功之后不必要返回登录验证"/>

</LinearLayout>
<?xml version="1.0" encoding="utf-8"?>
<LinearLayout xmlns:android="http://schemas.android.com/apk/res/android"
    xmlns:app="http://schemas.android.com/apk/res-auto"
    xmlns:tools="http://schemas.android.com/tools"
    android:id="@+id/main"
    android:layout_width="match_parent"
    android:layout_height="match_parent"
    tools:context=".LogininputActivity">

    <TextView
        android:layout_width="wrap_content"
        android:layout_height="wrap_content"
        android:text="这里是登录验证页面,此处省略了用户名和密码等输入"/>
    <Button
        android:id="@+id/btn_jump_success"
        android:layout_width="match_parent"
        android:layout_height="wrap_content"
        android:gravity="center"
        android:text="/跳转登录成功页面"/>

</LinearLayout>
在代码里面设置启动标志
- IntentFLAG_ACTIVITY_NEW_TASK:开辟一个新的任务栈
- IntentFLAG_ACTIVITY_SIGLE_TOP:当栈顶为待跳转的活动实例之时,则重用栈顶的实例
- IntentFLAG_ACTIVITY_CLEAR_TOP:当栈中存在待跳转的活动实例时,则重新创建一个新实例并清除原实例上方的所有实例
- Intent.FLAG_ACTIVITY_NO_HISTORY:栈中不保存新启动的活动实例
- Intent.FLAG_ACTIVITY_CLEAR_TASK:跳转到新页面中,栈中的原有实例被清空
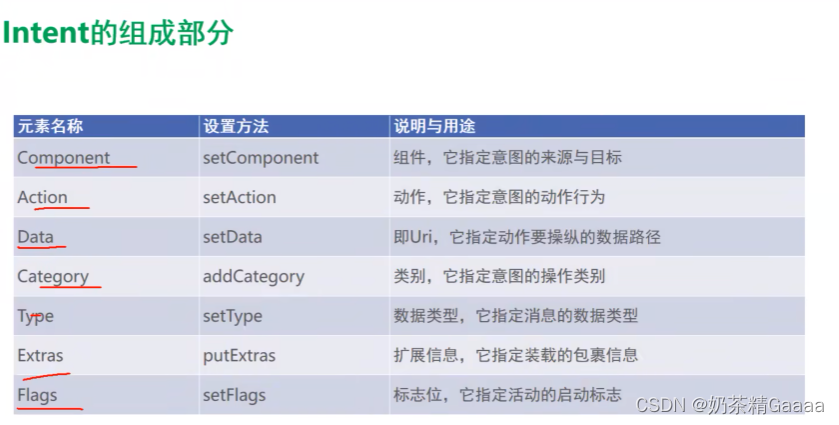
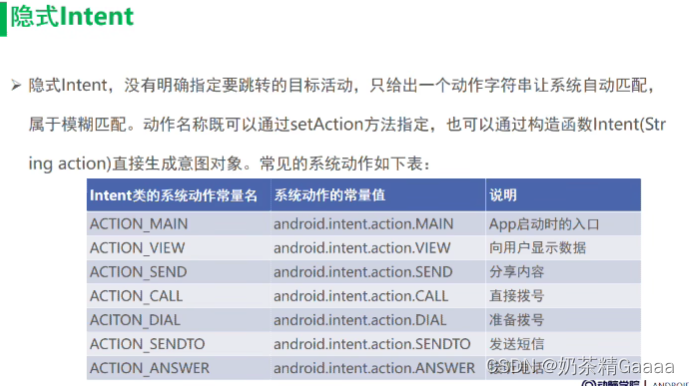
显式Intent和隐式Intent
显示Intent和隐式Intent
Intent是各个组件之间的信息沟通的桥梁,它用来Android各组件之间的通信,主要完成下列工作:
- 标明本次通信请求从哪里来,要怎么去
- 发起方携带本次通信请求从哪里来,要怎么去
- 发起方若想判断接收方的处理结果,意图负责让接受方传回应答的数据内容
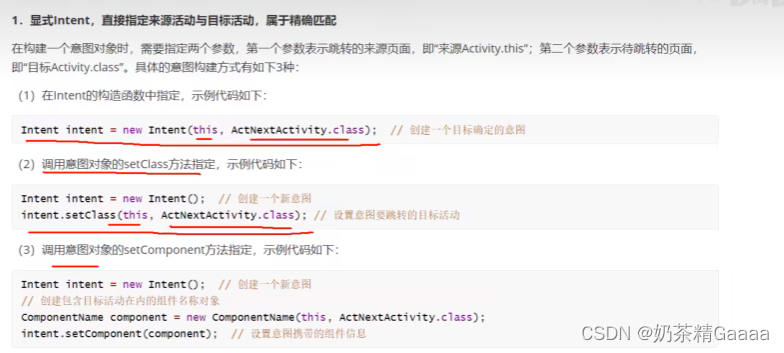
显式Intent
显式Intent直接指定来源活动与目标活动,属于精确匹配,它有三种构建方式:
- 在Intent的构造函数中指定
- 调用意图对象的setClass方法指定
- 调用意图对象的setComponent方法指定


package com.example.myapplication;
import android.content.Intent;
import android.net.Uri;
import android.os.Bundle;
import android.view.View;
import androidx.activity.EdgeToEdge;
import androidx.appcompat.app.AppCompatActivity;
import androidx.core.graphics.Insets;
import androidx.core.view.ViewCompat;
import androidx.core.view.WindowInsetsCompat;
public class ActionUriActivity extends AppCompatActivity implements View.OnClickListener {
@Override
protected void onCreate(Bundle savedInstanceState) {
super.onCreate(savedInstanceState);
EdgeToEdge.enable(this);
setContentView(R.layout.activity_action_uri);
findViewById(R.id.btn_dial).setOnClickListener(this);
findViewById(R.id.btn_sms).setOnClickListener(this);
findViewById(R.id.btn_my).setOnClickListener(this);
}
@Override
public void onClick(View v) {
Intent intent=new Intent();
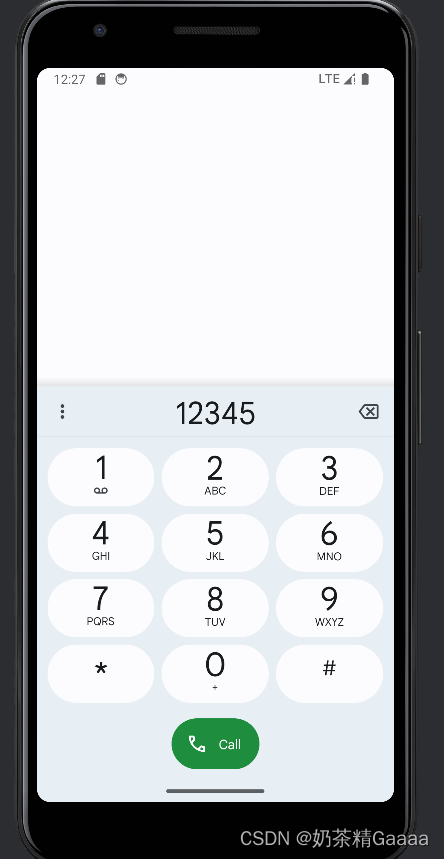
String phoneNo="12345";
switch (v.getId()){
case R.id.btn_dial:
intent.setAction(Intent.ACTION_DIAL);
Uri uri= Uri.parse("tel:"+phoneNo);
intent.setData(uri);
startActivity(intent);
break;
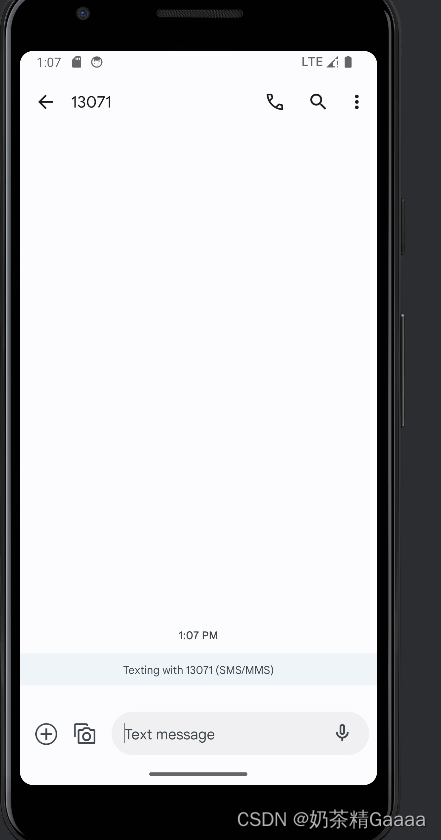
case R.id.btn_sms:
intent.setAction(Intent.ACTION_SENDTO);
Uri uri2= Uri.parse("tel:"+phoneNo);
intent.setData(uri2);
startActivity(intent);
break;
case R.id.btn_my:
intent.setAction("android.intent.action.NING");
intent.addCategory(Intent.CATEGORY_DEFAULT);
startActivity(intent);
break;
}
}
}
<?xml version="1.0" encoding="utf-8"?>
<LinearLayout xmlns:android="http://schemas.android.com/apk/res/android"
xmlns:app="http://schemas.android.com/apk/res-auto"
xmlns:tools="http://schemas.android.com/tools"
android:id="@+id/main"
android:layout_width="match_parent"
android:layout_height="match_parent"
tools:context=".ActionUriActivity"
android:orientation="vertical">
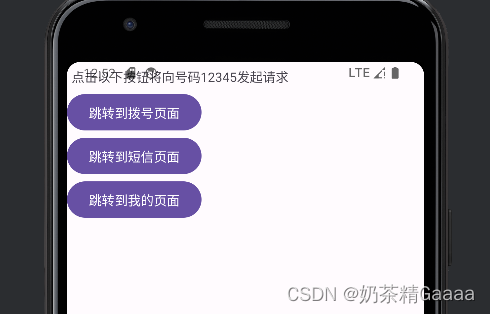
<TextView
android:layout_width="match_parent"
android:layout_height="wrap_content"
android:padding="5dp"
android:text="点击以下按钮将向号码12345发起请求"
/>
/>
<Button
android:id="@+id/btn_dial"
android:layout_width="wrap_content"
android:layout_height="wrap_content"
android:text="跳转到拨号页面"/>
<Button
android:id="@+id/btn_sms"
android:layout_width="wrap_content"
android:layout_height="wrap_content"
android:text="跳转到短信页面"/>
/>
<Button
android:id="@+id/btn_my"
android:layout_width="wrap_content"
android:layout_height="wrap_content"
android:text="跳转到我的页面"/>
/>
</LinearLayout>
```xml
<?xml version="1.0" encoding="utf-8"?>
<manifest xmlns:android="http://schemas.android.com/apk/res/android"
xmlns:tools="http://schemas.android.com/tools">
<application
android:allowBackup="true"
android:dataExtractionRules="@xml/data_extraction_rules"
android:fullBackupContent="@xml/backup_rules"
android:icon="@mipmap/ic_launcher"
android:label="@string/app_name"
android:roundIcon="@mipmap/ic_launcher_round"
android:supportsRtl="true"
android:theme="@style/Theme.MyApplication"
tools:targetApi="31">
<activity
android:name=".LoginSuccessActivity"
android:exported="false" />
<activity
android:name=".JumpSecondActivity"
android:exported="false" />
<activity
android:name=".GridLayoutActivity"
android:exported="false" />
<activity
android:name=".util.RelativeLayoutActivity"
android:exported="false" />
<activity
android:name=".LinearLayoutActivity"
android:exported="false" />
<activity
android:name=".ViewGravityActivity"
android:exported="false" />
<activity
android:name=".ViewMarginActivity"
android:exported="false" />
<activity
android:name=".TextColorActivity"
android:exported="true">
<intent-filter>
<action android:name="android.intent.action.MAIN" />
<category android:name="android.intent.category.LAUNCHER" />
</intent-filter>
</activity>
<activity
android:name=".CalculatorActivity"
android:exported="true">
<intent-filter>
<action android:name="android.intent.action.MAIN" />
<category android:name="android.intent.category.LAUNCHER" />
</intent-filter>
<intent-filter>
<action android:name="android.intent.action.NING" />
<!--设置成btn_my-->
<category android:name="android.intent.category.DEFAULT" />
</intent-filter>
</activity>
<activity
android:name=".ButtonStyleActivity"
android:exported="true">
<intent-filter>
<action android:name="android.intent.action.MAIN" />
<category android:name="android.intent.category.LAUNCHER" />
</intent-filter>
</activity>
<activity
android:name=".ActStartActivity"
android:exported="true">
<intent-filter>
<action android:name="android.intent.action.MAIN" />
<category android:name="android.intent.category.LAUNCHER" />
</intent-filter>
</activity> <!-- ActFinishActivity -->
<activity
android:name=".ActionUriActivity"
android:exported="true">
<intent-filter>
<action android:name="android.intent.action.MAIN" />
<category android:name="android.intent.category.LAUNCHER" />
</intent-filter>
</activity>
</application>
</manifest>
向下一个Activity发送数据

向下一个Activity返回数据
利用资源文件配置字符串
利用元数据传递配置信息
给应用页面注册快捷方式
练习题
图形drawable
形状图片
点9图片
状态列表图形
复选框CheckBox
开关按钮Switch
单选按钮radioButton
编辑框EditButton
焦点变更监听器
文本变化监听器
提醒对话框AlertDialog
日期对话框DatePickerDialog
时间对话框TimePickerDialog
案例-找回密码-登录界面
案例-找回密码-登录逻辑
案例-找回密码-找回密码
练习题
SharePreferences用法
SharePreference使用场景
记住密码
SQL基本语法
SQLiteDatabase
SQLiteOpenHelper
增删改查
事务管理
数据库版本升级
优化记住密码
外部存储空间
存储卡上读写图片文件
Aplication生命周期
Application全局变量
Jetpack Room
Room增删改查
案例-购物车-数据库准备
案例-购物车-商品列表展示
案例-购物车-商品详情
练习题
什么是内容提供者
Server端代码编写
Client端代码编写
数据删除
运行时间动态申请Lazy模式
运行时间动态申请Hungry模式
添加联系人
批处理添加联系人
查询联系人
监听短信内容
跳转到相册选图片
发送彩信
通过MediaStore查询图片
FileProvider
应用安装
练习题
下拉列表
智能推荐
tar --exclude用法-程序员宅基地
文章浏览阅读1.5w次,点赞5次,收藏13次。有时候我们压缩文件时,不希望把该文件下的某个文件夹或文件压缩进去,我们可以使用tar --exclude命令。可是该命令文件夹路径写法需要特别注意,明明加了--exclude,可是还是把不想压缩的压缩进去了。1、我们以一个文件夹为例,如下结构[pc@localhost tar_test]$ ls -a. .. 1.txt 2.txt 3.txt 4.txt .svn[pc..._tar --exclude
五个步骤完成windows安装nginx并代理本地前端项目静态文件_windows nginx代理前端静态文件-程序员宅基地
文章浏览阅读1.7k次。后端开发经常遇到需要自己启动前后端项目的问题,这时候如果你的工作电脑比较垃圾,那么同时启动前后端就会变得特别卡。可以在电脑上放一个nginx,代理前端项目的静态文件夹,这样就省去了启动前端项目的开销。一、下载nginx链接:http://nginx.org/en/download.html二、解压nginx解压后目录结构如下:三、修改conf文件夹中的nginx.con..._windows nginx代理前端静态文件
python是高级动态编程语言-Python语言-程序员宅基地
文章浏览阅读1.6k次。Python是一门跨平台、开源、免费的解释型高级动态编程语言。Python支持命令式编程(How to do)、函数式编程(What to do),完全支持面向对象程序设计,拥有大量扩展库。胶水语言:可以把多种不同语言编写的程序融合到一起实现无缝拼接,更好地发挥不同语言和工具的优势,满足不同应用领域的需求。1.Python是一门跨平台、开源、免费的解释型高级动态编程语言伪编译,Python源程序转..._python是一种怎样的高级动态语言
Goland中的PlantUML手动指定类图位置关系_plantuml调整位置-程序员宅基地
文章浏览阅读8.9k次,点赞2次,收藏4次。类之间默认采用两个破折号 -- 显示出垂直 方向的线. 要得到水平方向的可以像这样使用单破折号 (或者点):@startumlRoom o- StudentRoom *-- Chair@enduml你也可以通过改变倒置链接来改变方向@startumlStudent -o RoomChair --* Room@enduml也可通过在箭头内部使用关键字, 例如left..._plantuml调整位置
Lua中的协同程序——coroutine-程序员宅基地
文章浏览阅读2.4k次。Lua中的协程和多线程很相似,每一个协程有自己的堆栈,自己的局部变量,可以通过yield-resume实现在协程间的切换。不同之处是:Lua协程是非抢占式的多线程,必须手动在不同的协程间切换,且同一时刻只能有一个协程在运行。并且Lua中的协程无法在外部将其停止,而且有可能导致程序阻塞。 协同程序(Coroutine):三个状态:suspended(挂起,协同刚创建完成时或者yield之
Unix网络编程之5种IO模型_unix网络编程5种io模型-程序员宅基地
文章浏览阅读523次,点赞2次,收藏3次。1. Unix/Linux操作系统简述Unix操作与Linux系统结构图解 (引用计算机操作系统书籍)概要说明用户空间: 姑且将上述用户级别或者是unix编程的应用程序的部分称为用户空间,我们可以通过启动进程来调用内核来完成从硬件设备读取或写入等操作系统内核: 是直接与计算机硬件打交道的应用程序级别,在计算机相关的书籍中也称为操作系统,可以通过操作系统级别提供的一些组件来帮助..._unix网络编程5种io模型
随便推点
【jQuery】调用show()和hide()方法显示和隐藏元素_调用 控件名.hide( ); 和 控件名.show( )-程序员宅基地
文章浏览阅读2.3k次。show()和hide()方法用于显示或隐藏页面中的元素,它的调用格式分别为:$(selector).hide(speed,[callback])和$(selector).show(speed,[callback])参数speed设置隐藏或显示时的速度值,可为“slow”、“fast”或毫秒数值,可选项参数callback为隐藏或显示动作执行完成后调用的函数名。例如,在页面_调用 控件名.hide( ); 和 控件名.show( )
J2EE开发系列视频教程_j2ee基础免费教学视频-程序员宅基地
文章浏览阅读1.2k次。BF-TECH3.0 J2EE软件工程师高薪就业品牌课程适合人群:初级课时数量:900课时用到技术:J2EE涉及项目:权限管理通用模块、易买网、CRM客户关系管理系统等咨询qq:1840215592J2EE开发视频教程结合项目,进行实战图书馆信息管理系统、QQ聊天室、B2C网上书店网、论坛短消息、基于JSP B/S架构的企业门户网、租房网管理系统、个人博客系统、宠物商店_j2ee基础免费教学视频
Java开发从入门到精通(一):Java的基础环境知识入门:java概述、jdk安装,idea安装,环境变量配置、jdk组成、程序原理_idea和jdk环境变量配置-程序员宅基地
文章浏览阅读409次,点赞9次,收藏7次。Java开发从入门到精通(一):Java的基础环境 知识入门:java概述、jdk安装,idea安装,环境变量配置、jdk组成、程序原理一个java程序的完整的运行过程是先使用开发工具javac来编译代码,再使用java将class程序送进jvm虚拟机中运行,代码中涉及到的程序例如system.out.println就是java的程序,jvm通过核心类库来调用这个程序完成输出打印功能,JVM和核心类库统称为JRE,也就是java的运行环境,而JVM、核心类库和开发工具java,javac统称为JDK。_idea和jdk环境变量配置
HTML5基础知识-程序员宅基地
文章浏览阅读4k次,点赞20次,收藏90次。一、初识HTMLHTML:Hyper Text Markup Language(超文本标记语言)超文本包括:文字、图片、音频、视频、动画等HTML5的优势: 跨平台、 W3C标准 World Wide Web Consortium(万维网联盟) 成立于1994年,Web及时领域最权威和具影响力的国际中立性技术标准机..._html5基础知识
二十九、pycharm中报错“too many blank lines (3) ”等类似错误-程序员宅基地
文章浏览阅读1.7w次,点赞3次,收藏14次。 报错如下图:解决方法一:鼠标移至报错处,按住Alt+enter键,选择ignore errors like this方法二:找到设置File - Settings…… - Editor - Inspections中找到PEP8 coding style violation,在右下角ignore error中添加报错id 附件:或者警告id地址:http:..._too many blank lines
计组习题解1.3(1-8)-程序员宅基地
文章浏览阅读290次,点赞8次,收藏9次。DBCCDBCD。