Java程序设计实验六 Socket网络程序设计-程序员宅基地
[1]实验目的:理解Socket通信原理,掌握使用Socket和ServerSocket类进行TCP Socket通信的程序设计方法。
[2]实验内容:
1、使用ServerSocket类和Socket类实现按如下协议通信的服务器端和客户端程序。
服务器程序的处理规则如下:
- 向客户端程序发送Verifying Server!。
- 若读口令次数超过3次,则发送Illegal User!给客户端,程序退出。否则向下执行步骤3)。
- 读取客户端程序提供的口令。
- 若口令不正确,则发送PassWord Wrong!给客户端,并转步骤2),否则向下执行步骤5)。
- 发送Registration Successful!给客户端程序。
客户端程序的处理规则如下:
- 读取服务器反馈信息。
- 若反馈信息不是Verifying Server!,则提示Server Wrong!,程序退出。否则向下执行步骤3)
- 提示输入PassWord并将输入的口令发送给服务器。
- 读取服务器反馈信息。
- 若反馈信息是Illegal User!,则提示Illegal User!,程序退出。否则向下执行步骤6)
- 若反馈信息是PassWord Wrong!,则提示PassWord Wrong!,并转步骤3),否则向下执行步骤。
- 输出Registration Successful!。
服务器端:
package experiment6.exp6_1;

import java.io.BufferedReader;
import java.io.IOException;
import java.io.InputStreamReader;
import java.io.PrintWriter;
import java.net.ServerSocket;
import java.net.Socket;
import java.util.Objects;

public class Exp6_1_Server {
    public static void main(String[] args) throws IOException {
            ServerSocket socket = new ServerSocket(6001);
            Socket server = socket.accept();
            String password;
            int count = 0;
            PrintWriter out = new PrintWriter(server.getOutputStream(), true);//返回TCP连接提供的字节输出流,将其格式化
            BufferedReader in = new BufferedReader(new InputStreamReader(server.getInputStream()));//字节输入流转换为字符输入流,
            //BufferedReader 提供以缓冲方式读取一行字符串的方法
            out.println("Verifying Server!");
            while (true) {
                password = in.readLine(); //读取客户端数据
                System.out.println("Client:" + password);
                if (Objects.equals(password, "123456")) {
                    out.println("Registration Successful!");
                    System.out.println("Server:Registration Successful!");
                    System.exit(0);
                } else {
                    count++;
                    if (count == 3) {
                        out.println("Illegal User!");
                        System.out.println("Server: Illegal User!");
                        break;
                    } else {
                        out.println(" PassWord Wrong!");
                        System.out.println("Server: PassWord Wrong!");
                    }
                }
            }
            out.close();
            in.close();
            server.close();
            socket.close();
    }
}
客户端
package experiment6.exp6_1;

import java.io.BufferedReader;
import java.io.IOException;
import java.io.InputStreamReader;
import java.io.PrintWriter;
import java.net.Socket;
import java.util.Scanner;

public class Exp6_1_Client {
    public static void main(String[] args) throws IOException {
            Socket ser=new Socket("10.200.229.170",6001);
            Scanner scanner =new Scanner(System.in);
            String str,sc;
            PrintWriter out=new PrintWriter(ser.getOutputStream(),true);
            BufferedReader in=new BufferedReader(new InputStreamReader(ser.getInputStream()));
            while(true)
            {
                str=in.readLine();
                System.out.println("Server:"+str);
                if(str.equals("Illegal User!")||str.equals("Registration Successful!"))
                {
                    break;
                }
                System.out.print("Client:");
                sc= scanner.next();
                out.println(sc);
            }
            out.close();
            in.close();
            ser.close();
        }

}
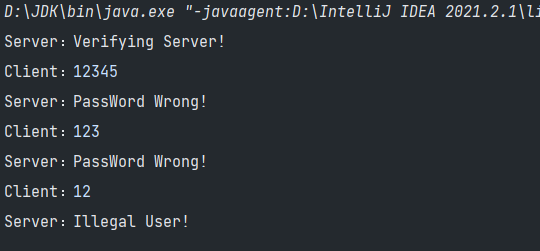
登录失败情况:
Server:

Client:

登录成功情况:
Server:

Client:

2、实现聊天室功能。
1)完成服务器端和一个客户端之间的聊天功能。
2)扩展部分,采用多线程技术实现一个服务器端和多个客户端之间的聊天功能。
服务器端
package experiment6.exp6_2;

import java.io.BufferedReader;
import java.io.IOException;
import java.io.InputStreamReader;
import java.io.PrintWriter;
import java.net.ServerSocket;
import java.net.Socket;
import java.util.ArrayList;
import java.util.List;
import java.util.Objects;
import java.util.Scanner;

public class server implements Runnable {// 服务端
    static List<Socket> socketList= new ArrayList<>();
    // 读取 In
    static Socket socket = null;
    static ServerSocket serverSocket = null;
    public server() {// 构造方法
        try {
            serverSocket = new ServerSocket(9999);
        } catch (IOException e) {
            e.printStackTrace();
        }

    }
    int offline =0;
    public static void main(String[] args) {
        System.out.println("Server");
        server t = new server();
        System.out.println("Port 9999 remains to be connected......");
        int count = 0;
        while (true) {
            try {
                socket = serverSocket.accept();
                count++;
                System.out.println(count + " client(s) connected successfully!");
                socketList.add(socket);
            } catch (IOException e) {
                e.printStackTrace();
            }
            Print p = new Print(socket);
            Thread read = new Thread(t);
            Thread print = new Thread(p);
            read.start();
            print.start();
        }
    }
    @Override
    public void run() {
        // 重写run方法
        try {
            BufferedReader in = new BufferedReader(new InputStreamReader(socket
                    .getInputStream()));

            while (true) {
                //接收消息
                String jieshou = in.readLine();
                if(jieshou == null){
                    System.out.println("One client got offline");
                    offline++;
                    if(offline ==socketList.size()){
                        System.out.println("All clients offline. Server offline now!");
                        serverSocket.close();
                        socket.close();
                        System.exit(0);
                    }
                    break;}
                else
                    System.out.println(jieshou);

                //向每一个客户发送接受的消息
                for (int i = 0; i < socketList.size(); i++) {
                    Socket socket = socketList.get(i);
                    PrintWriter out = new PrintWriter(socket.getOutputStream());
                    out.println(jieshou);
                    out.flush();
                }
            }
        } catch (Exception e) {

        }
    }
}


class Print implements Runnable {
    static List<Socket> socketList= new ArrayList<>();
    Scanner input = new Scanner(System.in);
    public Print(Socket s) {// 构造方法
        try {
            socketList.add(s);
        } catch (Exception e) {
            e.printStackTrace();
        }
    }
    @Override
    public void run() {
        try {
            BufferedReader bufferedReader = new BufferedReader(new InputStreamReader(System.in));
            while (true) {
                String msg = bufferedReader.readLine();
                if(Objects.equals(msg, "/quit")) System.exit(0);
                for (int i = 0; i < socketList.size(); i++) {
                    //对每一个客户端发送消息
                    Socket socket=socketList.get(i);
                    PrintWriter out = new PrintWriter(socket.getOutputStream());
                    out.println("Server: "+msg);
                    out.flush();
                }
            }
        } catch (Exception e) {
            e.printStackTrace();
        }
    }
}
客户端
package experiment6.exp6_2;

import java.io.BufferedReader;
import java.io.InputStreamReader;
import java.io.PrintWriter;
import java.net.Socket;
import java.util.Objects;
import java.util.Scanner;

public class client implements Runnable {// 客户端
    static Socket socket = null;
    Scanner input = new Scanner(System.in);
    String name;
    client(String name){this.name=name;}
    public void main1() {
        System.out.println("Client "+name);
        try {
            socket = new Socket("localhost", 9999);
            System.out.println("Connected!");
        } catch (Exception e) {
            e.printStackTrace();
        }
        client t = new client(name);
        Read r = new Read(socket);
        Thread print = new Thread(t);
        Thread read = new Thread(r);
        print.start();
        read.start();
    }
    @Override
    public void run() {
        try {
            PrintWriter out = new PrintWriter(socket.getOutputStream());
            BufferedReader bufferedReader = new BufferedReader(new InputStreamReader(System.in));
            while (true) {
                //向客户端发送消息
                String msg = bufferedReader.readLine();
                if(Objects.equals(msg, "/quit")){
                    socket.close();
                    System.exit(0);
                }

                out.println(name+": "+msg);
                out.flush();
            }
        } catch (Exception e) {
            e.printStackTrace();
        }
    }
}


class Read implements Runnable {
    static Socket socket = null;
    public Read(Socket socket) {
        this.socket = socket;
    }
    @Override
    public void run() {
        try {
            BufferedReader in = new BufferedReader(new InputStreamReader(socket
                    .getInputStream()));
            while (true) {
                //接受服务器的消息
                System.out.println(in.readLine());
            }
        } catch (Exception e) {
            System.out.println("Server offline! Connection Dismissed!");
            System.exit(0);
        }
    }
}

//client1
package experiment6.exp6_2;

import java.util.Scanner;

public class client1 {
    public static void main(String[] args){
        System.out.println("请输入昵称:");
        Scanner scanner = new Scanner(System.in);
        client client_1 = new client(scanner.next());
        client_1.main1();
    }
}
//client2
package experiment6.exp6_2;

public class client2 {
    public static void main(String[] args){
        client client_2 = new client("fang");
        client_2.main1();
    }
}
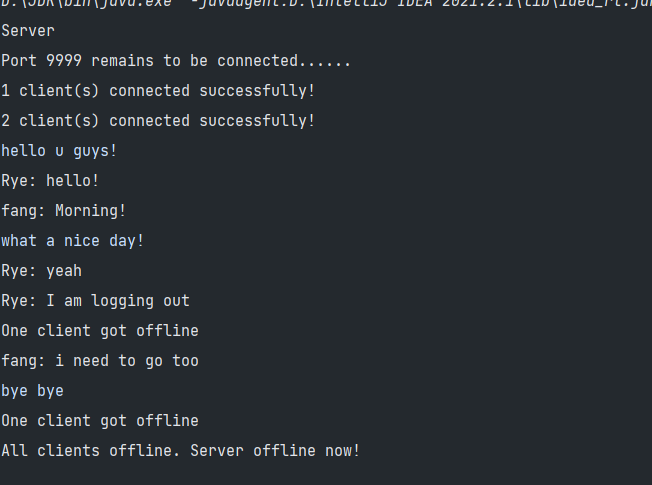
Server:

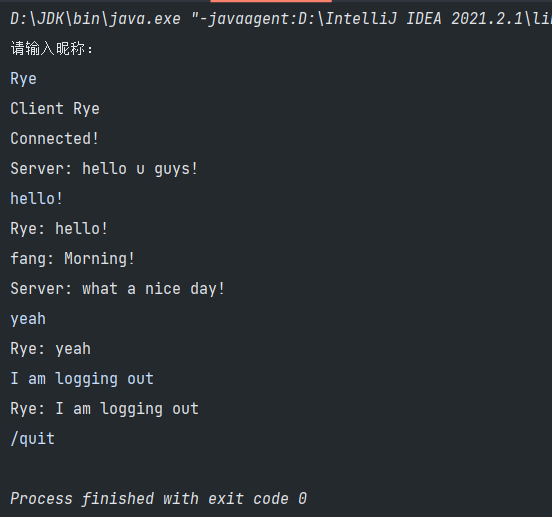
Client1:

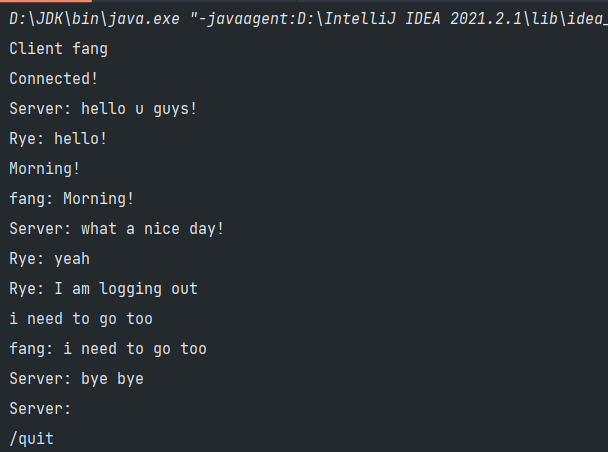
Client2:

[3]实验分析
第一题比较简单,只有单个客户端和单个服务器端的简单通信,使用PrintWriter返回TCP连接提供的字节输出流,将其格式化,用BufferReader将字节输入流转化为字符输入流,同时提供以缓冲方式读取一行字符串的方法。
对于第二题,为了实现一个服务器端和多个客户端之间的通信,将读和写的功能分别置于两个线程当中,服务器端用一个socket列表来存放与所有客户端建立连接的socket,每发生一个连接,启动新的读写线程来进行通信。客户端和服务器端用BufferReader来进行整行字符串的读取。
在服务器端接收到某个客户端的消息后,还会将其进行转发,发送至每一个客户端,是的所有客户端之间能看见互相发送的消息。同时,为客户端和服务器端设立退出关键字“/quit”,输入“/quit”之后,客户端会关闭socket,结束程序,客户端下线;服务器端则会关闭所有socket,使得所有客户端也被迫退出通信。如果所有客户端均退出,服务器端自动关闭。
客户端也具备自己决定昵称的功能。
智能推荐
Java substring用法_java substring的用法-程序员宅基地
文章浏览阅读467次。public String substring(int beginIndex, int endIndex)返回一个新字符串,它是此字符串的一个子字符串。该子字符串从指定的 beginIndex 处开始,一直到索引 endIndex - 1 处的字符。因此,该子字符串的长度为 endIndex-beginIndex。示例: "ham_java substring的用法
fopen,fopen_s,_wfopen_s与_fsopen, _wfsopen的区分_fopen_s和fopen的区别-程序员宅基地
文章浏览阅读1.5w次,点赞2次,收藏13次。C++做项目的过程中,需要实现文件打开保存的一个功能,当我对文件tmp.dat进行写操作以后,想要第二次对此文件进行写操作,此时用fopen_s,_wfopen_s均出现返回int error = 13也就是EACCES (Permission denied)的错误。而由于项目是Unicode编码,没办法用fopen进行文件操作(其实只要在预编译中加入_CRT_SECURE_NO_WARN_fopen_s和fopen的区别
合工大计算机组成原理ppt,合工大 计算机组成原理 计算机组成原理提纲.pdf-程序员宅基地
文章浏览阅读251次。合工大 计算机组成原理 计算机组成原理提纲计算机组成原理计算机组成原理合肥工业大学计算机与信息学院陈陈 田田2013.12.12提 纲11 考试形式和试卷结构考试形式和试卷结构2 考查目标3 参考书目44 考点及重点难点分析考点及重点难点分析计算机与信息学院 ..._计算机组成原理合工大
PostgreSQL--读懂执行计划(一)_postgresql 执行计划-程序员宅基地
文章浏览阅读7.9k次,点赞5次,收藏42次。这里写自定义目录标题前言执行计划常用命令参数解读常用组合执行计划解读关键字常见扫描方式Seq ScanIndex Only ScanIndex ScanBitmap Index Scan+Bitmap Heap ScanHash JoinNested LoopMerge Join小结前言PostgreSQL为每个收到查询产生一个查询计划。 选择正确的计划来匹配查询结构和数据的属性对于好的性能来说绝对是最关键的,因此系统包含了一个复杂的规划器来尝试选择好的计划。 你可以使用EXPLAIN命令察看规划器为任_postgresql 执行计划
释放AI创作潜能:从大模型训练到高产力应用-程序员宅基地
文章浏览阅读1.4w次,点赞83次,收藏82次。随着科技的不断进步,人工智能已经成为了各行各业的必备技能。特别是在内容创作领域,人工智能生成内容(AIGC)正逐渐成为趋势。AI可以创造出优秀的、原创的文章和故事,这为创作者们提供了一种新的创作方式。同时,AIGC技术也可以节省人力成本,提高内容生产效率。但是,如何在使用技术的前提下保持内容的原创性和质量,这是我们需要思考的问题。
mysql root 访问被拒绝_mysql-“连接失败:用户'root'@'localhost'(使用密码:是)的访问被拒绝”...-程序员宅基地
文章浏览阅读3.7k次。mysql-“连接失败:用户'root'@'localhost'(使用密码:是)的访问被拒绝”这个问题在这里已有答案:MySQL错误1045(28000):用户'bill'@'localhost'的访问被拒绝(使用密码:是) 35个答案我写了一些PHP网页使用的函数,以便与mysql数据库进行交互。 当我在服务器上测试它们时,..._mysql -uroot -p 数据库访问拒绝oot @localhost
随便推点
福利来啦!Python资料合集免费领!!!_python免费资料-程序员宅基地
文章浏览阅读1.1w次,点赞3次,收藏19次。资料合集免费领:https://t.csdnimg.cn/xxWg2020年转眼已过大半,在近一年的编程语言榜单中,Python已经走上卫冕的道路,并且与Java的差距拉得更远了一些。以往与Java常呈现你追我赶之势,而这一次则是直接相差由10%增加到15%!为什么只有Python这么火,能有机会成为通用语言?核心还是因为企业需要用它!因为其易用、逻辑简单并拥有海量扩展包等特性,不仅成为了 AI 的首选语言,而且在数据分析、Web、爬虫等领域也一样如此!不过,它最厉害的地方还是:._python免费资料
Windows系统后台运行mysql程序_windows怎么让mysql一直运行-程序员宅基地
文章浏览阅读1.9w次。使用Windows中的任务计划程序来让net start MySQL命令在后台一直执行。_windows怎么让mysql一直运行
Version 1.8.0 251 of the JVM is not sitable for this product Version: 11 or greater is required._version 1.8.0 251 of the jvm is not suitable for t-程序员宅基地
文章浏览阅读1.2k次。eclipse报Version 1.8.0 251 of the JVM is not sitable for this product Version: 11 or greater is required.意思是JVM的1.8.0 251版本不适用于此产品版本:需要11或更高版本。解决办法:到https://www.oracle.com/java/technologies/javase-jdk16-downloads.html下载比11更高的版本,我这里下载16版本的解压后设置环境_version 1.8.0 251 of the jvm is not suitable for this product. version: 11 o
Tensorflow-gpu 1.13.1+Python 3.7.2+CUDA 10.0 +cuDNN7.5_tensorflow-gpu==1.13.1需要那个版本的python-程序员宅基地
文章浏览阅读8.3k次,点赞3次,收藏20次。最近在工作站上安装Tensorflow-gpu失败了很多次,由于坚信Tensorflow 1.13.1对Python3.7和新的CUDA的支持,一直没有放弃,现在终于配置成功了,把过程简单记录下来,希望能对大家有帮助。【电脑基础环境】硬件:工作站,显卡Nvidia quadro M5000软件:windows 7【软件安装过程】Anaconda3下载地址:https://www.a..._tensorflow-gpu==1.13.1需要那个版本的python
静态编译的方式合并第三方dll,并生成自己的dll,以及出现‘__acrt_first_block == header’异常解决方式_vs 将opencv的dll打包到自己的dll-程序员宅基地
文章浏览阅读4.7k次,点赞2次,收藏8次。有时候调用了第三方的dll,但是由于种种原因不能显示出来,需要将第三方dll封装到自己的dll里,在使用时,让别人只你的dll,而不用调用你使用的第三方dll。怎么实现?用静态编译的方式!最近由于项目需要,用VS2015+opencv2.4.13编程实现了静态编译生成自己的dll,这个dll相当于将opencv的部分功能封装到自己的dll中了(不要跟我说opencv开源,不需要封装到自己的d..._vs 将opencv的dll打包到自己的dll
unity Android安卓平台读取Application.persistentDataPath路径_unity怎么 读取 application.persistentdatapath 下的文件-程序员宅基地
文章浏览阅读3.1k次。这次这么测试是对的,下次再有问题再看看写入的时候这样写的: fileLocal = Application.persistentDataPath + "/" + path; finalPath =#if UNITY_ANDROID && !UNITY_EDITOR fileLocal;#else "file://" + fileLocal;#endif读取的时候这样写的: path =#._unity怎么 读取 application.persistentdatapath 下的文件