Java OCR tesseract 图像智能字符识别技术 Java代码实现_tesocr jave-程序员宅基地
技术标签: tesseract 图像智能字符识别技术 【Java 并发专题】 ocr
接着上一篇OCR所说的,上一篇给大家介绍了tesseract 在命令行的简单用法,当然了要继承到我们的程序中,还是需要代码实现的,下面给大家分享下java实现的例子。
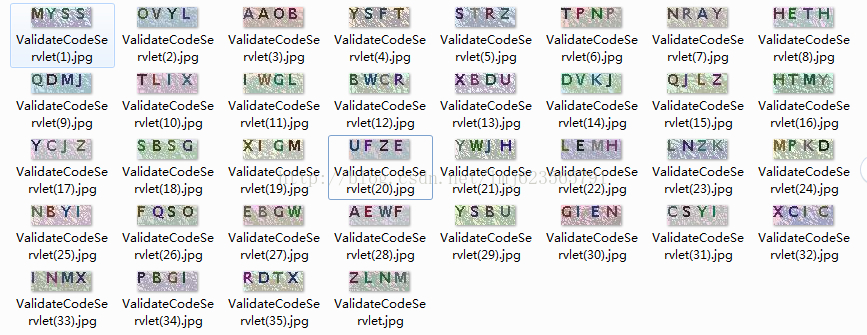
拿代码扫描上面的图片,然后输出结果。主要思想就是利用Java调用系统任务。
下面是核心代码:
package com.zhy.test;

import java.io.BufferedReader;

import java.io.File;
import java.io.FileInputStream;
import java.io.InputStreamReader;
import java.util.ArrayList;
import java.util.List;

import org.jdesktop.swingx.util.OS;

public class OCRHelper
{
	private final String LANG_OPTION = "-l";
	private final String EOL = System.getProperty("line.separator");
	/**
	 * 文件位置我防止在,项目同一路径
	 */
	private String tessPath = new File("tesseract").getAbsolutePath();

	/**
	 * @param imageFile
	 *            传入的图像文件
	 * @param imageFormat
	 *            传入的图像格式
	 * @return 识别后的字符串
	 */
	public String recognizeText(File imageFile) throws Exception
	{
		/**
		 * 设置输出文件的保存的文件目录
		 */
		File outputFile = new File(imageFile.getParentFile(), "output");

		StringBuffer strB = new StringBuffer();
		List<String> cmd = new ArrayList<String>();
		if (OS.isWindowsXP())
		{
			cmd.add(tessPath + "\\tesseract");
		} else if (OS.isLinux())
		{
			cmd.add("tesseract");
		} else
		{
			cmd.add(tessPath + "\\tesseract");
		}
		cmd.add("");
		cmd.add(outputFile.getName());
		cmd.add(LANG_OPTION);
//		cmd.add("chi_sim");
		cmd.add("eng");

		ProcessBuilder pb = new ProcessBuilder();
		/**
		 *Sets this process builder's working directory.
		 */
		pb.directory(imageFile.getParentFile());
		cmd.set(1, imageFile.getName());
		pb.command(cmd);
		pb.redirectErrorStream(true);
		Process process = pb.start();
		// tesseract.exe 1.jpg 1 -l chi_sim
		// Runtime.getRuntime().exec("tesseract.exe 1.jpg 1 -l chi_sim");
		/**
		 * the exit value of the process. By convention, 0 indicates normal
		 * termination.
		 */
//		System.out.println(cmd.toString());
		int w = process.waitFor();
		if (w == 0)// 0代表正常退出
		{
			BufferedReader in = new BufferedReader(new InputStreamReader(
					new FileInputStream(outputFile.getAbsolutePath() + ".txt"),
					"UTF-8"));
			String str;

			while ((str = in.readLine()) != null)
			{
				strB.append(str).append(EOL);
			}
			in.close();
		} else
		{
			String msg;
			switch (w)
			{
			case 1:
				msg = "Errors accessing files. There may be spaces in your image's filename.";
				break;
			case 29:
				msg = "Cannot recognize the image or its selected region.";
				break;
			case 31:
				msg = "Unsupported image format.";
				break;
			default:
				msg = "Errors occurred.";
			}
			throw new RuntimeException(msg);
		}
		new File(outputFile.getAbsolutePath() + ".txt").delete();
		return strB.toString().replaceAll("\\s*", "");
	}
}
测试代码:
package com.zhy.test;

import java.io.File;

public class Test
{
	public static void main(String[] args)
	{
		try
		{

			File testDataDir = new File("testdata");
			System.out.println(testDataDir.listFiles().length);
			int i = 0 ;
			for(File file :testDataDir.listFiles())
			{
				i++ ;
				String recognizeText = new OCRHelper().recognizeText(file);
				System.out.print(recognizeText+"\t");

				if( i % 5  == 0 )
				{
					System.out.println();
				}
			}

		} catch (Exception e)
		{
			e.printStackTrace();
		}

	}
}
输出结果:
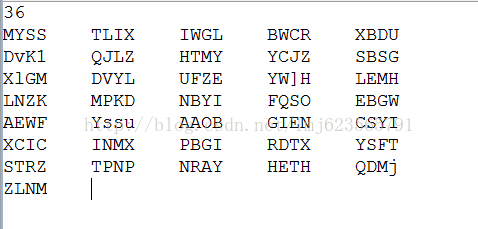
对比第一张图片,是不是很完美~哈哈 ,当然了如果你只需要实现验证码的读写,那么上面就足够了。下面继续普及图像处理的知识。
-------------------------------------------------------------------我的分割线--------------------------------------------------------------------
当然了,有时候图片被扭曲或者模糊的很厉害,很不容易识别,所以下面我给大家介绍一个去噪的辅助类,绝对碉堡了,先看下效果图。

来张特写:

一个类,不依赖任何jar,把图像中的干扰线消灭了,是不是很给力,然后再拿这样的图片去识别,会不会效果更好呢,嘿嘿,大家自己实验~
代码:
package com.zhy.test;

import java.awt.Color;
import java.awt.image.BufferedImage;
import java.io.File;
import java.io.IOException;

import javax.imageio.ImageIO;

public class ClearImageHelper
{

	public static void main(String[] args) throws IOException
	{


		File testDataDir = new File("testdata");
		final String destDir = testDataDir.getAbsolutePath()+"/tmp";
		for (File file : testDataDir.listFiles())
		{
			cleanImage(file, destDir);
		}

	}

	/**
	 *
	 * @param sfile
	 *            需要去噪的图像
	 * @param destDir
	 *            去噪后的图像保存地址
	 * @throws IOException
	 */
	public static void cleanImage(File sfile, String destDir)
			throws IOException
	{
		File destF = new File(destDir);
		if (!destF.exists())
		{
			destF.mkdirs();
		}

		BufferedImage bufferedImage = ImageIO.read(sfile);
		int h = bufferedImage.getHeight();
		int w = bufferedImage.getWidth();

		// 灰度化
		int[][] gray = new int[w][h];
		for (int x = 0; x < w; x++)
		{
			for (int y = 0; y < h; y++)
			{
				int argb = bufferedImage.getRGB(x, y);
				// 图像加亮(调整亮度识别率非常高)
				int r = (int) (((argb >> 16) & 0xFF) * 1.1 + 30);
				int g = (int) (((argb >> 8) & 0xFF) * 1.1 + 30);
				int b = (int) (((argb >> 0) & 0xFF) * 1.1 + 30);
				if (r >= 255)
				{
					r = 255;
				}
				if (g >= 255)
				{
					g = 255;
				}
				if (b >= 255)
				{
					b = 255;
				}
				gray[x][y] = (int) Math
						.pow((Math.pow(r, 2.2) * 0.2973 + Math.pow(g, 2.2)
								* 0.6274 + Math.pow(b, 2.2) * 0.0753), 1 / 2.2);
			}
		}

		// 二值化
		int threshold = ostu(gray, w, h);
		BufferedImage binaryBufferedImage = new BufferedImage(w, h,
				BufferedImage.TYPE_BYTE_BINARY);
		for (int x = 0; x < w; x++)
		{
			for (int y = 0; y < h; y++)
			{
				if (gray[x][y] > threshold)
				{
					gray[x][y] |= 0x00FFFF;
				} else
				{
					gray[x][y] &= 0xFF0000;
				}
				binaryBufferedImage.setRGB(x, y, gray[x][y]);
			}
		}

		// 矩阵打印
		for (int y = 0; y < h; y++)
		{
			for (int x = 0; x < w; x++)
			{
				if (isBlack(binaryBufferedImage.getRGB(x, y)))
				{
					System.out.print("*");
				} else
				{
					System.out.print(" ");
				}
			}
			System.out.println();
		}

		ImageIO.write(binaryBufferedImage, "jpg", new File(destDir, sfile
				.getName()));
	}

	public static boolean isBlack(int colorInt)
	{
		Color color = new Color(colorInt);
		if (color.getRed() + color.getGreen() + color.getBlue() <= 300)
		{
			return true;
		}
		return false;
	}

	public static boolean isWhite(int colorInt)
	{
		Color color = new Color(colorInt);
		if (color.getRed() + color.getGreen() + color.getBlue() > 300)
		{
			return true;
		}
		return false;
	}

	public static int isBlackOrWhite(int colorInt)
	{
		if (getColorBright(colorInt) < 30 || getColorBright(colorInt) > 730)
		{
			return 1;
		}
		return 0;
	}

	public static int getColorBright(int colorInt)
	{
		Color color = new Color(colorInt);
		return color.getRed() + color.getGreen() + color.getBlue();
	}

	public static int ostu(int[][] gray, int w, int h)
	{
		int[] histData = new int[w * h];
		// Calculate histogram
		for (int x = 0; x < w; x++)
		{
			for (int y = 0; y < h; y++)
			{
				int red = 0xFF & gray[x][y];
				histData[red]++;
			}
		}

		// Total number of pixels
		int total = w * h;

		float sum = 0;
		for (int t = 0; t < 256; t++)
			sum += t * histData[t];

		float sumB = 0;
		int wB = 0;
		int wF = 0;

		float varMax = 0;
		int threshold = 0;

		for (int t = 0; t < 256; t++)
		{
			wB += histData[t]; // Weight Background
			if (wB == 0)
				continue;

			wF = total - wB; // Weight Foreground
			if (wF == 0)
				break;

			sumB += (float) (t * histData[t]);

			float mB = sumB / wB; // Mean Background
			float mF = (sum - sumB) / wF; // Mean Foreground

			// Calculate Between Class Variance
			float varBetween = (float) wB * (float) wF * (mB - mF) * (mB - mF);

			// Check if new maximum found
			if (varBetween > varMax)
			{
				varMax = varBetween;
				threshold = t;
			}
		}

		return threshold;
	}
}
好了,就到这里。如果这篇文章对你有用,赞一个吧~
智能推荐
c语言中struct和typedef struct的用法_typedef struct用法-程序员宅基地
文章浏览阅读2.2k次,点赞18次,收藏51次。基本形式在C语言中,可以使用结构体(Struct)来存放一组不同类型的数据。结构体的定义形式为:struct 结构体名{ 结构体所包含的变量或数组};结构体是一种集合,它里面包含了多个变量或数组,它们的类型可以相同,也可以不同,每个这样的变量或数组都称为结构体的成员(Member),比如????struct stu{ char *name; //姓名 int num; //学号 int age; //年龄 char group; //所在学习小组_typedef struct用法
用 .NET 启动你的 DJI Ryze Tello 无人机_c# 大疆sdk-程序员宅基地
文章浏览阅读2.2k次,点赞5次,收藏6次。用 .NET 启动你的无人机_c# 大疆sdk
基础的Linux命令_touch index.js-程序员宅基地
文章浏览阅读92次。基本的Linux命令改变目录回退到上一个目录显示当前所在目录路径列出当前目录中的所有文件新建一个文件,如index.js,在当前目录下新建一个index.js文件删除一个文件新建一个目录(新建一个文件夹)删除一个文件夹index移动文件重新初始化终端清屏查看命令历史帮助退出注释改变目录cd回退到上一个目录cd…显示当前所在目录路径pwd列出当前目录中的所有文件ls新建一个文件,如index.js,在当前目录下新建一个index.js文件touch index.js删除一个文件如rm _touch index.js
Qt中如何将QComboBox中的选项StringItem与数值内联binding_qt combobox显示数值和实际值怎么绑定-程序员宅基地
文章浏览阅读501次。Qt中如何将QComboBox中的选项StringItem与数值内联binding开发文档中有两种方法第一种:第二种:这里介绍第二种(我认为更简单的一种)就用我目前做的一个小项目来说吧我的combo box中有各种各样的运动,每种运动自动内联着它所对应的一个小时所消耗的卡路里(int)consume::consume(QWidget *parent) : QDialog(parent), ui(new Ui::consume){ ui->setupUi(_qt combobox显示数值和实际值怎么绑定
最新大猿人中控充值系统 免授权学习版 支持公众号H5、分销等功能_猿人充值系统 3.2 漏洞-程序员宅基地
文章浏览阅读1.5k次。简介:最新大猿人中控充值系统 免授权破解版 支持公众号H5、分销等功能功能简介:大猿人中控系统目前是市面上用的最多的电话费充值中控系统,支持代理分销、公众号H5、API接口对接等功能,也是目前最完善的一款中控系统,前端全开源,已破解免授权!配置环境:php7.3 + Redis搭建教程:1、首先吧大猿人中控系统压缩包上传到服务器内进行解压,然后吧数据库文件导入数据库内2、修改/application/database.php 文件进行配置链接数据库。_猿人充值系统 3.2 漏洞
创建异形窗口[3]-程序员宅基地
文章浏览阅读81次。为什么80%的码农都做不了架构师?>>> ..._gtk3 异形窗口
随便推点
服务器阵列卡缓存显示错误,服务器阵列卡(缓存)-程序员宅基地
文章浏览阅读1.1k次。RAID卡介绍:提到RAID卡就不得不提到什么是RAID。RAID是英文Redundant Array of Independent Disks的缩写,翻译成中文即为独立磁盘冗余阵列,或简称磁盘阵列。简单的说,RAID是一种把多块独立的硬盘(物理硬盘)按不同方式组合起来形成一个硬盘组(逻辑硬盘),从而提供比单个硬盘更高的存储性能和提供数据冗余的技术。组成磁盘阵列的不同方式成为RAID级别(RAID..._把raid缓存强制开启 显示参数无效
您绝对不能错过的 10 个 OKR 示例!_优秀的okr案例-程序员宅基地
文章浏览阅读429次,点赞6次,收藏8次。在此基础上,制定团队 OKR,它可以是产品层面的或部门层面的,但它们会融入组织的目标中。使用 OKR 方法的一个巨大好处是,它可以针对不同的部门和团队进行细分, 以便整个公司追求相同的组织目标,但利用特定的关键结果。如果您没有达到 100% 的关键结果,您仍然应该为实现这一目标所付出的努力感到自豪,评估是否需要进行更改,并重新调整下一个周期的目标和关键结果。令人惊讶的是,伦敦商学院进行的一项研究显示,在接受调查的 11,000 名高级管理人员中,只有三分之一能够列出他们公司的三大优先事项。_优秀的okr案例
HDU 5350(MZL's munhaff function-哈夫曼树)_禎痲霤攷 hdu-程序员宅基地
文章浏览阅读2.1k次。MZL's munhaff functionTime Limit: 3000/1500 MS (Java/Others) Memory Limit: 131072/131072 K (Java/Others)Total Submission(s): 230 Accepted Submission(s): 133Problem DescriptionMZL is _禎痲霤攷 hdu
AndroidStudio4.1 自定义模板_android studio 4.1 自定义模板-程序员宅基地
文章浏览阅读1.3k次。AndroidStudio4.0之前,可以在template的文件夹里使用freemarker的自定义模板,可以在AndroidStudio的文件夹中,随意的添加适合自己的自定义模板,之前鸿洋大神的文章已经有来详细的介绍(https://blog.csdn.net/lmj623565791/article/details/51592043)。但是从4.1版本开始提供新的方式,Geminio,用Kotlin的形式编写新的template,而且需要使用插件的形式,才能使用自定义的模板,摸索了好几天,终于解决了_android studio 4.1 自定义模板
微信小程序云开发-酒店点餐类系统,附带(node.js在widows环境下的配置过程)_云开发可以做扫码类么-程序员宅基地
文章浏览阅读3.2k次,点赞3次,收藏11次。前些日子,帮一个学生做了一个毕业设计,是关于酒店点餐的微信小程序,现在整理一下过程。本款小程序是基于微信云开发的,现在做微信小程序的一大方便是:微信给大家提供了免费空间(云开发),对于不想花钱去租用服务器和域名的小伙伴儿来说,这无疑是一大喜事! 本款小程序非常适合商城类小程序的二次开发或是学习商城类小程序最佳的一个案例。废话不多说,直接上图:小程序..._云开发可以做扫码类么
jq使用ajax报错404,jQuery中ajax错误调试分析-程序员宅基地
文章浏览阅读1.8k次。jQuery中把ajax封装得非常好。但是日常开发中,我偶尔还是会遇到ajax报错。这里简单分析一下ajax报错一般的jQuery用法如下,ajax通过post方式提交"汤姆和老鼠"这段数据到xxx.php文件中。成功后则打印返回的数据,失败则打印错误原因。$.ajax({url:"xxx.php",type:"post",datatype:"json",data:{"cat":"tom","mo..._jquery ajax保存数据到后端flask,出现404not found错误