AIoT应用创新大赛-基于TencentOS Tiny 的遥控小车_智能小车连接腾讯云平台-程序员宅基地
技术标签: TencentOS Tiny
AIoT应用创新大赛-基于TencentOS Tiny 的遥控小车 - 云+社区 - 腾讯云![]() https://cloud.tencent.com/developer/article/1951791
https://cloud.tencent.com/developer/article/1951791
一,项目介绍。
很早就有做个智能小车的想法,但由于时间有限和囊中羞涩,一直没有付出行动,感谢腾讯TencentOS Tiny团队的信任,给了这么一次机会,虽然离自己的设想的功能还差很多,但至少迈出了重要的一步,更重要的是能学习TencentOS Tiny实时操作系统 和i.MX RT系列应用处理器,在此表示感谢。
最初的设想是能做个可以实时传输视频的巡检车,但是由于项目时间和目前硬件限制,目前只能说是做了个基于TencentOS Tiny 的遥控小车。主要实现了以下功能:
- 基于腾讯云平台,利用腾讯连连H5面板来控制小车动作。
- 小车的行驶,包括前进、后退、左转向、右转向。
- 小车避障,利用超声波模块测距,前进过程中,当距离小于30厘米,小车自动刹车,停止前进。
- 实时上报前方障碍物的距离,在H5面板中显示。
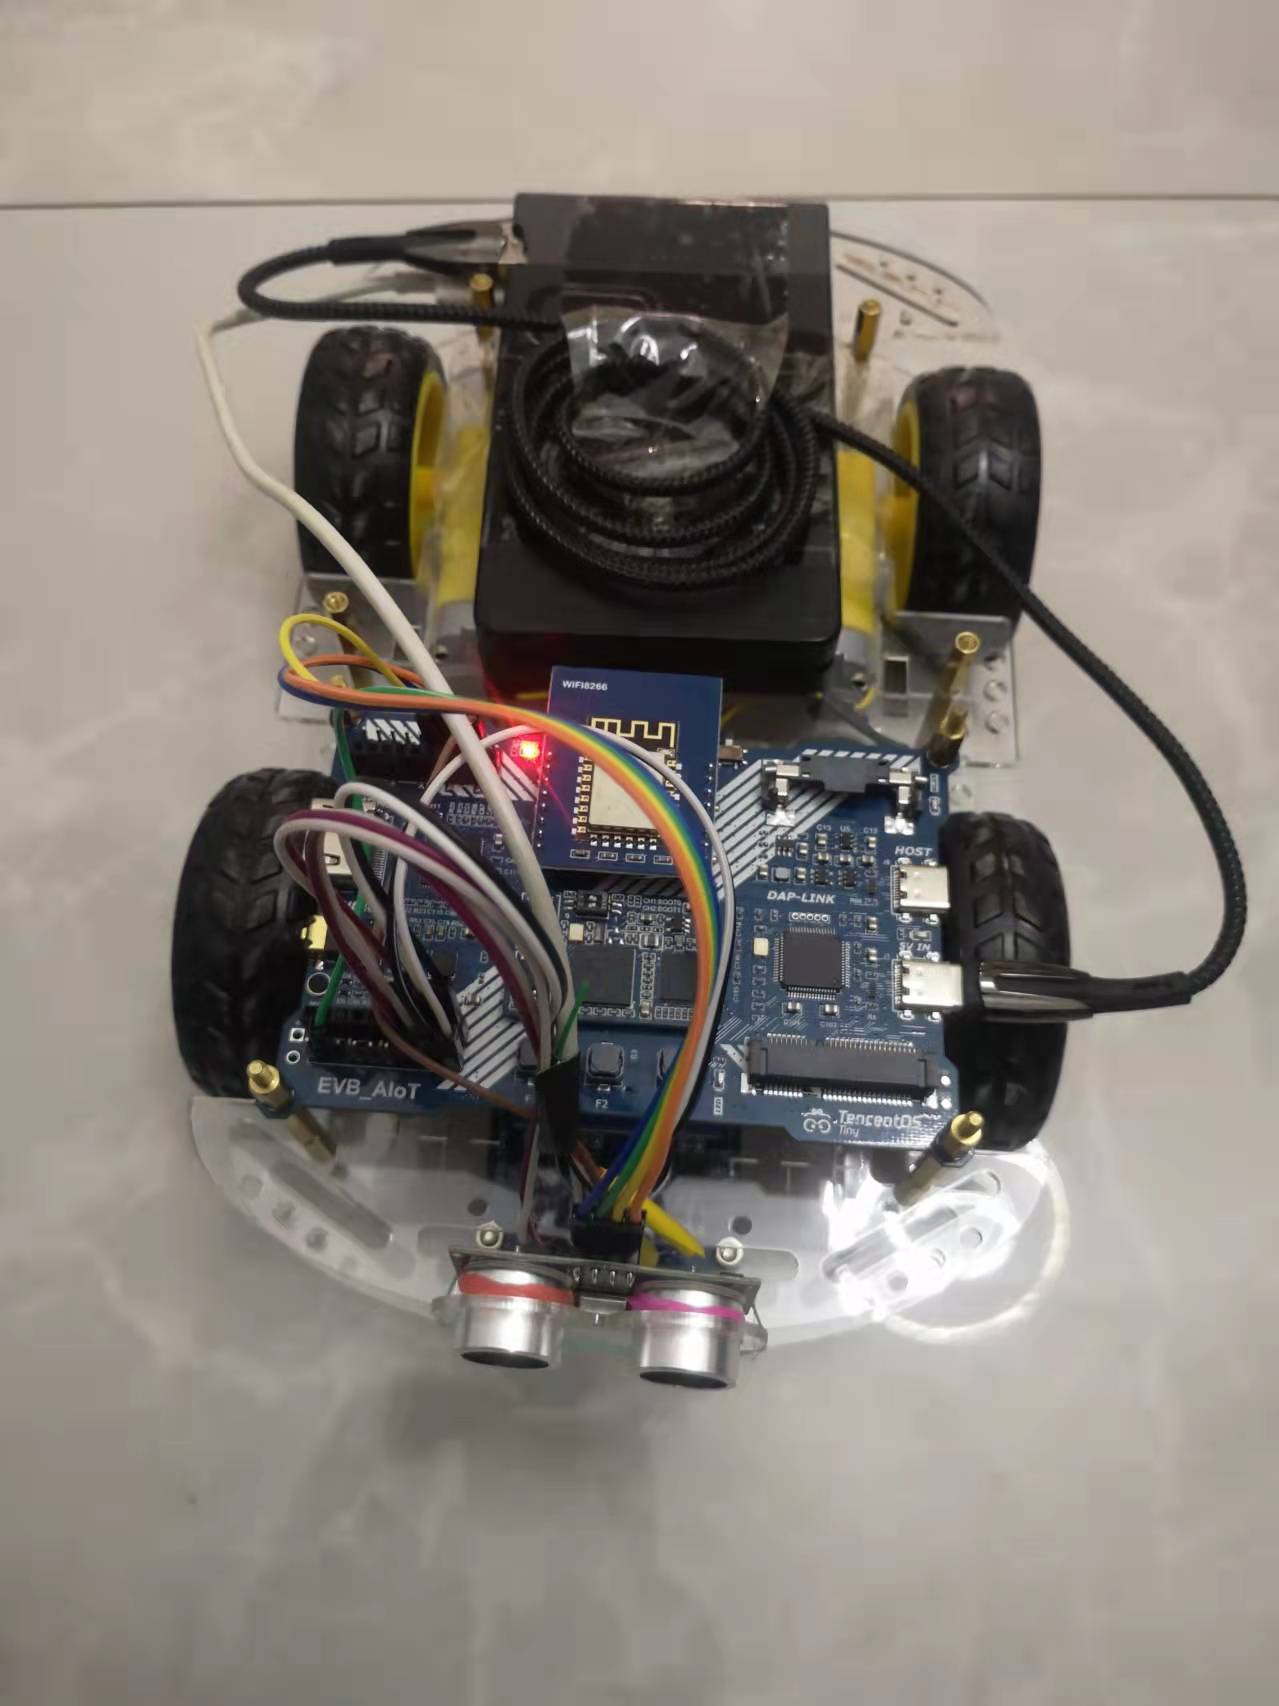
遥控小车
二,项目整体架构图
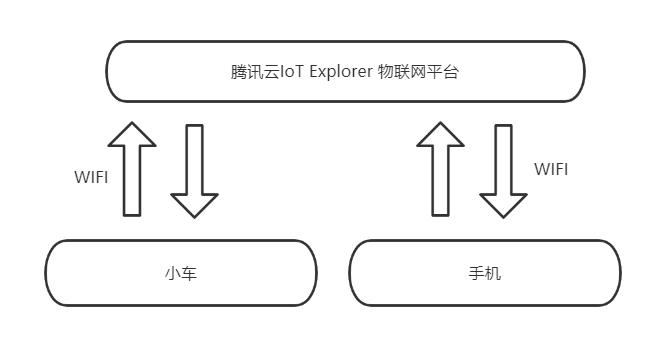
整体架构图
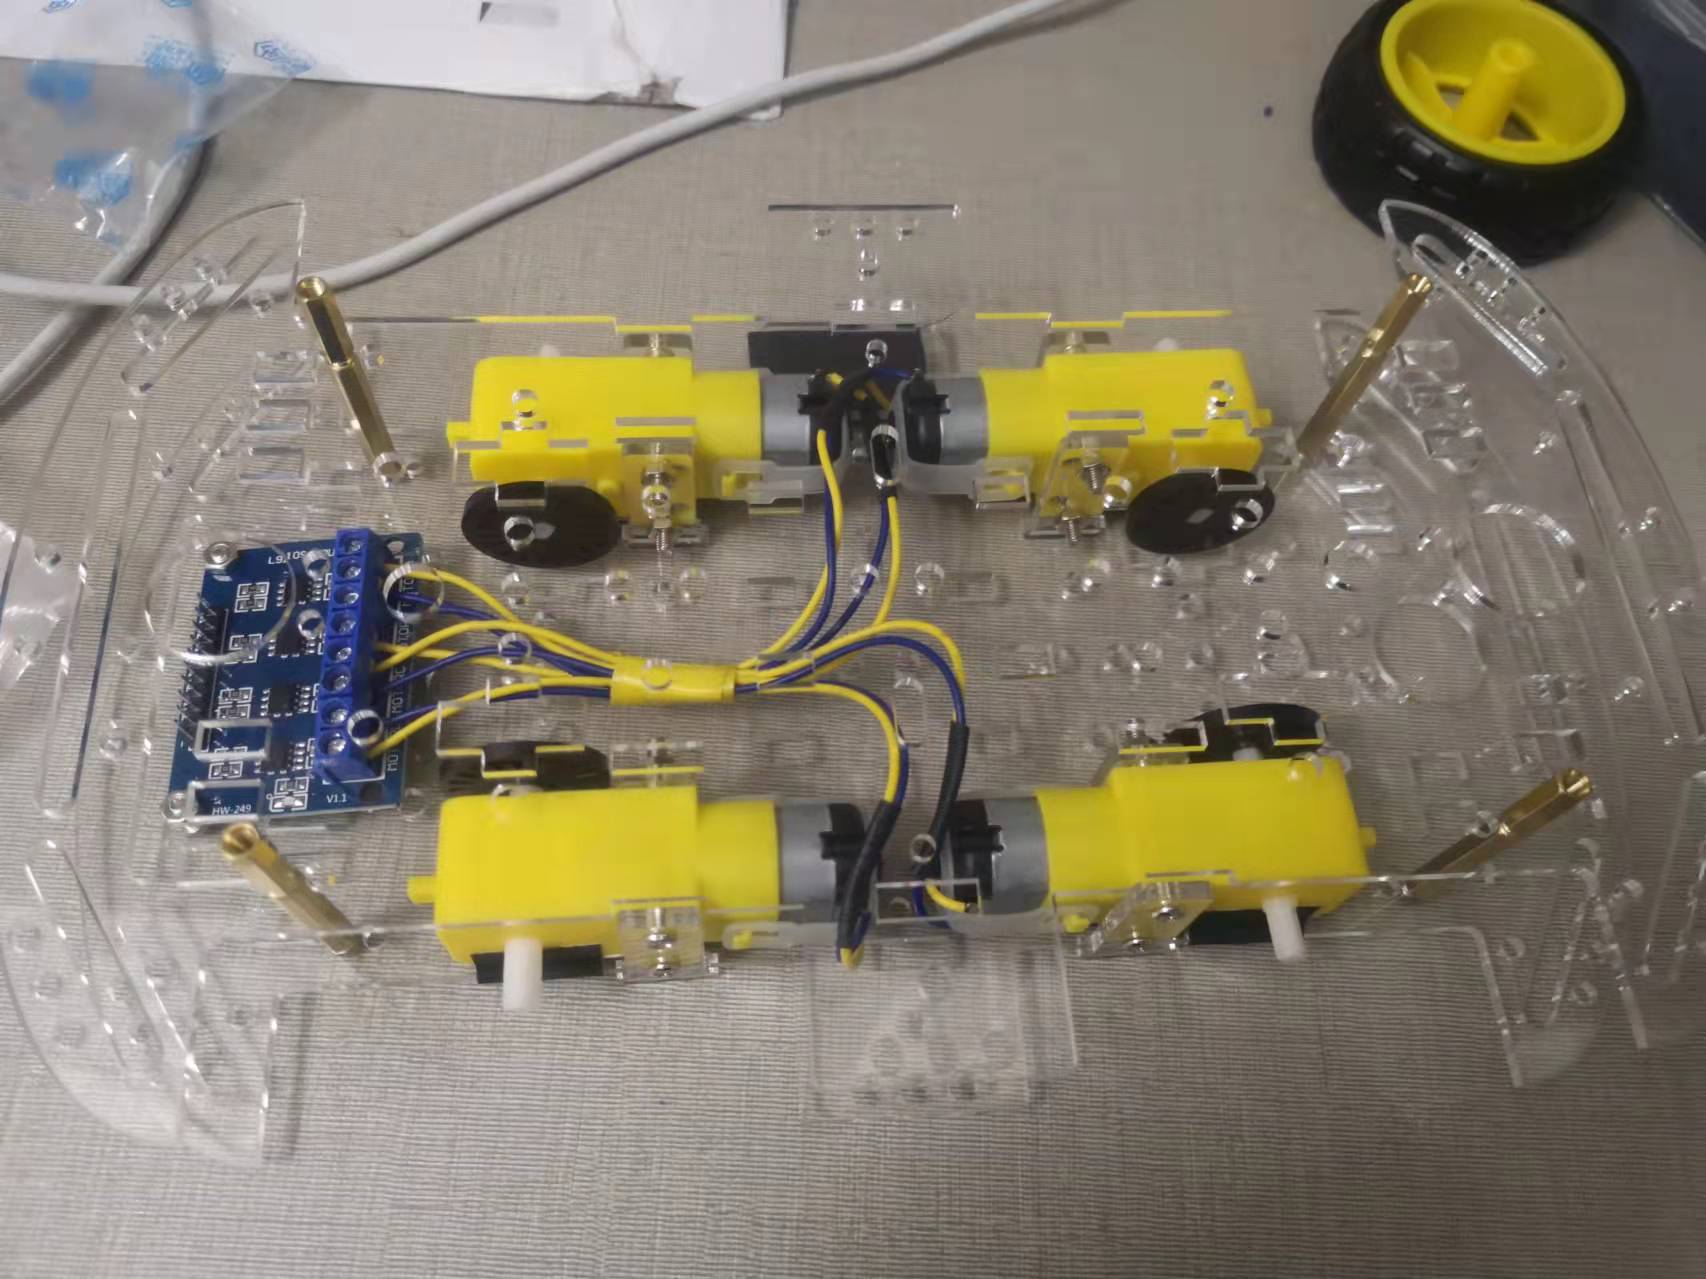
三,小车硬件组成。
1,小车底盘。四个直流电机驱动。
小车底盘
2,TencentOS Tiny AIoT开发套件

TencentOS Tiny AIoT开发板
开发板特性:
- 内置TencentOS Tiny开源物联网操作系统。
- 核心板采用的RT1062处理器属于i.MX RT 系列 MCU,是由 NXP 推出的跨界处理器,跨界是指该系列MCU的定位既非传统的微控制器、也非传统的微处理器,i.MX RT 系列 MCU 则综合了两者的优势,既具备高频率(最高主频600M)、高处理性能,也具备中断响应迅速、实时性高的特点。
- 1M RAM 16M SDRAM 64MB qspi flash 128MB spi flash。
- 板载Type-C接口CMSIS DAP仿真器。
- 板载PCIE接口,可扩展4G类物联网模组。
- 板载物联网俱乐部WAN Interface接口,可支持NB-IoT、WiFi、4G cat1、LoRa等模组。
- 板载物联网俱乐部E53 Interface接口,可扩展全系E53传感器。
- 板载标准24P DVP摄像头接口,可支持最高500万像素摄像头。
- 板载RGB显示接口,可转换HDMI输出。
- 板载高性能音频解码芯片,可做语音识别测试。
- 预留SD卡、用户按键、SPI Flash。
3,HG7881CP 四路直流电机驱动模块。
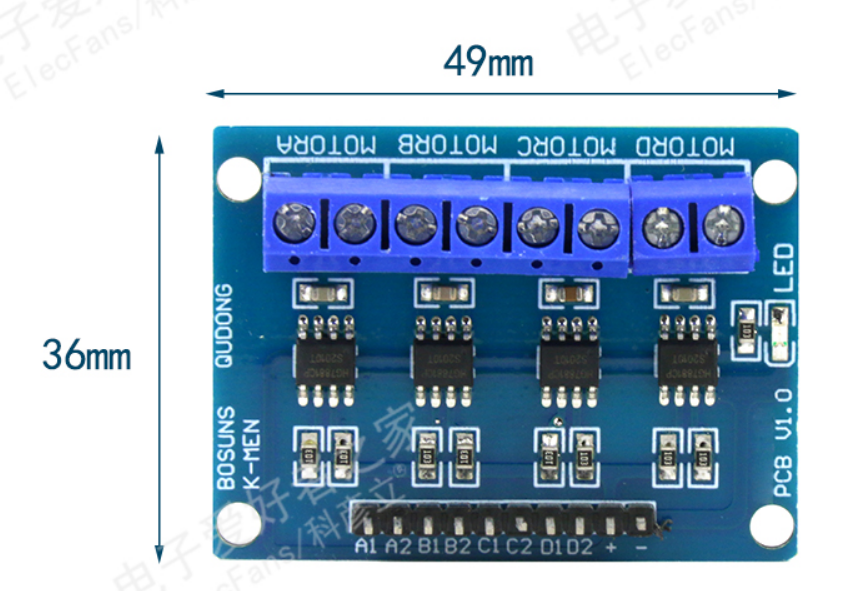
电机驱动模块

4,HC-SR04超声波测距模块。
HC-SR04
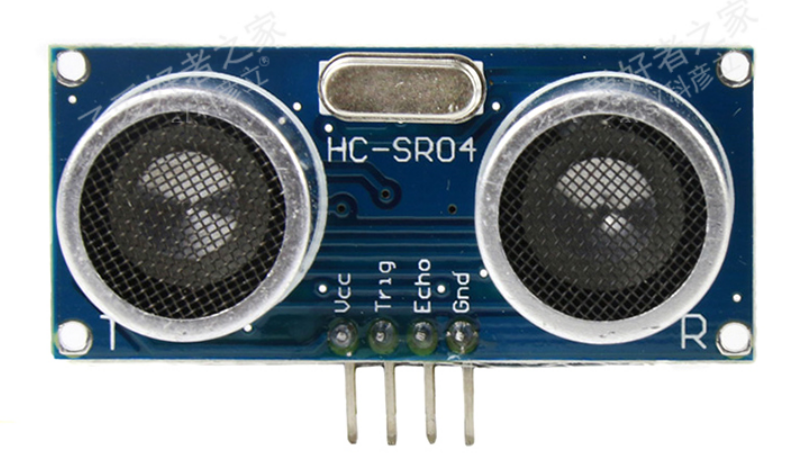
HC-SR04模块工作原理:
(1)采用IO触发测距,给至少10us的高电平信号;
(2)模块自动发送8个40khz的方波,自动检测是否有信号返回;
(3)有信号返回,通过IO输出一高电平,高电平持续的时间就是超声波从发射到返回的时间.
测试距离=(高电平时间*声速(340M/S))/2;
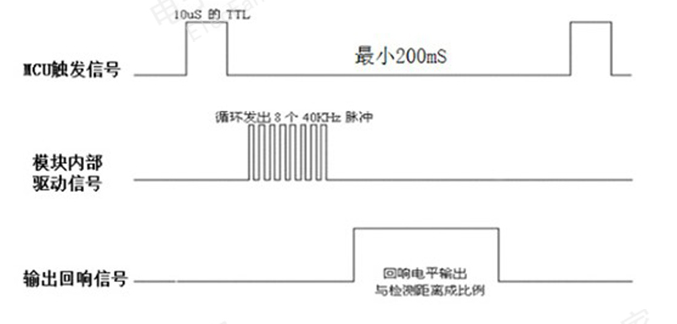
超声波时序图
5,ESP8266模组
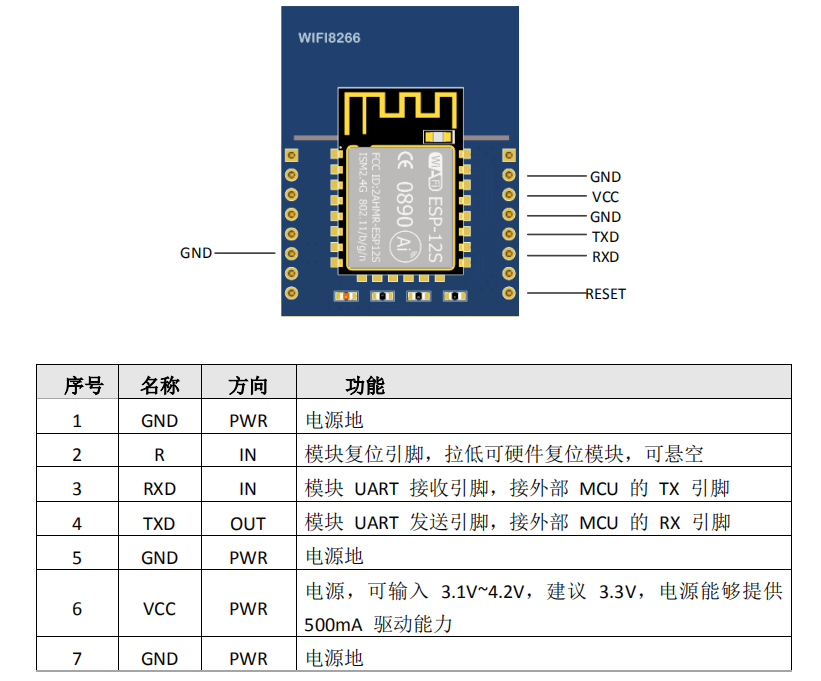
ESP8266模组
四,项目涉及到的知识点。
1,腾讯云平台的利用,H5面板配置及调试。
2,TencentOS Tiny的使用。
3,了解MQTT协议,了解cJSON数据格式。
4,利用ESP8266模块给腾讯云平台发送接收数据。
5,官方开发工具MCUXpresso IDE的使用。
6,RT1062的GPIO的配置。
7,RT1062利用输入捕获测量脉宽。
五,软件介绍。
1,TencentOS tiny物联网操作系统
TencentOS tiny是腾讯面向物联网领域开发的实时操作系统,现已捐赠给开放原子开源基金会进行孵化,具有低功耗,低资源占用,模块化,安全可靠等特点,可有效提升物联网终端产品开发效率。TencentOS tiny 提供精简的 RTOS 内核,内核组件可裁剪可配置,可快速移植到多种主流 MCU (如NXP Arm Cortex-M 全系列)及模组芯片上。而且,基于RTOS内核提供了丰富的物联网组件,内部集成主流物联网协议栈(如 CoAP/MQTT/TLS/DTLS/LoRaWAN/NB-IoT 等),可助力物联网终端设备及业务快速接入腾讯云物联网平台。
· 资源占用极少
TencentOS Tiny 内核具有超低资源占用的特点,RAM 0.8KB,ROM 1.8KB;在类似烟感和红外等实际场景下,TencentOS tiny 的资源占用仅为:RAM 2.69KB、ROM 12.38KB。
· 高效功耗管理框架
完整包含 MCU 和外围设备功耗管理,用户可以根据业务场景选择可参考的低功耗方案,有效降低设备耗电,延长设备寿命。
· 自动移植工具
TencentOS tiny 提供多种编译器快速移植指南和移植工具,可实现向新硬件开发板的一键移植,省时省力,有效提升开发效率。
· 最后一屏调试工具
TencentOS tiny 可以自动获取故障现场信息,并保持在端侧存储设备中,触发重启后会自动上传故障信息,可有效解决远程物联网设备故障信息获取难题,提升故障分析解决效率。
· 安全分级方案
TencentOS tiny 提供了多个等级的 IoT 安全方案。您可以根据业务场景和成本要求选择合适的安全解决方案,方便客户在安全需求和成本控制之间进行有效平衡。
2,云平台下发数据解析。
static void tos_topic_handler(void* client, message_data_t* msg)
{
    (void) client;
    cJSON* cjson_root   = NULL;
    cJSON* cjson_status = NULL;

    cJSON* cjson_params = NULL;//add zyd

    char* status = NULL;
  // char* cmd_value = NULL;  //add zyd
   // char  cmd_value = 0;  //add zyd

    k_event_flag_t event_flag = report_fail;

    /* ��ӡ��־ */
    MQTT_LOG_I("-----------------------------------------------------------------------------------");
    MQTT_LOG_I("%s:%d %s()...\ntopic: %s, qos: %d. \nmessage:\n\t%s\n", __FILE__, __LINE__, __FUNCTION__,
            msg->topic_name, msg->message->qos, (char*)msg->message->payload);
    MQTT_LOG_I("-----------------------------------------------------------------------------------\n");

    /* ʹ��cjson�����ϱ���Ӧ���� */
    cjson_root = cJSON_Parse((char*)msg->message->payload);
    if (cjson_root == NULL) {
        printf("report reply message parser fail\r\n");
        event_flag = report_fail;
        goto exit;
    }

    /*解析 下发 指令 */
	cjson_params = cJSON_GetObjectItem(cjson_root, "params");
	if (cjson_params != NULL) {
		cJSON* cjson_onoff = cJSON_GetObjectItem(cjson_params,"onoff");
		if(cjson_onoff != NULL) car_cmd.onoff = cjson_onoff->valueint;

		cJSON* cjson_drive = cJSON_GetObjectItem(cjson_params,"drive");
		if(cjson_drive != NULL) car_cmd.drive = cjson_drive->valueint;

		cJSON* cjson_reverse = cJSON_GetObjectItem(cjson_params,"reverse");
		if(cjson_reverse != NULL) car_cmd.reverse = cjson_reverse->valueint;

		cJSON* cjson_right = cJSON_GetObjectItem(cjson_params,"right");
		if(cjson_right != NULL) car_cmd.right = cjson_right->valueint;

		cJSON* cjson_left = cJSON_GetObjectItem(cjson_params,"left");
		if(cjson_left != NULL) car_cmd.left = cjson_left->valueint;
	}

    /* ��ȡstatus״̬ */
    cjson_status = cJSON_GetObjectItem(cjson_root, "status");
    status = cJSON_GetStringValue(cjson_status);
    if (cjson_status == NULL || status == NULL) {
        printf("report reply status parser fail\r\n");
        event_flag = report_fail;
        goto exit;
    }

    /* �ж�status״̬ */
    if (strstr(status,"success")) {
        event_flag = report_success;
    }else {
        event_flag = report_fail;
    }

exit:
    cJSON_Delete(cjson_root);
    cjson_root = NULL;
    status = NULL;

    tos_event_post(&report_result_event, event_flag);

    return;
}
复制
3,云平台上传数据。
void mqttclient_task(void)
{
    int error;

    int lightness = 0;

    mqtt_client_t *client = NULL;

    mqtt_message_t msg;

    k_event_flag_t match_flag;

    char  host_ip[20];

    memset(&msg, 0, sizeof(msg));

#ifdef USE_ESP8266
    esp8266_sal_init(esp8266_port);
   // esp8266_join_ap("TencentOS", "tencentostiny");
    esp8266_join_ap("TP-LINK_AF26", "xn20190213");
   // esp8266_join_ap("TP-LINK_EA9E", "20160130");
#endif


#ifdef USE_EC600S
    ec600s_sal_init(HAL_UART_PORT_0);
#endif

    mqtt_log_init();

    client = mqtt_lease();

    tos_event_create(&report_result_event, (k_event_flag_t)0u);

    /* Domain Format: <your product ID>.iotcloud.tencentdevices.com */
    tos_sal_module_parse_domain("O0CBVXMB0X.iotcloud.tencentdevices.com",host_ip,sizeof(host_ip));

    /*
        These infomation is generated by mqtt_config_gen.py tool in "TencentOS-tiny\tools" directory.
    */
    mqtt_set_port(client, "1883");
    mqtt_set_host(client, host_ip);
    mqtt_set_client_id(client, "O0CBVXMB0XCar");
    mqtt_set_user_name(client, "O0CBVXMB0XCar;21010406;12365;4294967295");
    mqtt_set_password(client, "63d7adbf99fe8a2c93876da22dd150bdc6f78dea;hmacsha1");
    mqtt_set_clean_session(client, 1);

    error = mqtt_connect(client);

    //MQTT_LOG_D("mqtt connect error is %#0x", error);

    error = mqtt_subscribe(client, "$thing/down/property/O0CBVXMB0X/Car", QOS0, tos_topic_handler);

   // MQTT_LOG_D("mqtt subscribe error is %#0x", error);

    while (1) {
        memset(&msg, 0, sizeof(msg));
       // snprintf(report_buf, sizeof(report_buf), REPORT_DATA_TEMPLATE, lightness++);
        snprintf(report_buf, sizeof(report_buf), REPORT_DATA_TEMPLATE, distance);
       // if (lightness > 100) {
       //     lightness = 0;
       // }
        msg.qos = QOS0;
        msg.payload = (void *) report_buf;
        error = mqtt_publish(client, "$thing/up/property/O0CBVXMB0X/Car", &msg);

       // MQTT_LOG_D("mqtt publish error is %#0x", error);

        tos_event_pend(&report_result_event,
                       report_success|report_fail,
                       &match_flag,
                       TOS_TIME_FOREVER,
                       TOS_OPT_EVENT_PEND_ANY | TOS_OPT_EVENT_PEND_CLR);

        if (match_flag == report_success) {
           // printf("report to Tencent IoT Explorer success\r\n");

        }else if (match_flag == report_fail){
          //  printf("report to Tencent IoT Explorer fail\r\n");
        }
        ///
        tos_task_delay(1000);
    }
}
复制
4,电机控制及超声波测距程序。(脉宽的测量程序这里参考野火i.MXRT1052开发板中例程)
#include "pin_mux.h"
#include "board.h"
#include "fsl_gpio.h"
#include "fsl_common.h"
#include "fsl_iomuxc.h"
#include "fsl_debug_console.h"
#include "clock_config.h"
#include "fsl_gpt.h"
#include "car_contrl.h"
#include "tos_k.h"
#include "pad_config.h"
#include "bsp_nvic.h"

//#define SR04_ECHO_GPIO    	GPIO1
//#define SR04_ECHO_GPIO_PIN  	01U

#define SR04_TRIG_GPIO          GPIO1
#define SR04_TRIG_GPIO_PIN      02U
/*******************************************************************************
 * Variables
 ******************************************************************************/
/* Whether the SW is turned on */
volatile bool g_InputSignal = false;

/* Symbols to be used with GPIO driver */
#define MOTOR_D1_GPIO          GPIO2   /*!< GPIO peripheral base pointer */
#define MOTOR_D1_GPIO_PIN      30U   /*!< GPIO pin number */

/* Symbols to be used with GPIO driver */
#define MOTOR_D2_GPIO           GPIO2   /*!< GPIO peripheral base pointer */
#define MOTOR_D2_GPIO_PIN       31U   /*!< GPIO pin number */

/* Symbols to be used with GPIO driver */
#define MOTOR_B1_GPIO           GPIO1   /*!< GPIO peripheral base pointer */
#define MOTOR_B1_GPIO_PIN       16U   /*!< GPIO pin number */
/* Symbols to be used with GPIO driver */
#define MOTOR_B2_GPIO          GPIO1   /*!< GPIO peripheral base pointer */
#define MOTOR_B2_GPIO_PIN      17U   /*!< GPIO pin number */

#define MOTOR_REVERSE_EN()     GPIO_PinWrite(MOTOR_D1_GPIO, MOTOR_D1_GPIO_PIN, 1U);\
	                           GPIO_PinWrite(MOTOR_D2_GPIO, MOTOR_D2_GPIO_PIN, 0U);\
	                           GPIO_PinWrite(MOTOR_B1_GPIO, MOTOR_B1_GPIO_PIN, 1U);\
	                           GPIO_PinWrite(MOTOR_B2_GPIO, MOTOR_B2_GPIO_PIN, 0U)

#define MOTOR_DRIVE_EN()       GPIO_PinWrite(MOTOR_D1_GPIO, MOTOR_D1_GPIO_PIN, 0U);\
							   GPIO_PinWrite(MOTOR_D2_GPIO, MOTOR_D2_GPIO_PIN, 1U);\
							   GPIO_PinWrite(MOTOR_B1_GPIO, MOTOR_B1_GPIO_PIN, 0U);\
							   GPIO_PinWrite(MOTOR_B2_GPIO, MOTOR_B2_GPIO_PIN, 1U)

#define  MOTOR_RIGHT_EN()      GPIO_PinWrite(MOTOR_B1_GPIO, MOTOR_B1_GPIO_PIN, 0U);\
							   GPIO_PinWrite(MOTOR_B2_GPIO, MOTOR_B2_GPIO_PIN, 1U)

#define  MOTOR_LEFT_EN()       GPIO_PinWrite(MOTOR_D1_GPIO, MOTOR_D1_GPIO_PIN, 0U);\
							   GPIO_PinWrite(MOTOR_D2_GPIO, MOTOR_D2_GPIO_PIN, 1U)


#define MOTOR_STOP()           GPIO_PinWrite(MOTOR_D1_GPIO, MOTOR_D1_GPIO_PIN, 0U);\
							   GPIO_PinWrite(MOTOR_D2_GPIO, MOTOR_D2_GPIO_PIN, 0U);\
							   GPIO_PinWrite(MOTOR_B1_GPIO, MOTOR_B1_GPIO_PIN, 0U);\
							   GPIO_PinWrite(MOTOR_B2_GPIO, MOTOR_B2_GPIO_PIN, 0U);

#define SR04_TRIG_ON()		   GPIO_PinWrite(SR04_TRIG_GPIO, SR04_TRIG_GPIO_PIN, 1U);
#define SR04_TRIG_OFF()		   GPIO_PinWrite(SR04_TRIG_GPIO, SR04_TRIG_GPIO_PIN, 0U);

//*****************//
ctrl_cmd_t  car_cmd;
volatile uint64_t timer = 0;
volatile int distance = 0;
int trig_cnt = 0;
// 定时器输入捕获用户自定义变量结构体定义
volatile GPT_ICUserValueTypeDef GPT_ICUserValueStructure = {0,0,0,0,0};

/**
* @brief  配置GPT相关引脚功能
* @param  无
* @retval 无
*/
void GPT_GPIO_Config(void)
{
  /*定义GPIO引脚配置结构体*/
  gpio_pin_config_t gpt_config;

  IOMUXC_SetPinMux(IOMUXC_GPIO_EMC_40_GPT2_CAPTURE2, 0U);
  IOMUXC_SetPinConfig(IOMUXC_GPIO_EMC_40_GPT2_CAPTURE2, GPT_COMPARE_PAD_CONFIG_DATA);

  gpt_config.direction = kGPIO_DigitalInput;  //输入模式
  //gpt_config.outputLogic =  0;              //默认高电平
  gpt_config.interruptMode = kGPIO_NoIntmode; //不使用中断

  /* 初始化 GPT COMPARE1 GPIO. */
  GPIO_PinInit(GPT2_CAPTURE2_GPIO, GPT2_CAPTURE2_GPIO_PIN, &gpt_config);
}


/**
* @brief  配置GPT工作模式
* @param  无
* @retval 无
*/
void GPT_Config(void)
{

  gpt_config_t gptConfig;

  /*初始化GPT引脚*/
  GPT_GPIO_Config();

  /*GPT的时钟设置*/
  CLOCK_SetMux(kCLOCK_PerclkMux, EXAMPLE_GPT_CLOCK_SOURCE_SELECT);
  CLOCK_SetDiv(kCLOCK_PerclkDiv, EXAMPLE_GPT_CLOCK_DIVIDER_SELECT);

  /*初始化GPT*/
  GPT_GetDefaultConfig(&gptConfig);
  GPT_Init(EXAMPLE_GPT, &gptConfig);

  /* 设置时钟分频 */
  GPT_SetClockDivider(EXAMPLE_GPT, GPT_DIVIDER);

  /*设置位输入模式*/
  GPT_SetInputOperationMode(EXAMPLE_GPT,kGPT_InputCapture_Channel2,kGPT_InputOperation_RiseEdge);
  /*使能输入捕获中断*/
  GPT_EnableInterrupts(EXAMPLE_GPT, kGPT_InputCapture2InterruptEnable);
  /*使能溢出中断*/
  GPT_EnableInterrupts(EXAMPLE_GPT,kGPT_RollOverFlagInterruptEnable);

  /*设置中断优先级,*/
  set_IRQn_Priority(GPT_IRQ_ID,Group4_PreemptPriority_6, Group4_SubPriority_0);
  /*使能中断*/
  EnableIRQ(GPT_IRQ_ID);

  /* 开启定时器 */
  GPT_StartTimer(EXAMPLE_GPT);
}


/*定义中断服务函数*/
void EXAMPLE_GPT_IRQHandler(void)
{
	//tos_knl_irq_enter();
	//PRINTF("GPIO_GetPinsInterrupt_zyd3333\r\n");
  /*
  *当要被捕获的信号的周期大于定时器的最长定时时,定时器就会溢出,产生更新中断
  *这个时候我们需要把这个最长的定时周期加到捕获信号的时间里面去
  */
   if ( GPT_GetStatusFlags(EXAMPLE_GPT,kGPT_RollOverFlag) != false )
   {
      if ( GPT_ICUserValueStructure.Capture_StartFlag != 0 )
      {
        GPT_ICUserValueStructure.Capture_Period ++;
      }
      GPT_ClearStatusFlags(EXAMPLE_GPT, kGPT_RollOverFlag);
   }

   /*捕获中断*/
  if (GPT_GetStatusFlags(EXAMPLE_GPT,kGPT_InputCapture2Flag) != false)
  {

      if(GPT_ICUserValueStructure.Capture_FinishFlag != 1)
      {
        /*第一次捕获*/
        if ( GPT_ICUserValueStructure.Capture_StartFlag == 0 )
        {
          /*清除溢出次数*/
          GPT_ICUserValueStructure.Capture_Period = 0;

          /*读取当前计数值*/
          GPT_ICUserValueStructure.Capture_CcrValue_1 = GPT_GetInputCaptureValue(EXAMPLE_GPT,kGPT_InputCapture_Channel2);
          //PRINTF("GPIO_GetPinsInterrupt_zyd1111 RiseEdge %d \r\n",GPT_ICUserValueStructure.Capture_CcrValue_1);
          /*当第一次捕获到上升沿之后,就把捕获边沿配置为上升沿*/
          GPT_SetInputOperationMode(EXAMPLE_GPT,kGPT_InputCapture_Channel2,kGPT_InputOperation_FallEdge);
          /*开始捕获标志置1*/
          GPT_ICUserValueStructure.Capture_StartFlag = 1;
        }
        /*上升沿捕获中断,第二次捕获*/
        else
        {
          /*获取捕获比较寄存器的值,这个值就是捕获到的高电平的时间的值*/
          GPT_ICUserValueStructure.Capture_CcrValue_2 = GPT_GetInputCaptureValue(EXAMPLE_GPT,kGPT_InputCapture_Channel2);
          //PRINTF("GPIO_GetPinsInterrupt_zyd2222 FallEdge%d \r\n",GPT_ICUserValueStructure.Capture_CcrValue_2);
          /*当第二次捕获到上升沿之后,就把捕获边沿配置为下降沿,好开启新的一轮捕获*/
          GPT_SetInputOperationMode(EXAMPLE_GPT,kGPT_InputCapture_Channel2,kGPT_InputOperation_RiseEdge);
          /*开始捕获标志清0*/
          GPT_ICUserValueStructure.Capture_StartFlag = 0;
          /*捕获完成标志置1	*/
          GPT_ICUserValueStructure.Capture_FinishFlag = 1;
         }
       }

     GPT_ClearStatusFlags(EXAMPLE_GPT, kGPT_InputCapture2Flag);
  }
  //tos_knl_irq_leave();
}

void delay(uint32_t count)
{
    volatile uint32_t i = 0;
    for (i = 0; i < count; ++i)
    {
        __asm("NOP");
    }
}
void motor_ctrl_entry(void *arg)
{
	/*初始化并开启GPT定时器*/
	GPT_Config();
	SR04_TRIG_ON();
	delay(2000);//20us
	SR04_TRIG_OFF();

    while (1) {
    	if (car_cmd.onoff){
    		USER_LED_ON();
		}else{
			USER_LED_OFF();
		}

		if ((car_cmd.drive)&&(distance>=300)){
			MOTOR_DRIVE_EN();
		}else if(car_cmd.reverse){
			MOTOR_REVERSE_EN();
		}else if(car_cmd.right){
			MOTOR_RIGHT_EN();
		}else if(car_cmd.left){
			MOTOR_LEFT_EN();
		}else{
			MOTOR_STOP();
		}
		trig_cnt++;
    	if(GPT_ICUserValueStructure.Capture_FinishFlag)
		 {
			/*得到计数值,timer 为64位数据,32位很可能会溢出*/
			timer = GPT_ICUserValueStructure.Capture_Period * 0xffffffff;
		    timer += GPT_ICUserValueStructure.Capture_CcrValue_2;
			timer -= GPT_ICUserValueStructure.Capture_CcrValue_1;
			/*将计数值转化为时间,单位(ms)*/
			//timer = timer / ((EXAMPLE_GPT_CLK_FREQ)/1000); //单位ms
			timer = (172*timer) / ((EXAMPLE_GPT_CLK_FREQ)/1000);//单程声速 344/2 =172  距离单位mm
			distance =(int)(timer);
			//PRINTF("the result is: %lld ms \r\n",timer);
			PRINTF("the result is: %lld ms \r\n",distance);
			GPT_ICUserValueStructure.Capture_FinishFlag = 0;
			SR04_TRIG_ON();
			delay(2000);//20us
			SR04_TRIG_OFF();
			trig_cnt = 0;
		 }
    	if(trig_cnt>10)
    	{
    		trig_cnt = 0;
    		SR04_TRIG_ON();
			delay(2000);//20us
			SR04_TRIG_OFF();
    	}
    	//PRINTF("###I am task1 %d  \r\n",GPT_ICUserValueStructure.Capture_Period);
        tos_task_delay(20);
    }
}
复制
六,腾讯连连H5面板。
1,电脑端调试界面。
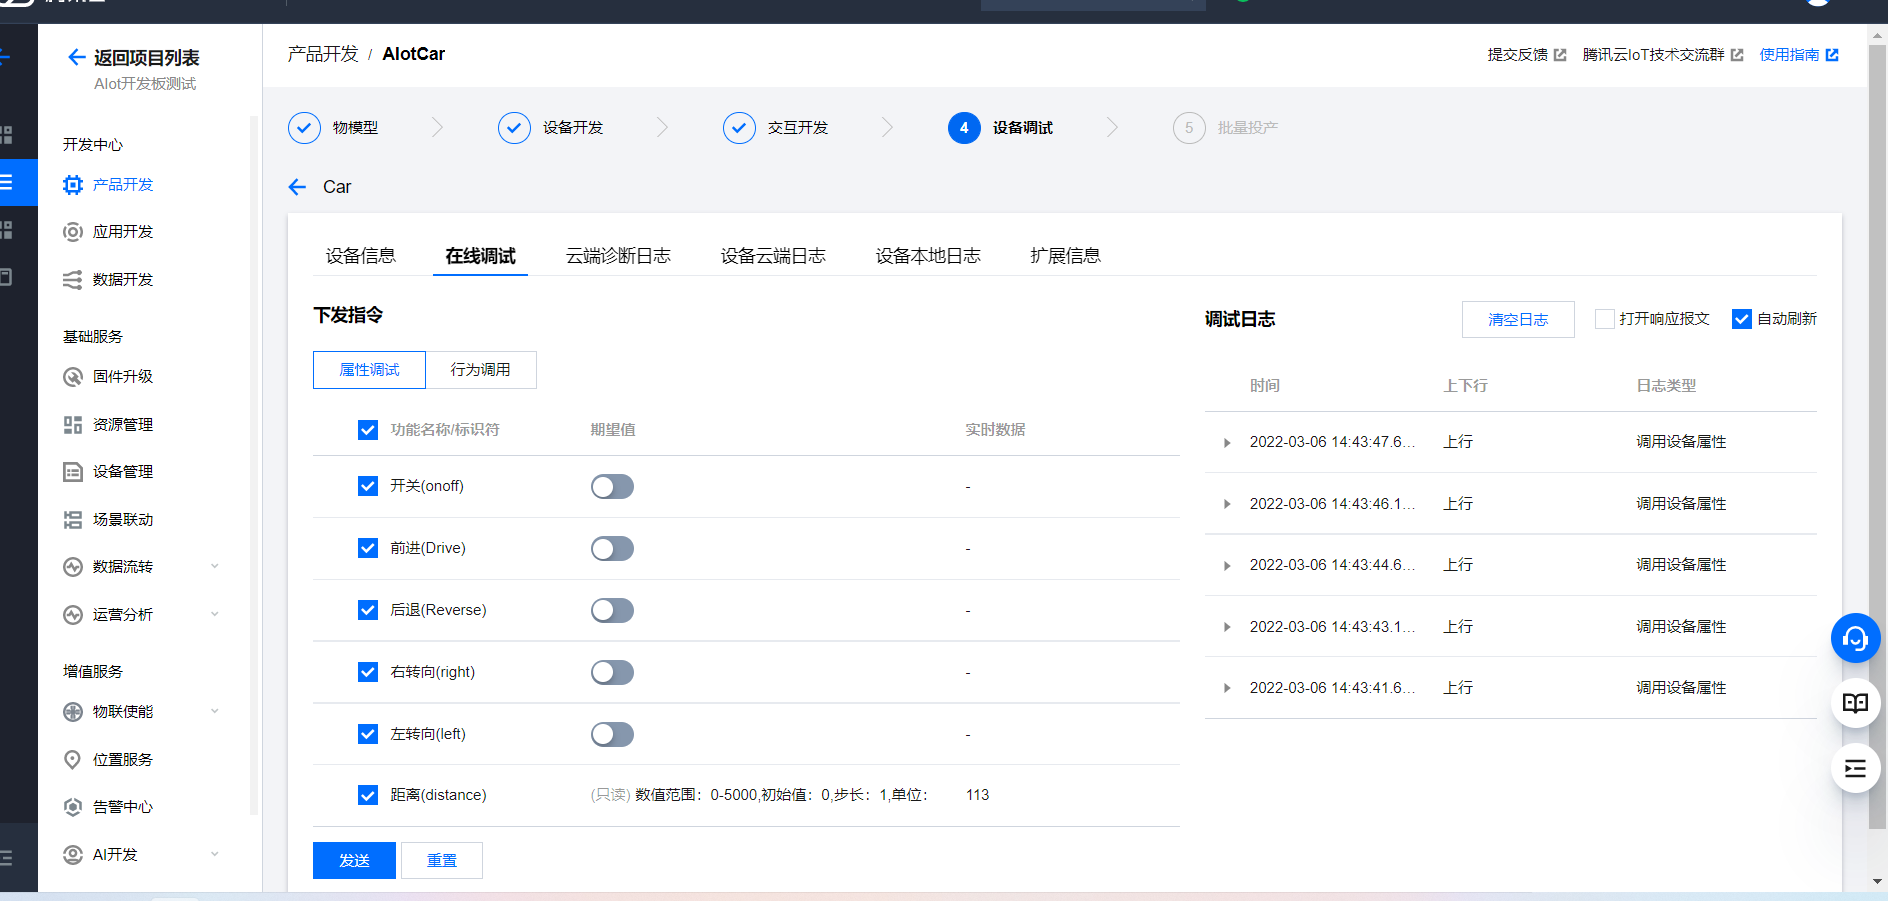
调试界面
2,手机端界面。
这里用的是标准面板,使用方法还是很简单的,不过界面和功能有待优化,有时间使用SDK开发,应该就会非常好了。
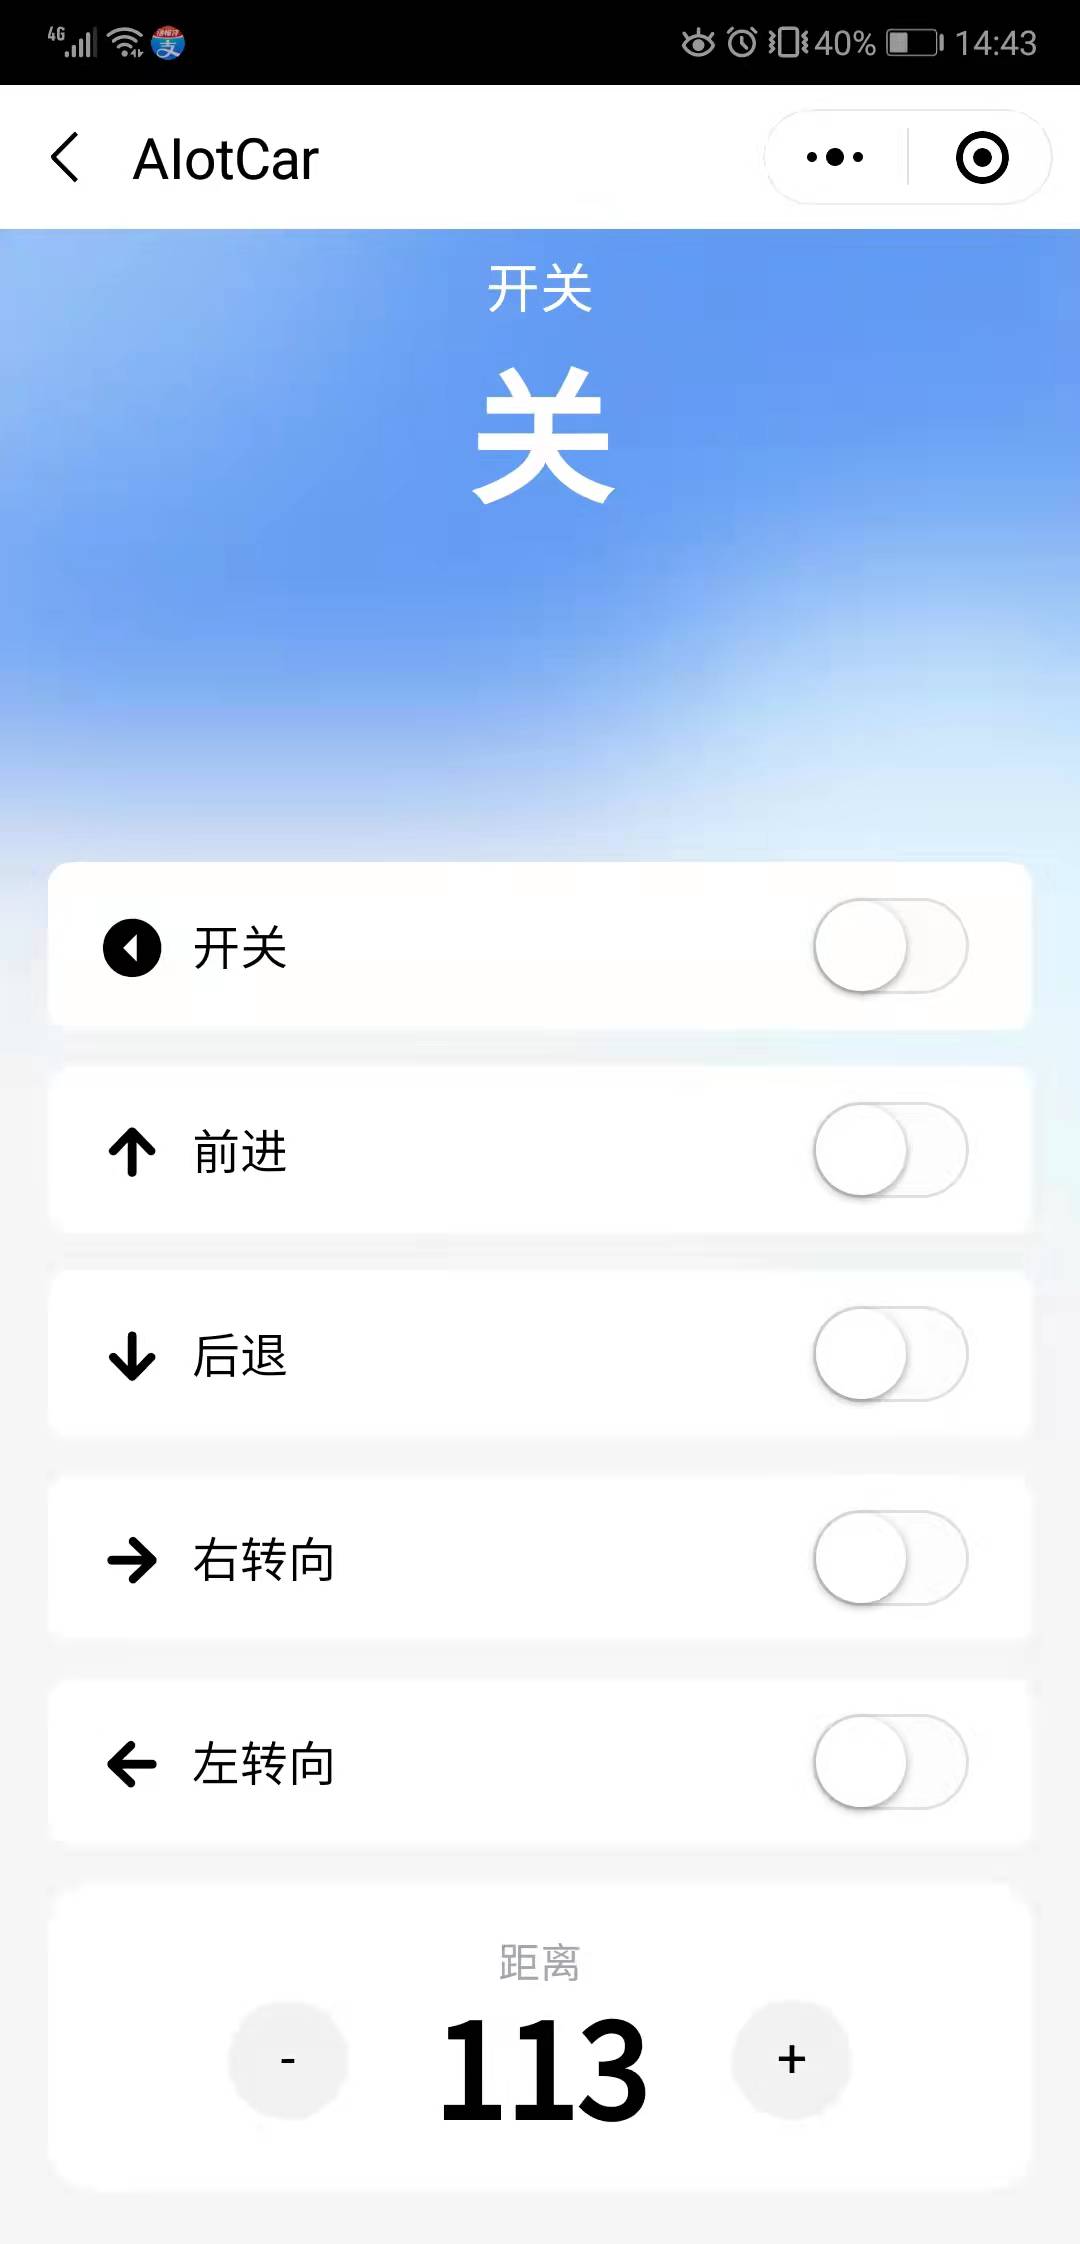
手机端
七,总结。
以前很少接触物联网方面的项目,随着物联网的普及应用,以后工作中可能会大量用到,通过这个项目,确实学到了很多知识,受益良多。自己按照教程,移植TencentOS Tiny 内核,仅仅几个步骤,非常简单。腾讯云IoT explorer平台初次使用,利用H5标准面板,上手非常快。工作中一直使用NXP的单片机,可以说非常有感情,如果能得到一块RT1062开发板,内心也是无限满足了,哈哈。
这次开发用的是NXP官方的开发工具MCUXpresso IDE ,用惯了keil,刚开始使用不太顺手,不过用习惯了,还是很好用的,功能非常强大。最重要的是keil是要版权的,官方能提供免费的IDE,真的该多多支持。
由于时间太紧,好多功能没来的及做,后面,有时间会继续完善,继续学习TencentOS Tiny和RT1062。
原创声明,本文系作者授权云+社区发表,未经许可,不得转载。
如有侵权,请联系 [email protected] 删除。
智能推荐
三分钟了解Activity工作流-程序员宅基地
文章浏览阅读2.1w次,点赞10次,收藏47次。文章目录一、 什么是工作流二、 工作流技术的优点三、 Java开发者会为什么要学Activity工作流四、 Activity工作流学习要点1、1个插件2、1个引擎3、1个配置文件4、5种数据库表5、23张表6、5项Service7、7项基本操作一、 什么是工作流以请假为例,现在大多数公司的请假流程是这样的员工打电话(或网聊)向上级提出请假申请——上级口头同意——上级将请假记录下来——月底将请假记录上交公司——公司将请假录入电脑采用工作流技术的公司的请假流程是这样的员工使用账户登录系统——点击请假—_activity工作流
c++课程作业-程序员宅基地
文章浏览阅读594次。#include #include #include#includeusing namespace std; class Student //通过定义一个类来定义数据录入的函数 { char name[20]; char number[20]; float maogai,modian,shudian,cpp,english,average,sum; int ta_c++课程作业
力扣经典150题第四十二题:字母异位词分组-程序员宅基地
文章浏览阅读985次,点赞16次,收藏19次。本篇博客介绍了力扣经典150题中的第四十二题:字母异位词分组。题目要求将给定的字符串数组中的字母异位词分组,并返回分组结果。输入: strs = [“eat”, “tea”, “tan”, “ate”, “nat”, “bat”],将其中字母异位词(由重新排列源单词的所有字母得到的新单词)组合在一起,最终返回分组后的结果列表。输出: [[“bat”],[“nat”,“tan”],[“ate”,“eat”,“tea”]]的长度,k 是字符串的最大长度。展示了几个不同的示例测试,验证了字母异位词分组的功能。
springboot报错---@RunWith(SpringRunner.class)_springrunner.class报错-程序员宅基地
文章浏览阅读2.4k次。@RunWith(SpringRunner.class)因为缺乏pom文件里Junit依赖导致。解决方法:在pom.xml里添加以下依赖<dependency> <groupId>org.springframework.boot</groupId> <artifactId>spring-boot-starter-test</artifactId> <scope>test</scope> </_springrunner.class报错
boost/lexical_cast.hpp的简单使用方法_行动_新浪博客-程序员宅基地
文章浏览阅读264次。boost/lexical_cast.hpp的简单使用方法_行动_新浪博客 boost/lexical_cast.hpp的简单使用方法_行动_新浪博客 boost/lexical_cast.hpp的简单使用方法 (2010-03-19 16:31:13)..._boost/lexical_cast.hpp
DELL戴尔服务器Windows Server 2008 2012 操作系统安装指导-U盘安装_戴尔s150阵列卡驱动2012_dell s150阵列-程序员宅基地
文章浏览阅读815次,点赞10次,收藏17次。4.2.如果是server2008,那么首先检查RAID是否配好,然后准备另外一个U盘,我们命名为U盘2,把阵列卡驱动放到U盘2中,插在服务器上,此时服务器插着两个U盘,一个是启动盘,一个是U盘2,在看到以上提示时,我们点击Load driver,然后如下图,点击浏览Browse,然后找到阵列卡驱动路径,一般是一个EXE可执行文件,选好后,下一步即可。2.以防步骤1中硬盘与服务器连接有问题,那么在服务器完全关机且切断电源的情况下,需要将硬盘拔下清理灰尘,在重新插上,然后上电开机。配置,而要 Import!_dell s150阵列
随便推点
开发与研发-程序员宅基地
文章浏览阅读229次。转:http://blog.sae.sina.com.cn/archives/981按:这几天我一直在写这篇东西,本来是胸有成竹,没想到后来越写越发现自己在这个题目下有太多话想说,而以我现在的能力又不能很好地概括总结,以至于越写越长,文章结构也变得混乱,到后来修改的时候每次都要考虑好久才能下笔,所以决定拆成两部分来发,以便阅读。这篇写得我心力交瘁,质量不算好,凑合着看吧。同样是写程序..._研发和开发
关于android双进程守护-后台持续定位功能+项目IM中写到自己的即时通讯_jobintentservice跨进程-程序员宅基地
文章浏览阅读1.6k次。1.关于进程守护无非就是6.0以下,6.0以上的高版本保活a.android中6.0以下的保护采用双线程守护即可是aidl (1)创建aidl文件 interface IServiceAidlInterface { String getServiceName(); } (2)创建本地service是LocalService类实现aid..._jobintentservice跨进程
FastGithub:github加速神器,解决github打不开、用户头像无法加载、releases无法上传下载、git-clone、git-pull、git-push失败等问题。_fastgithub 程序将自动关闭:系统已运行其它实例-程序员宅基地
文章浏览阅读657次。FastGithub:github加速神器,解决github打不开、用户头像无法加载、releases无法上传下载、git-clone、git-pull、git-push失败等问题。_fastgithub 程序将自动关闭:系统已运行其它实例
c++ 去除字符串中的空格和标点符号 (remove_if 函数的用法)_ctype.h去除空格-程序员宅基地
文章浏览阅读1.7w次,点赞8次,收藏26次。C++中提供了自动删除空格和标点符号的函数,使用如下:#include #include str_testing.erase( remove_if ( str_testing.begin(), str_testing.end(), static_cast(&ispunct) ), str_testing.end()); str_testing.erase( _ctype.h去除空格
单片机设计_俄罗斯方块游戏(AT89C51 LCD12864)_基于51单片机俄罗斯方块-程序员宅基地
文章浏览阅读7.2k次,点赞9次,收藏80次。此电路由AT89C51最小系统、12864显示模块和独立按键组成。可实现类似俄罗斯方块的游戏。_基于51单片机俄罗斯方块
中石油企业微信私有版设置服务器,企业微信授权配置教程-程序员宅基地
文章浏览阅读4k次。# **企业微信授权配置教程**## **1.创建企业微信应用*** 注册进入企业微信后台 https://work.weixin.qq.com/>[danger] ## **请先关闭自动欢迎语【重要】 设置欢迎语或直接导致无法收到*..._中石油企业微信 组织机构域