iOS16.1 实时活动 (Live Activity)&灵动岛适配-程序员宅基地
iOS16.1 实时活动 (Live Activity)&灵动岛适配
前言
苹果在 WWDC22 中,提出了实时活动(Live Activity)的概念,以便于用户在锁屏查看一些应用实时活动的更新。并且ActivityKit实现了灵动岛视图的自定义。经过我近两个月的学习,总结出了一些经验分享出来供大家批评和指正。
说明
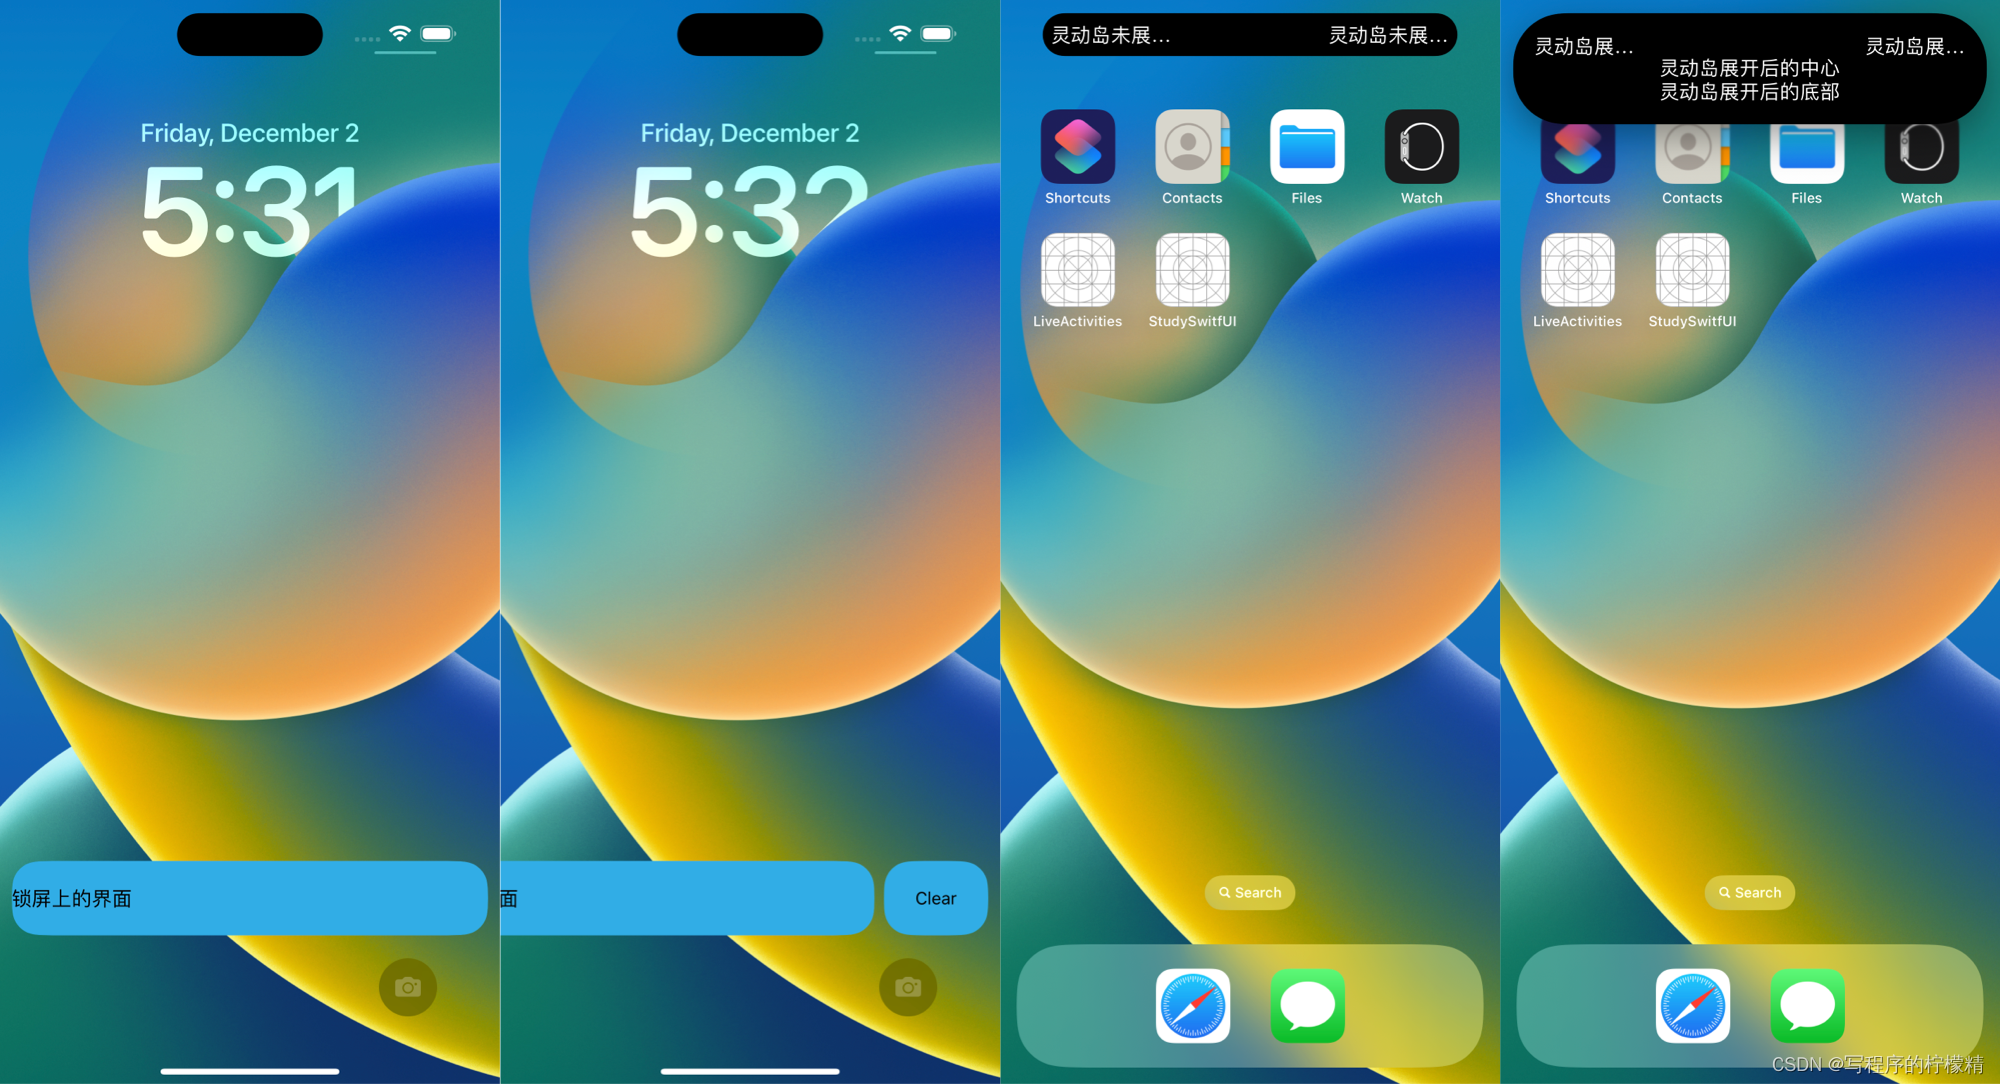
iOS16.1 锁屏界面上新增了实时活动界面,目前仅有iPhone 14 Pro和iPhone 14 Pro Max 两款机型上拥有灵动岛。实时活动包括了锁屏界面和灵动岛界面两个部分的内容,示例如下图所示:
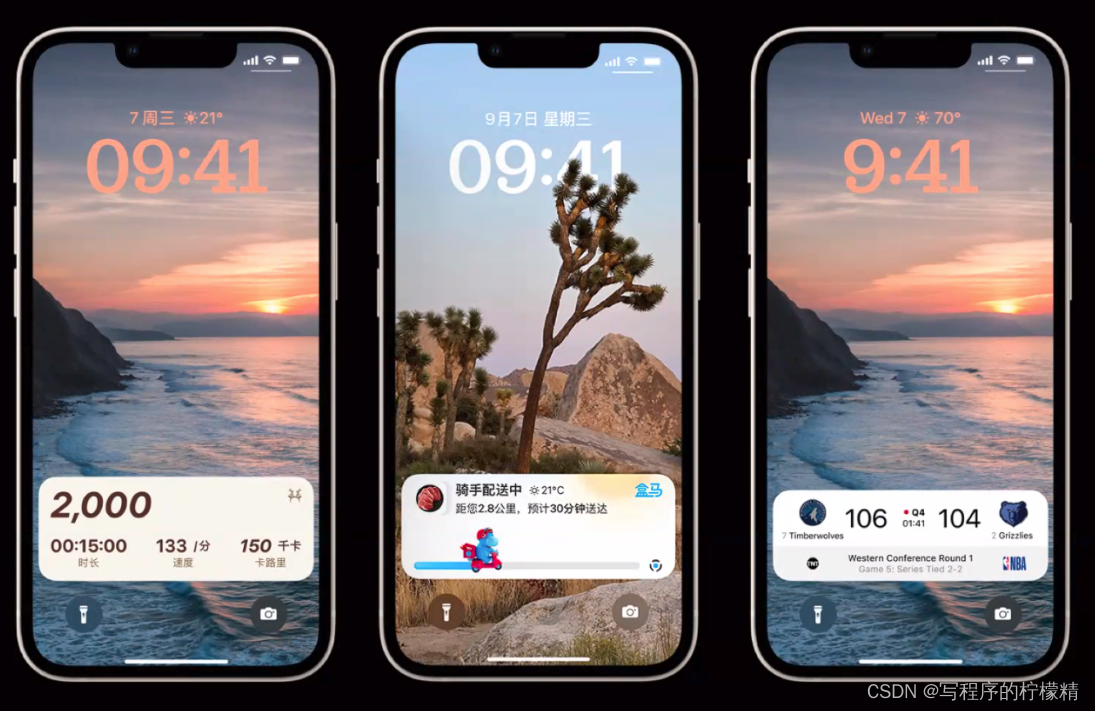
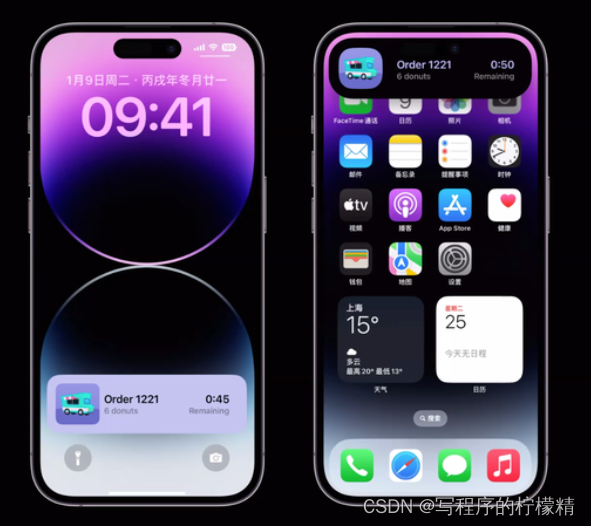
相较于iOS16.0的锁屏小组件,实时活动是显示在通知区域,且拥有更自由的视图定制和刷新方式。和小组件一样,它也限制了视图上的动画效果显示。我们可以使用实时更新来做一些有意思的设计和功能。例如上面演示的 运动监测、订单进度、赛事成绩等。
场景限制及建议(节选自参考文献1)
- 最多持续8小时,使用场景需要考虑,8小时之后无法再刷新(目前实际还可以,但是以官方文档为准,自行限制),12小时后强制消失(因此跨天场景不考虑)
- 创建时,需要app在前台主动创建,没启动应用的时候不能自己出现(与特定业务绑定,比如下单后显示)
- 卡片本身禁止定位以及网络请求,少量(4KB)数据可通过通知发送,或通过后台活动刷新数据
- 同场景多卡片由于样式趋同且折叠,不建议同时创建多卡片
灵动岛适配必要性(节选自参考文献1)
- 与锁屏Live Activity共享数据,在支持灵动岛的机型下,用户在非锁屏页面时,信息的更新会以灵动岛的形式展示更新
- Live Activity创建后,灵动岛就可以进行点击响应了,如果不适配的话,点击灵动岛会自动进入主程序,并且长按会变成一个没有任何信息的黑块
- iPhone14 Pro、iPhone14 Pro Max用户占比逐渐升高
开发基础知识(节选自参考文献2)
- 设备只支持iPhone,并且是有“药丸屏”的iPhone14Pro和14Pro Max上;
- Max系统版本、编译器及iOS系统版本:>=MacOS12.4、>=Xcode14.0+beta4、>=iOS16.1+beta;
- 使用 ActivityKit 用于配置、开始、更新、结束实现 Live Activity 能力。使用 WidgetKit 、SwiftUI在widget小组件中创建 Live Activity的用户界面,这样小组件和 Live Activity的代码是可以共享;
- Live Activity目前只能通过 ActivityKit 从主工程获取数据,或者从 远程通知 获取最新数据;无法访问网络或者接受位置更新信息
- ActivityKit 和 远程通知推送 更新的数据不能超过4KB;
- Live Activity可以给不同的控制绑定不同的 deeplink,使其跳转到不同的页面;
- Live Activity在用户主动结束前最多存活8小时;
- 已经结束的 Live Activity 在锁屏也最多保留4小时,所以一个Live Activity 最长可以停留12小时;
- 最多同时存在两组 Live Activity ,排列顺序待发现
- Live Activity只有Swift版本,项目是 OC的话需要桥接。
实现
一、主程序配置
需要在主程序的Info.plist中添加键值:Supports Live Activities为YES
二、扩展部分
1.创建WidgetExtension
如果项目中已经有WidgetExtension,可以直接快进到第二步。

2.认识代码
struct LiveActivitiesWidget: Widget {
var body: some WidgetConfiguration {
ActivityConfiguration(for: LiveActivitiesAttributes.self) {
context in
Text("锁屏上的界面")
.activityBackgroundTint(Color.cyan) // 背景色
.activitySystemActionForegroundColor(Color.black) // 系统操作的按钮字体色
} dynamicIsland: {
context in
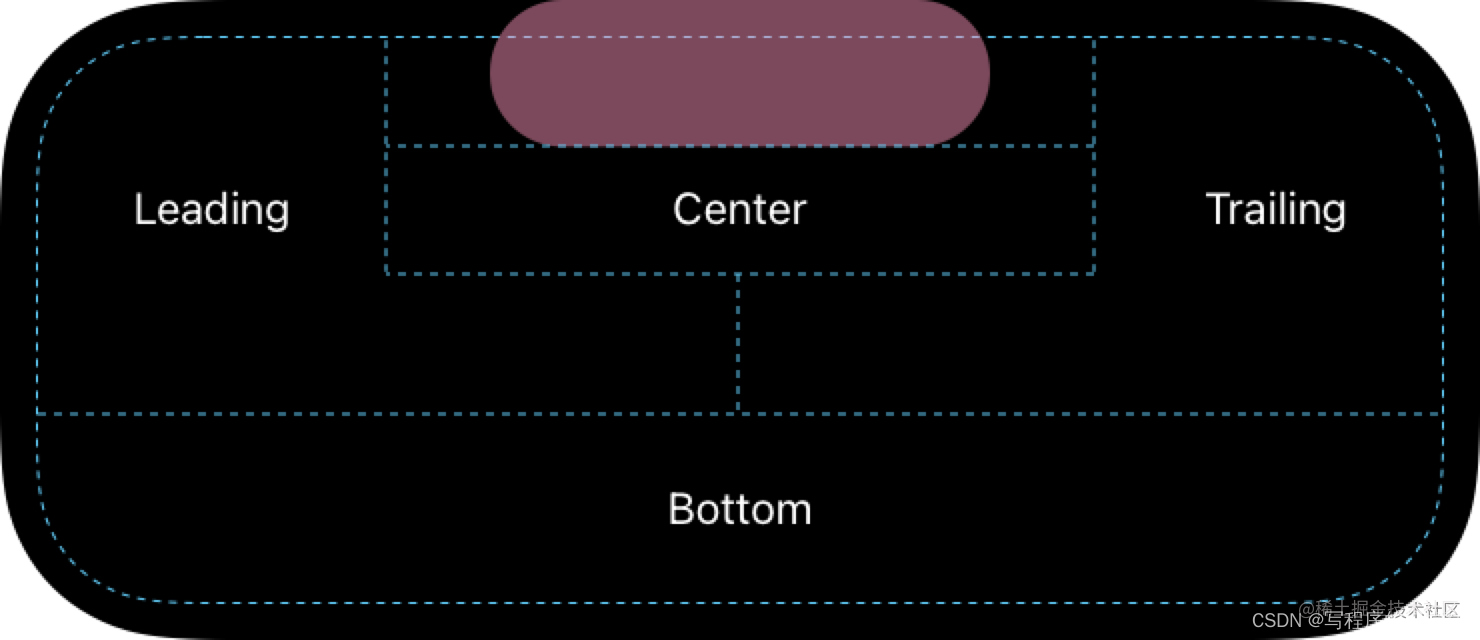
DynamicIsland {
DynamicIslandExpandedRegion(.leading) {
Text("灵动岛展开后的左边")
}
DynamicIslandExpandedRegion(.trailing) {
Text("灵动岛展开后的右边")
}
DynamicIslandExpandedRegion(.center) {
Text("灵动岛展开后的中心")
}
DynamicIslandExpandedRegion(.bottom) {
Text("灵动岛展开后的底部")
}
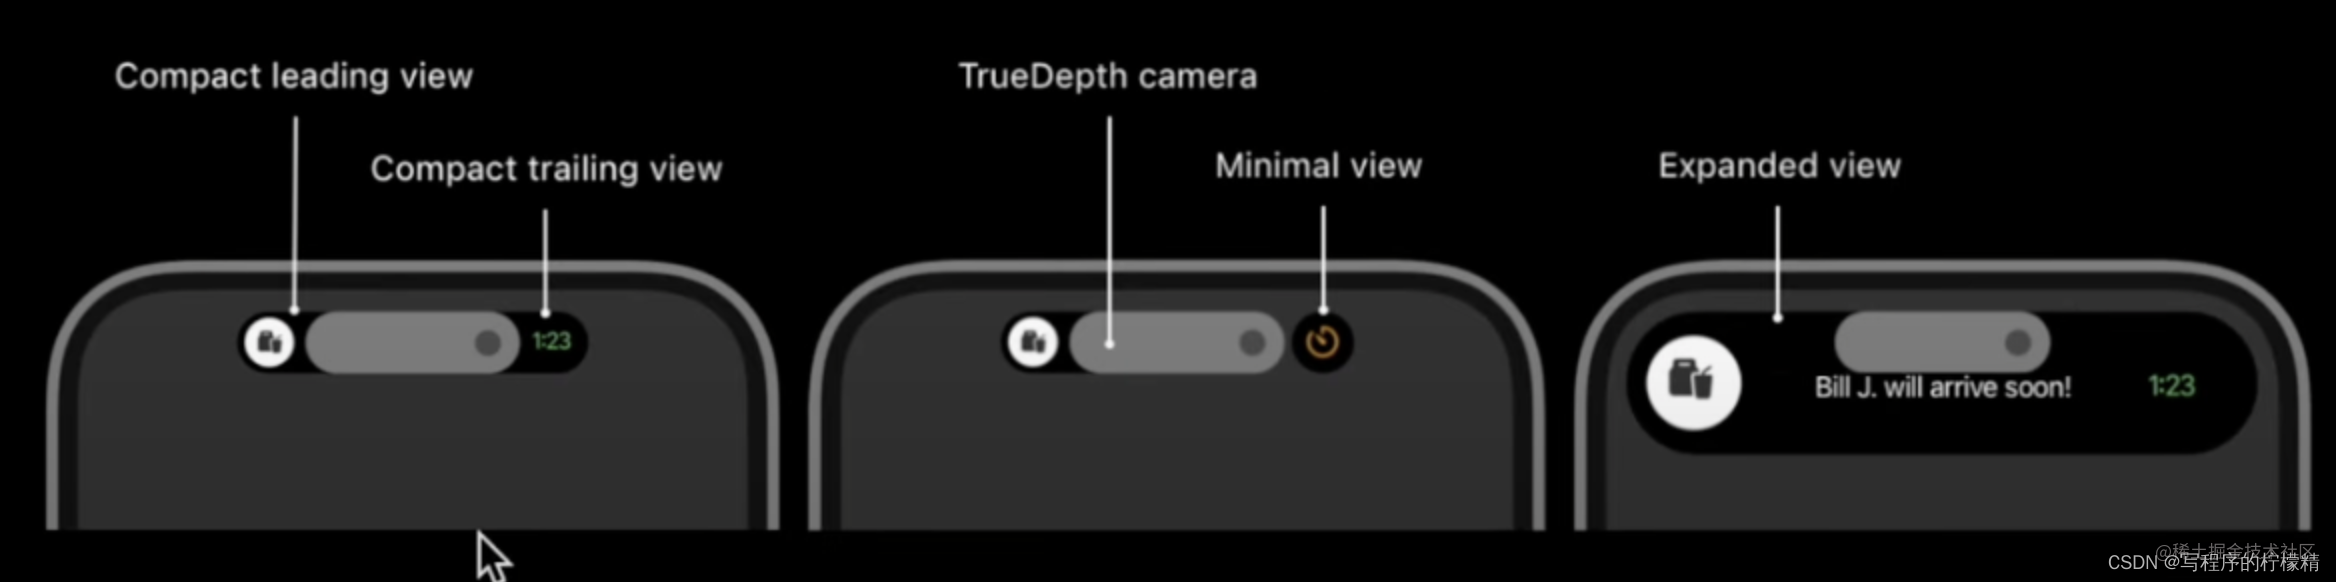
} compactLeading: {
Text("灵动岛未展开的左边")
} compactTrailing: {
Text("灵动岛未展开的右边")
} minimal: {
// 这里是灵动岛有多个任务的情况下,展示优先级高的任务,位置在右边的一个圆圈区域
Text("灵动岛Mini")
}
.widgetURL(URL(string: "http://www.apple.com")) // 点击整个区域,通过deeplink将数据传递给主工程,做相应的业务
.keylineTint(Color.red) // ///设置“动态岛”中显示的“活动”的关键帧线色调。
}
}
}
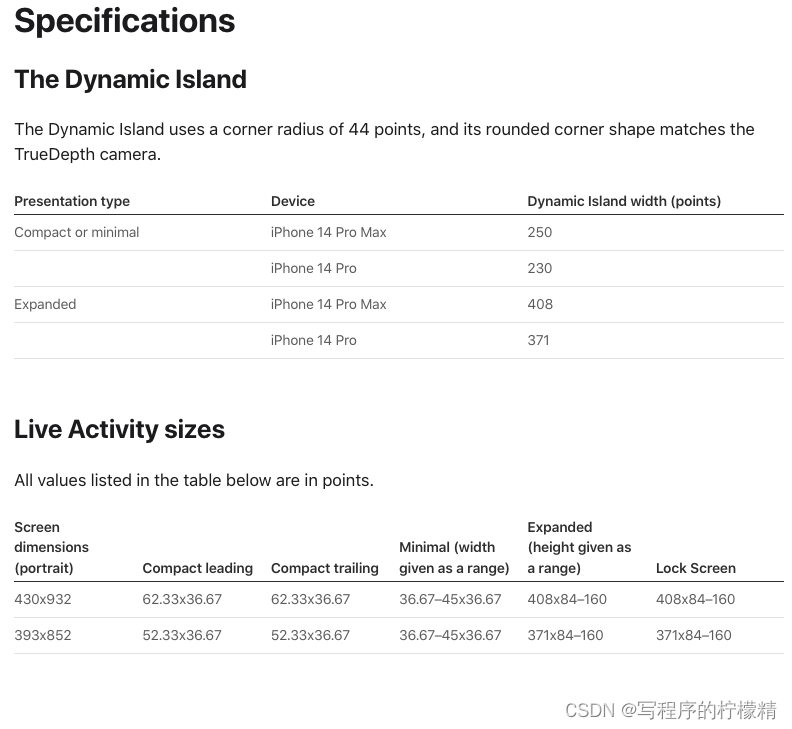
界面的相关设计规范请参考人机交互官方文档,参考文献3
3.定义数据部分
struct ActivityWidgetAttributes: ActivityAttributes {

    public struct ContentState: Codable, Hashable {

        var nickname: String // 用户对象的昵称
        ......
    }
    // Fixed non-changing properties about your activity go here!
    var name: String
}
数据由ContentState(可变部分) 和 不可变部分组成。更新所需要传递的就是可变部分的内容。
三、主程序部分
实时活动的开启、更新和结束都需要在主程序进行管理。
1.开启
// 使用方法
public static func request(attributes: Attributes, contentState: Activity<Attributes>.ContentState, pushType: PushType? = nil) throws -> Activity<Attributes>
--------------------------
private var myActivity: Activity<ActivityWidgetAttributes>? = nil

let initialContentState = ActivityWidgetAttributes.ContentState(nickName: "哈哈哈")
let activityAttributes = ActivityWidgetAttributes(name: "嘻嘻嘻")
do {

	// 本地更新的创建方式
	myActivity = try Activity.request(attributes: activityAttributes, contentState: initialContentState)
	// 通知更新的创建方式,需要传递pushType: .token
	myActivity = try Activity.request(attributes: activityAttributes, contentState: initialContentState, pushType: .token)
	print("Activity id : \(String(describing: cymActivity?.id ?? "nil")).")
} catch (let error) {

	print("ActivityError: \(error.localizedDescription)" )
}
2.更新
// 使用方法
public func update(using contentState: Activity<Attributes>.ContentState, alertConfiguration: AlertConfiguration? = nil) async
------------------------------------------------------------
// 更新内容
let updateStatus = ActivityWidgetAttributes.ContentState(nickName: "啊啊啊")
// 关于通知的配置
let alertConfiguration = AlertConfiguration(title: "111", body: "2222", sound: .default)
Task {

	await myActivity?.update(using: updateStatus, alertConfiguration: alertConfiguration)
}
3.结束
// 使用方法
public func end(using contentState: Activity<Attributes>.ContentState? = nil, dismissalPolicy: ActivityUIDismissalPolicy = .default) async
// 结束策略有3种
 	/// The system's default dismissal policy for the Live Activity.
    ///
    /// With the default dismissal policy, the system keeps a Live Activity that ended on the Lock Screen for
    /// up to four hours after it ends or the user removes it. The ``ActivityKit/ActivityState``
    /// doesn't change to ``ActivityKit/ActivityState/dismissed`` until the user or the system
    /// removes the Live Activity user interface.
    public static let `default`: ActivityUIDismissalPolicy

    /// The system immediately removes the Live Activity that ended.
    ///
    /// With the `immediate` dismissal policy, the system immediately removes the ended Live Activity
    /// and the ``ActivityKit/ActivityState`` changes to
    /// ``ActivityKit/ActivityState/dismissed``.
    public static let immediate: ActivityUIDismissalPolicy

    /// The system removes the Live Activity that ended at the specified time within a four-hour window.
    ///
    /// Provide a date to tell the system when it should remove a Live Activity that ended. While you can
    /// provide any date, the system removes a Live Activity that ended after the specified date or after four
    /// hours from the moment the Live Activity ended — whichever comes first. When the system
    /// removes the Live Activity,  the ``ActivityKit/ActivityState`` changes to ``ActivityKit/ActivityState/dismissed``.
    ///
    /// - Parameters:
    ///     - date: A date within a four-hour window from the moment the Live Activity ends.
    public static func after(_ date: Date) -> ActivityUIDismissalPolicy

--------------------------------------------------------------
Task {

    await myActivity?.end(using:nil, dismissalPolicy: .immediate)
}
4.状态获取
创建成功后可以使用activityStateUpdates监听到实时活动的状态
Task.detached {

	for awaitactivity in Activity<ActivityWidgetAttributes>.activities {

    	for await state in activity.activityStateUpdates {

        	if (state == .active) {

            /// The Live Activity is active, visible to the user, and can receive content updates.
            } else if (state == .ended) {

            /// The Live Activity is visible, but the user, app, or system ended it, and it won't update its content anymore.
            } else {
     // .dismissed
            /// The Live Activity ended and is no longer visible because the user or the system removed it.
            }
        }
    }
}
5.PushToken获取
如果需要使用通知进行更新,需要将PushToken发送给服务端。
// 创建时需要 pushType: .token
Activity.request(attributes: activityAttributes, contentState: initialContentState, pushType: .token)
// 创建成功后
Task.detached {

	for await activity in Activity<ActivityWidgetAttributes>.activities {

    	for await pushToken in activitie.pushTokenUpdates {

            	let mytoken = pushToken.map {
    String(format: "%02x", $0)}.joined().uppercased()
            	// pushToken 是Data 需要经过上面的方法 转换成String传递给服务端使用
            	print("push token", mytoken)
            }
        }
    }
}
6.权限

实时活动的权限无法监听获得,只能主动进行判断,需要在进行创建前进行判断来提示用户
// 实时活动是否可用,包括权限是否开启和手机是否支持实时活动
ActivityAuthorizationInfo().areActivitiesEnabled
// 获取已有的实时活动个数
Activity<ActivityWidgetAttributes>.activities.count
四、服务端部分
服务端需要使用p8 + jwt实现liveActivity的推送
// 推送配置
TEAM_ID=开发者账号里的TEAM_ID
AUTH_KEY_ID=p8推送需要的验证秘钥ID
TOPIC=主程序的Bundle Identifier.push-type.liveactivity
DEVICE_TOKEN=PushToken
APNS_HOST_NAME=api.sandbox.push.apple.com
// APS结构
{
    "aps": {

   "timestamp":1666667682, // 更新的时间
   "event": "update", // 事件选择更新,也可以进行结束操作
   "content-state": {
     // 需要与程序中的数据结构保持一致
      "nickname": "我来更新"
   },
   "alert": {
     // 通知配置
      "title": "Track Update",
      "body": "Tony Stark is now handling the delivery!"
   }
}}
五、Q&A
实时活动的网络研讨会上自由提问时间里一些开发者的问题和回答
Q:可以在didBecomeBackground的时刻启动LiveActivity吗?
A:有可能不成功,因为进入后台可能会导致无法取到PushToken
Q:灵动岛是否支持lottie svgs gif等动画吗
A:不行,自定义动画都不支持,系统会处理动画
Q:灵动岛如何进行调试,打断点调试无效
A:暂时无法回答
Q:可以使用ObjC实现实时活动吗
A:不行!ActivityKit Only Swift,需要进行桥接
Q:如何在Live Activity中获取WebImage
A:一次更新不能超过4KB,webimage最好下载好放在本地的
Q:是否可以创建一个Button处理点击事件,而不是打开App
A:不行,通过Link和widgetURL,点击就会自动打开你的App
Q:如果用户没有开启APP的推送权限,会导致无法实施实时活动吗
A:不会,通知推送和实时活动的推送是两套不同的系统,只要实时活动权限开启即可
Q:灵动岛和实时活动一样最多显示8小时吗
A:是的
参考文献
本人新手,如果有写错的地方欢迎指正,期待和大家一起交流开发。
1.《盒马 iOS Live Activity &“灵动岛”配送场景实践》
2.《iOS灵动岛开发实践》
3.《Apple Developer-Design-Live Activities》
4.《iOS 使用推送通知更新 Dynamic Island 和 Live Activity》
5.《Mastering Dynamic Island in SwiftUI》
记录一个很严重的问题
产品要求:将用户头像和一些数据显示在实时活动和灵动岛上,随即使用AppGroup保存头像,在创建实时活动时取出头像使用,但是发生了一个很严重的问题。
测试员使用四台手机 iPhone 12、iPhone X、iPhone XR、iPhone 11(iOS版本全部为 16.1.1)进行了测试,iPhone 12、iPhone X成功的显示了实时活动,但是iPhone XR、iPhone 11却没有显示,在Log中发现实时活动虽然被创建了,但是立马被系统删除了。
经过一下午的实验,终于发现
// 主程序保存头像
NSURL *imageURL = [NSURL URLWithString:@"https://xxxxxxxxxxxx.png"];
[[SDWebImageDownloader sharedDownloader] downloadImageWithURL:imageURL completed:^(UIImage * _Nullable image, NSData * _Nullable data, NSError * _Nullable error, BOOL finished) {

    if (finished && image) {

        NSFileManager *fileManager = [NSFileManager defaultManager];
        NSURL *pathURL = [fileManager containerURLForSecurityApplicationGroupIdentifier:@"group.app.???.???"];
        pathURL = [pathURL URLByAppendingPathComponent:@"ActivityLoverAvatar.png"];
        NSData *imageData = UIImagePNGRepresentation(image);
        BOOL success = [imageData writeToURL:pathURL atomically:YES];
        ...
        // 创建实时活动
    } else {

        ...
        // 处理错误
    }
}];

// 实时活动获取对象头像
func getLoveryAvatatImage()->Image {

    let manager = FileManager.default
    let floderURL:URL = manager.containerURL(forSecurityApplicationGroupIdentifier: "group.app.???.???")!
    let fileURL:URL = floderURL.appendingPathComponent("ActivityLoverAvatar.png")
    do {

        let data: Data = try Data.init(contentsOf: fileURL)
        let image = UIImage.init(data: data)
        return Image(uiImage: image!)
    } catch let error{

        print(error.localizedDescription)
        return Image("placeholderImage")
    }
}

// 实时活动Widget配置
struct ActivityWidget: Widget {

    var body: some WidgetConfiguration {

        ActivityConfiguration(for: ActivityWidgetAttributes.self) {
     context in
            ActivityWidgetMainView(context: context) // 内部使用了 getLoveryAvatatImage()
        } dynamicIsland: {
     context in
            DynamicIsland {

                // Expanded UI goes here.  Compose the expanded UI through
                // various regions, like leading/trailing/center/bottom
                DynamicIslandExpandedRegion(.leading, priority: 1) {

                    ActivityWidgetMainDynamicIslandView(context: context) //内部使用了 getLoveryAvatatImage()
                        .dynamicIsland(verticalPlacement: .belowIfTooWide)
                        .padding(0)
                }

            } compactLeading: {

               getLoveryAvatatImage()
                    .resizable()
                    .frame(width: 22, height: 22)
                    .clipShape(Circle())
            } compactTrailing: {

                Image(getIconImageName(context.state.iconName))
                    .resizable()
                    .frame(width: 17, height: 17)
            } minimal: {

                getLoveryAvatatImage()
                    .resizable()
                    .frame(width: 22, height: 22)
                    .clipShape(Circle())
            }
        }
    }
}
代码中一共有4处使用了 getLoveryAvatatImage() 方法,如果删除minimal和compactLeading中的getLoveryAvatatImage(),不能正常显示的两个手机就可以正常显示了。所以,建议设计师将这两处换成了显示App的Logo图片了。
// 实时活动Widget配置
struct ActivityWidget: Widget {

    var body: some WidgetConfiguration {

        ActivityConfiguration(for: ActivityWidgetAttributes.self) {
     context in
            ActivityWidgetMainView(context: context) // 内部使用了 getLoveryAvatatImage()
        } dynamicIsland: {
     context in
            DynamicIsland {

                // Expanded UI goes here.  Compose the expanded UI through
                // various regions, like leading/trailing/center/bottom
                DynamicIslandExpandedRegion(.leading, priority: 1) {

                    ActivityWidgetMainDynamicIslandView(context: context) //内部使用了 getLoveryAvatatImage()
                        .dynamicIsland(verticalPlacement: .belowIfTooWide)
                        .padding(0)
                }

            } compactLeading: {

               Image("AppLogo")
                    .resizable()
                    .frame(width: 22, height: 22)
                    .clipShape(Circle())
            } compactTrailing: {

                Image(getIconImageName(context.state.iconName))
                    .resizable()
                    .frame(width: 17, height: 17)
            } minimal: {

                Image("AppLogo")
                    .resizable()
                    .frame(width: 22, height: 22)
                    .clipShape(Circle())
            }
        }
    }
}
但是这个问题的根本原因却不知道,因为有的手机是可以正常使用的,只有那两台测试机无法正常使用。如果有人知道为什么请私信我,大家一起讨论,谢谢!!!
智能推荐
Vue中使用Datav 完成大屏基本布局_datav大屏-程序员宅基地
文章浏览阅读2.5w次,点赞25次,收藏136次。Vue就像一个大房子,可以集成组件一起使用。Datav + Vue-Baidu-Map + ECharts,相互一起使用。经过这一套流程我们就可以快速搭建出属于自己的大屏框架,在根据实际需求进行更改。_datav大屏
关于import tensorflow报错ImportError: DLL load failed的解决办法_导入tensorflow时dll load failed while importing _pywr-程序员宅基地
文章浏览阅读430次。我安装了tensorflow的cpu版,import tensorflow 报ImportError: DLL load failed错误,原因是安装的tensorflow 2.1版本不兼容旧版本cpu,解决办法是通过pip uninstall protobufpip uninstall tensorflow卸载已安装tensorflow,通过pip install --ignore-i..._导入tensorflow时dll load failed while importing _pywrap_tf2: 动态链接库(dll)
java中excel文件上传_java上传excel-程序员宅基地
文章浏览阅读3.5k次,点赞3次,收藏2次。excel文件上传_java上传excel
关于purge master logs的一个小实验-程序员宅基地
文章浏览阅读751次。原理部分来自《MariaDB原理与实现》 Page109-111purge删除binlog的过程如下:1、检查to_log在mysql-bin.index中是否存在,避免非法的purge操作2、创建一个purge_index_file,用于保存待删除的binlog文件名称3、遍历index文件,将可删除的binlog添加到purge_index_file中(purge删除时候..._purge master与purge purge
李宏毅2022机器学习/深度学习 个人笔记(3)-程序员宅基地
文章浏览阅读263次。接下来李宏毅教授介绍了梯度下降的优化方案,如采用动量、RMSProp、Learning Rate Decay、Warm Up等。接下来介绍遇到鞍点时的优化办法。接下来探讨,当optimization不佳的时候,如何判断是遇到了鞍点还是遇到了局部最小值点?而红框是一个二次型,若二次型矩阵是正定或者负定的,则可直接判断出该点是局部最小还是局部最大。本系列用于推导、记录该系列视频中本人不熟悉、或认为有价值的知识点。当然,这个方法不多用,只是介绍,顺便复习有关知识即可。关于多元函数泰勒公式,可参考。
vue多层嵌套下的数据绑定_vue多层嵌套数据绑定-程序员宅基地
文章浏览阅读4.2k次。vue作为数据驱动,通过数据和视窗view层绑定,操作数据即可触发view层的更新,所以数据绑定尤为重要单层的数据绑定很简单,父组件传值进去,子组件通过props获取,然后通过$emit事件携带参数回调父组件<v-child :vlaue="data" @update="update"></v-child>子组件<template> <inp..._vue多层嵌套数据绑定
随便推点
计算机毕业设计源代码 javaSSM274基于VUE酒店客房管理系统 论文答辩ppt_ssm酒店管理系统ppt-程序员宅基地
文章浏览阅读556次。这是新款的java ssm项目源码,开发工具:idea,也支持eclipse,数据库:MySQL功能也比较全面,比较适合作为毕业设计使用运行环境:最好是javajdk1.8,我们在这个平台上运行的。其他版本理论上也可以。IDE环境:Eclipse,Myeclipse,IDEA或者SpringToolSuite都可以tomcat环境:Tomcat7.x,8.x,9.x版本均可操作系统环境:WindowsXP/7/8/10或者Linux或者MacOS,2G内存以上(推荐4G,4G以..._ssm酒店管理系统ppt
最详细的Centos7 gcc4.9升级gcc10_centos 安装 gcc10-程序员宅基地
文章浏览阅读3.9k次,点赞3次,收藏9次。文章目录1.准备源码包2.安装GMP3.安装MPFR4.安装MPC5.安装GCC106.GCC版本更新6.1备份旧版本gcc6.2为gcc10创建软链接6.3替换libstdc++.so.6附录最近编译gtest源码时,由于gcc版本太低,编译报错。看到gtest里面写的要求gcc5.0以上版本,于是我直接升级到了gcc10,可以使用更多新特性。1.准备源码包安装gcc10,下面的几个源码包必不可少gcc10下载地址:https://mirrors.aliyun.com/gnu/gcc/gcc-_centos 安装 gcc10
Windows下安装 git_windows 安装git-程序员宅基地
文章浏览阅读307次。目录下载安装包安装教程下载安装包http://git-scm.com/点击下载按钮可以直接下载 git 安装文件。如果想要学习关于 git 相关内容的话,官网也有中文版的电子书,如下:安装教程这里有别人写好的,很详细,我就偷个懒吧Git安装教程(Windows安装超详细教程)..._windows 安装git
Uncaught DONException: Failed to execute ‘atob‘ on “window ‘: The string to be decoded is not carrec_failed to execute 'atob' on 'window': the string t-程序员宅基地
文章浏览阅读1.9w次,点赞2次,收藏6次。在console出现了标题这段报错,原因是编码的字符串中含有“-”或者“_”。解决办法如下:// 将上面这段改为下面这段代码//var bstr = atob(arr[1]);var bstr = decodeURIComponent(escape(atob(arr[1])));_failed to execute 'atob' on 'window': the string to be decoded is not correc
计算机中丢失msvcp140.dll无法启动此程序怎么办?msvcp140.dll在哪里_无法启动此程序因为计算机丢失msvcp140d.dll-程序员宅基地
文章浏览阅读577次。计算机中丢失msvcp140.dll无法启动此程序怎么办?msvcp140.dll在哪里_无法启动此程序因为计算机丢失msvcp140d.dll
16bit高精度、250MSPS采样率,支持4通道同步采集、2通道同步输出的高速数据采集卡_16bit精度-程序员宅基地
文章浏览阅读723次。N-LINX 是南科复华信息科技研发的一款同时具备交流耦合程控放大器和支持单、双极性宽带信号输入的高速数据采集卡;板载FPGA具备实时信号处理能力,这些特性使N-LINX成为激光雷达、光电倍增管应用以及光纤传感等领域进行信号采集和分析的理想工具。N-LINX提供快速的PCI Express3.0x8数据传输接口,以及灵活配置的硬件组合,获得性能、功耗和成本之间的佳平衡,尤其适合于OEM应用。南科复华高速数据采集卡N-LINX的应用领域,激光雷达系统;光电倍增管采集系统;雷电定位系统等其他相关领域。_16bit精度