[Spring MVC] @Configuration 的用法_spring mvc @configuration-程序员宅基地
技术标签: Spring
原文出处:https://www.cnblogs.com/duanxz/p/7493276.html
从Spring3.0,@Configuration用于定义配置类,可替换xml配置文件,被注解的类内部包含有一个或多个被@Bean注解的方法,这些方法将会被AnnotationConfigApplicationContext或AnnotationConfigWebApplicationContext类进行扫描,并用于构建bean定义,初始化Spring容器。
注意:@Configuration注解的配置类有如下要求:
@Configuration不可以是final类型;
@Configuration不可以是匿名类;
嵌套的configuration必须是静态类。
一、用@Configuration加载spring
1.1、@Configuration配置spring并启动spring容器
1.2、@Configuration启动容器+@Bean注册Bean
1.3、@Configuration启动容器+@Component注册Bean
1.4、使用 AnnotationConfigApplicationContext 注册 AppContext 类的两种方法
1.5、配置Web应用程序(web.xml中配置AnnotationConfigApplicationContext)
二、组合多个配置类
2.1、在@configuration中引入spring的xml配置文件
2.2、在@configuration中引入其它注解配置
2.3、@configuration嵌套(嵌套的Configuration必须是静态类)
三、@EnableXXX注解
四、@Profile逻辑组配置
五、使用外部变量
@Configuation加载Spring方法
@Configuation注解一个类配置应用上下文
用@Configuation注解一个类,这个类相当于Spring容器的应用上下文(xml)
配置类
package test;
import org.springframework.context.annotation.Configuration;
@Configuration
public class BeansContainer {
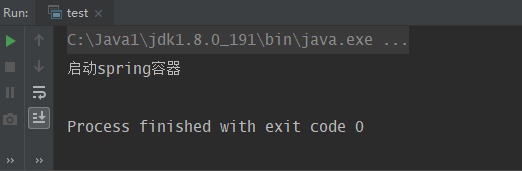
public BeansContainer(){
System.out.println("启动spring容器");
}
}
相当于,这个xml应用上下文
<?xml version="1.0" encoding="UTF-8"?>
<beans xmlns="http://www.springframework.org/schema/beans" xmlns:xsi="http://www.w3.org/2001/XMLSchema-instance"
    xmlns:context="http://www.springframework.org/schema/context" xmlns:jdbc="http://www.springframework.org/schema/jdbc"
    xmlns:jee="http://www.springframework.org/schema/jee" xmlns:tx="http://www.springframework.org/schema/tx"
    xmlns:util="http://www.springframework.org/schema/util" xmlns:task="http://www.springframework.org/schema/task" xsi:schemaLocation="
        http://www.springframework.org/schema/beans http://www.springframework.org/schema/beans/spring-beans-4.0.xsd
        http://www.springframework.org/schema/context http://www.springframework.org/schema/context/spring-context-4.0.xsd
        http://www.springframework.org/schema/jdbc http://www.springframework.org/schema/jdbc/spring-jdbc-4.0.xsd
        http://www.springframework.org/schema/jee http://www.springframework.org/schema/jee/spring-jee-4.0.xsd
        http://www.springframework.org/schema/tx http://www.springframework.org/schema/tx/spring-tx-4.0.xsd
        http://www.springframework.org/schema/util http://www.springframework.org/schema/util/spring-util-4.0.xsd
        http://www.springframework.org/schema/task http://www.springframework.org/schema/task/spring-task-4.0.xsd" default-lazy-init="false">


</beans>
测试
package test;

import org.springframework.context.annotation.AnnotationConfigApplicationContext;
import org.springframework.context.support.AbstractApplicationContext;

public class test {
    public static void main(String[] args){
        AbstractApplicationContext context
                = new AnnotationConfigApplicationContext(BeansContainer.class);
    }
}
结果
@Configuration启动容器+@Bean注册Bean,@Bean下管理bean的生命周期
@Bean标注在方法上(返回某个实例的方法),等价于spring的xml配置文件中的,作用为:注册bean对象
bean类:
package test;
import org.springframework.context.annotation.Bean;
import org.springframework.context.annotation.Configuration;
import org.springframework.context.annotation.Scope;
@Configuration
public class BeansContainer {
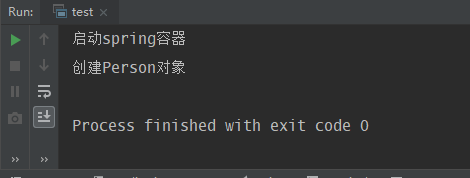
public BeansContainer(){
System.out.println("启动spring容器");
}
@Bean("person")
@Scope("prototype")
public Person createPerson(){
return new Person();
}
}
配置类
package test;

import org.springframework.context.annotation.Bean;
import org.springframework.context.annotation.Configuration;
import org.springframework.context.annotation.Scope;


@Configuration
public class BeansContainer {
    public BeansContainer(){
        System.out.println("启动spring容器");
    }

    @Bean("person")
    @Scope("prototype")
    public Person createPerson(){
        return new Person();
    }


}
测试
package test;

import org.springframework.context.annotation.AnnotationConfigApplicationContext;
import org.springframework.context.support.AbstractApplicationContext;

public class test {
    public static void main(String[] args){
        AbstractApplicationContext context
                = new AnnotationConfigApplicationContext(BeansContainer.class);

        Person person = context.getBean("person",Person.class);
    }
}
结果
注:
(1)、@Bean注解在返回实例的方法上,如果未通过@Bean指定bean的名称,则默认与标注的方法名相同;
(2)、@Bean注解默认作用域为单例singleton作用域,可通过@Scope(“prototype”)设置为原型作用域;
(3)、既然@Bean的作用是注册bean对象,那么完全可以使用@Component、@Controller、@Service、@Ripository等注解注册bean,当然需要配置@ComponentScan注解进行自动扫描。
@Bean下管理bean的生命周期
可以使用基于 Java 的配置来管理 bean 的生命周期。@Bean 支持两种属性,即 initMethod 和destroyMethod,这些属性可用于定义生命周期方法。在实例化 bean 或即将销毁它时,容器便可调用生命周期方法。生命周期方法也称为回调方法,因为它将由容器调用。使用 @Bean 注释注册的 bean 也支持 JSR-250 规定的标准 @PostConstruct 和 @PreDestroy 注释。如果您正在使用 XML 方法来定义 bean,那么就应该使用 bean 元素来定义生命周期回调方法。以下代码显示了在 XML 配置中通常使用 bean 元素定义回调的方法。
bean类
package test;
public class Person {
private String name;
public Person(){
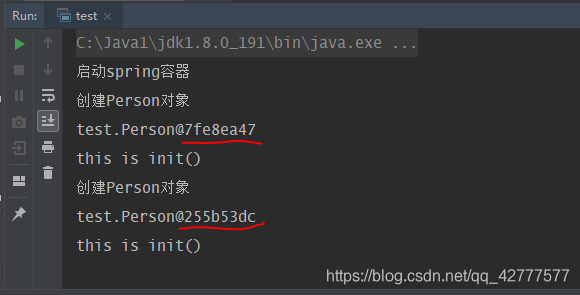
System.out.println("创建Person对象");
System.out.println(this);
}
public String getName() {
return name;
}
public void setName(String name) {
this.name = name;
}
public void init(){
System.out.println("this is init()");
}
public void destroy(){
System.out.println("this is destroy");
}
}
配置类
package test;

import org.springframework.context.annotation.Bean;
import org.springframework.context.annotation.Configuration;
import org.springframework.context.annotation.Scope;


@Configuration
public class BeansContainer {
    public BeansContainer(){
        System.out.println("启动spring容器");
    }

    @Bean(name = "person",initMethod = "init",destroyMethod = "destroy")
    @Scope("prototype")
    public Person createPerson(){
        return new Person();
    }


}
测试
package test;

import org.springframework.context.annotation.AnnotationConfigApplicationContext;
import org.springframework.context.support.AbstractApplicationContext;

public class test {
    public static void main(String[] args){
        AbstractApplicationContext context
                = new AnnotationConfigApplicationContext(BeansContainer.class);

        Person person = context.getBean("person",Person.class);

        Person person2 = context.getBean("person",Person.class);


    }
}
结果
分析:
结果中的1:表明initMethod生效
结果中的2:表明@Scope("prototype")生效
@Configuration启动容器+@Component注册Bean
bean类:
package test;

import org.springframework.stereotype.Component;

@Component("p")
public class Person {
    private String name;
    public Person(){
        System.out.println("创建Person对象");
        System.out.println(this);
    }

    public String getName() {
        return name;
    }

    public void setName(String name) {
        this.name = name;
    }

    public void init(){
        System.out.println("this is init()");
    }

    public void destroy(){
        System.out.println("this is destroy");
    }

}
配置类
package test;

import org.springframework.context.annotation.*;


@Configuration
@ComponentScan(basePackages = "test")
public class BeansContainer {
    public BeansContainer(){
        System.out.println("启动spring容器");
    }

    /**
    @Bean(name = "person",initMethod = "init",destroyMethod = "destroy")
    @Scope("prototype")
    public Person createPerson(){
        return new Person();
    }*/


}
测试
package test;

import org.springframework.context.annotation.AnnotationConfigApplicationContext;
import org.springframework.context.support.AbstractApplicationContext;

public class test {
    public static void main(String[] args){
        AbstractApplicationContext context
                = new AnnotationConfigApplicationContext(BeansContainer.class);

        Person person = context.getBean("p",Person.class);

    }
}
@Component("beanName")指定bean的名字,便于取用bean
使用 AnnotationConfigApplicationContext 注册 AppContext 类的两种方法
配置类的注册方式是将其传递给 AnnotationConfigApplicationContext 构造函数
	// @Configuration注解的spring容器加载方式,用AnnotationConfigApplicationContext替换ClassPathXmlApplicationContext
    ApplicationContext context = new AnnotationConfigApplicationContext(TestConfiguration.class);

	//获取bean
	TestBean tb = (TestBean) context.getBean("testBean");
	tb.sayHello();
AnnotationConfigApplicationContext 的register 方法传入配置类来注册配置类
public static void main(String[] args) {
  ApplicationContext ctx = new AnnotationConfigApplicationContext();
  ctx.register(AppContext.class)
}
配置Web应用程序(web.xml中配置AnnotationConfigApplicationContext)
过去,您通常要利用 XmlWebApplicationContext 上下文来配置 Spring Web 应用程序,即在 Web 部署描述符文件 web.xml 中指定外部 XML 上下文文件的路径。XMLWebApplicationContext 是 Web 应用程序使用的默认上下文类。以下代码描述了 web.xml 中指向将由 ContextLoaderListener 监听器类载入的外部 XML 上下文文件的元素。
<web-app>
    <context-param>
        <param-name>contextConfigLocation</param-name>
        <param-value>/WEB-INF/applicationContext.xml</param-value>
    </context-param>
    <listener>
        <listener-class>
            org.springframework.web.context.ContextLoaderListener
        </listener-class>
    </listener>
    <servlet>
    <servlet-name>sampleServlet</servlet-name>
    <servlet-class>
        org.springframework.web.servlet.DispatcherServlet
    </servlet-class>
    </servlet>

...
</web-app>
现在,您要将 web.xml 中的上述代码更改为使用 AnnotationConfigApplicationContext 类。切记,XmlWebApplicationContext 是 Spring 为 Web 应用程序使用的默认上下文实现,因此您永远不必在您的web.xml 文件中显式指定这个上下文类。现在,您将使用基于 Java 的配置,因此在配置 Web 应用程序时,需要在web.xml 文件中指定 AnnotationConfigApplicationContext 类。上述代码将修改如下:
<web-app>
    <context-param>
        <param-name>contextClass</param-name>
        <param-value>
            org.springframework.web.context.
            support.AnnotationConfigWebApplicationContext
        </param-value>
    </context-param>
    <context-param>
        <param-name>contextConfigLocation</param-name>
        <param-value>
            demo.AppContext
        </param-value>
    </context-param>
    <listener>
        <listener-class>
            org.springframework.web.context.ContextLoaderListener
        </listener-class>
    </listener>
    <servlet>
    <servlet-name>sampleServlet</servlet-name>
    <servlet-class>
        org.springframework.web.servlet.DispatcherServlet
    </servlet-class>
    <init-param>
        <param-name>contextClass</param-name>
        <param-value>
            org.springframework.web.context.
            support.AnnotationConfigWebApplicationContext
        </param-value>
    </init-param>
    </servlet>

...
</web-app>
以上修改后的 web.xml 现在定义了 AnnotationConfigWebApplicationContext 上下文类,并将其作为上下文参数和 servlet 元素的一部分。上下文配置位置现在指向 AppContext 配置类。这非常简单。下一节将演示 bean 的生命周期回调和范围的实现。
@Configuation总结
@Configuation等价于 <Beans></Beans>
@Bean等价于<Bean></Bean>
@ComponentScan等价于<context:component-scan base-package="com.dxz.demo"/>
组合多个配置类
在@configuration中引入spring的xml配置文件
配置类
package test;

import org.springframework.context.annotation.*;
import test2.Config;

@Configuration
@ImportResource("classpath:xspringmvc-servlet.xml")
@ComponentScan(basePackages = "test")
public class BeansContainer {
    public BeansContainer(){
        System.out.println("启动spring容器");
    }
}
xml文件
<?xml version="1.0" encoding="UTF-8"?>
<beans xmlns="http://www.springframework.org/schema/beans"
       xmlns:xsi="http://www.w3.org/2001/XMLSchema-instance"
       xmlns:context="http://www.springframework.org/schema/context"
       xsi:schemaLocation="http://www.springframework.org/schema/beans http://www.springframework.org/schema/beans/spring-beans.xsd http://www.springframework.org/schema/context https://www.springframework.org/schema/context/spring-context.xsd">


    <bean id="multipartResolver" class="org.springframework.web.multipart.commons.CommonsMultipartResolver">
        <!-- 支持的其中一个属性,支持的最大文件大小,以字节为单位 -->
        <property name="maxUploadSize" value="100000"/>
    </bean>
    <bean
</beans>
这里很遗憾,我想添加以上bean时,会报错,可能跟依赖有关系,导入自己的bean是可以的。
在@configuration中引入其它注解配置
配置类
package test;

import org.springframework.context.annotation.*;
import test2.Config;


@Configuration
@Import(Config.class)
@ComponentScan(basePackages = "test")
public class BeansContainer {
    public BeansContainer(){
        System.out.println("启动spring容器");
    }

}
package test2;

import org.springframework.context.annotation.Bean;
import org.springframework.context.annotation.Configuration;

@Configuration
public class Config {
    public Config(){
        System.out.println("启动Config容器");
    }
    @Bean
    public Student student(){
        return new Student();
    }


}
@configuration嵌套(嵌套的Configuration必须是静态类)
通过配置类嵌套的配置类,达到组合多个配置类的目的。但注意内部类必须是静态类
package test;

import org.springframework.context.annotation.*;
import test2.Config;


@Configuration
@ComponentScan(basePackages = "test")
public class BeansContainer {
    public BeansContainer(){
        System.out.println("启动spring容器");
    }

    @Configuration
    static class innerBeansContainer{
        public innerBeansContainer(){
            System.out.println("启动BeansContainer容器");
        }
        @Bean
        public boss boss(){
            return new boss();
        }

    }
}
智能推荐
MyBatis 插件 : 打印 SQL 及其执行时间-程序员宅基地
文章浏览阅读884次。Plugins摘一段来自MyBatis官方文档的文字。MyBatis允许你在某一点拦截已映射语句执行的调用。默认情况下,MyBatis允许使用插件来拦截方法调用:Executor(update、query、flushStatements、commint、rollback、getTransaction、close、isClosed)ParameterHand..._打印数据库语句执行时间
网络原理之TCP_IP传输层协议,TCP中的主要核心机制(重点)_控制器对tcp保留字段的处理-程序员宅基地
文章浏览阅读812次。TCP/IP传输层协议的原理详细讲解,TCP的主要核心机制的底层详细分析_控制器对tcp保留字段的处理
机器视觉学习(五)—— 图像的几何-程序员宅基地
文章浏览阅读1.5k次,点赞27次,收藏29次。图像的翻转、仿射变化、平移、旋转、缩放和透视变换
linux内核中链表结构及使用方法_内核链怎么调用链表-程序员宅基地
文章浏览阅读6.7k次,点赞5次,收藏20次。声明:在学习linux 内核数据结构之链表部分时参考了http://blog.chinaunix.net/uid-14114479-id-2932024.html。Linux kernel里面从来就不缺少简洁,优雅和高效的代码,只是我们缺少发现和品味的眼光。在Linux kernel里面,简洁并不表示代码使用神出鬼没的超然技巧,相反,它使用的不过是大家非常熟悉的基础数据结构,但是kernel开_内核链怎么调用链表
K8S的存储卷---数据卷-程序员宅基地
文章浏览阅读1.1k次,点赞21次,收藏14次。1、Provisioning(配置) ---> pvc请求request ---> 检索(找一个合适的pvc) ---> pvc和pv(binding绑定) ---> 使用 ---> pod被删除 ---> pv的releasing(释放) ---> recycling(回收)即使容器被销毁、删除、重启,节点上的存储卷的数据依然存在,后续也可以继续使用。容器在系统上的生命周期是短暂的。pv是集群当中的存储资源,pvc请求存储资源,也是对存储资源的一个检索(检查索引),选择一个最合适的pv来存储资源。
grpc python3_用 Python 编写简单的 gRPC 服务-程序员宅基地
文章浏览阅读591次。♚作者:xnow.meBlog:zhihu.com/people/xnow.me个人感觉gRPC一直在流行与不流行之间,似乎周围没什么人用,但是每隔一段时间都会听到一些gRPC的消息,今天刚好有团队要gRPC的支持,所以就自己也测试下怎么用Python来写gRPC的服务。RPC是远程过程调用(Remote Procedure Call)的缩写形式,可以理解为RPC就是要像调用本地的函数一样去调远..._python grpc
随便推点
(转帖)小菜编程成长记(八 用“策略模式”是一种好策略) _sap 策略不好用-程序员宅基地
文章浏览阅读439次。小菜次日来找大鸟,说:“《深入浅出设计模式》的第一章我看完了,它讲的是策略模式(Strategy)。『策略模式』定义了算法家族,分别封装起来,让它们之间可以互相替换, 此模式让算法的变化, 不会影响到使用算法的客户。看来商场收银系统应该考虑用策略模式?” “你问我?你说呢?”大鸟笑道,“商场收银时如何促销,用打折还是返利,其实都是一些算法,用工厂来生成算法对象,感觉是不是很怪?而最重要的_sap 策略不好用
php的命名空间实例-程序员宅基地
文章浏览阅读47次。php的命名空间实例什么是命名空间?从广义上来说,命名空间是一种封装事物的方法。在很多地方都可以见到这种抽象概念。例如,在操作系统中目录用来将相关文件分组,对于目录中的文件来说,它就扮演了命名空间的角色。具体举个例子,文件 foo.txt 可以同时在目录/home/greg 和 /home/other 中存在,但在同一个目录中不能存在两个 foo.txt 文件 -- php手册n...
嵌入式图形用户界面uc/gui在nios II上的移植_nios gui-程序员宅基地
文章浏览阅读7.1k次。 uc/gui是一个优秀的嵌入式图形用户界面,这几天的工作就是将它移植到nios II系统上。前人也做了一些工作,不过大部分都是针对其他硬核处理器,针对nios II软核处理器的移植资料那简直是凤毛麟角。在阅读了相关文档后,我决定自己亲自动手实践,这下面的很多过程都是自己摸索出来的,并通过了实验的验证。这只是一个初步的移植,也许在以后的更复杂的应用中,还需要对其进行调整。但对目前我的应用而言,_nios gui
Hbase的伪分布式安装-程序员宅基地
文章浏览阅读55次。Hbase安装模式介绍单机模式 1> Hbase不使用HDFS,仅使用本地文件系统 2> ZooKeeper与Hbase运行在同一个JVM中分布式模式– 伪分布式模式1> 所有进程运行在同一个节点上,不同进程运行在不同的JVM当中2> 比较适合实验测试– 完全分布式模式1> 进程运行在多个服务器集群中2> 分布式依赖于HDFS系统,因此布署Hbase..._linux系统hbase伪分布式搭建starting master, logging to /usr/local/hbase/bin/.
python pip与pip3安装、更新、卸载、查看等常用命令汇总_pip td3-程序员宅基地
文章浏览阅读5.2k次。Python和pycharm的使用1. pycharm和Python下载 安装后需要激活码。判断Python是否安装好了,cmd下跑: python --version2. 配置环python境路径,下载的时候可选,路径一个是python所在路径,还有一个是python下的Scripts,检验是否正确方法为cmd下跑: pip --version, 这是为了pip的使用,为了安装第三方库的方便,跑命令:pip install xxx。否则的话自己上网查找 下载库包。然后pyt......_pip td3
c语言语法——c程序的内存分区_常量区在哪个段-程序员宅基地
文章浏览阅读165次。内存四区:代码区(text段)、数据区(静态全局区(bss、data)、常量区(rodata))、堆区(heap)、栈区(stack)代码区:存放程序二进制代码,编译时已经确定,通常为只读存储区数据区:数据区分为静态全局区和常量区,静态(全局)区存储全局变量和静态变量,静态区又可分为bss段和data段,bss段存储未初始化的全局变量和静态变量,data段存储已经初始化的全局变量和静态变量,常量区(rodata段)存储const修饰的全局变量,#define定义的常量,字符串常量堆区:由程序员手动申_常量区在哪个段