思科Cisco交换机路由器配置指令大全_思科交换机配置命令大全-程序员宅基地
目录
PC
Ctrl+shift+6快速结束
show是静态查看,debug是动态查看
PC1> ping 192.168.1.1 –t #持续执行ping命令(Ctrl+C取消)
PC>nslookup www.baidu.com #域名解析
PC>tracert www.baidu.com #查看本机到达百度的路径
PC>ip dhcp
PC1> show ip #查看IP以及网络相关参数
show arp #查看ARP表
show users #查看用户
PC1> set pcname PC1 #设置主机名字
PC1> ip 192.168.1.1 255.255.255.0 #配置IP地址 + mask
PC1> ip 192.168.1.1 255.255.255.0 192.168.1.254 #配置IP地址 + mask + 网关
PC1>clear ip
PC1> save #保存主机配置
Telnet
NTT(config)#line vty 0 4 #配置虚拟线路 0 1 2 3 4 (5条线路)
NTT(config-line)#transport input telnet #允许telnet登录
NTT(config-line)#password cisco #设置登录密码
NTT(config-line)#login #以密码方式登录 (默认)
在配置远程登录之前,必须配置enable password 特权密码
NTT(config)#enable password cisco123 # 配置特权密码
cisco#telnet 192.168.1.2 #远程登录到telnet 服务器
NTT(config)#no ip domain lookup #关闭掉配置错误命令解析
NTT(config)#banner login c #配置登录标语 c 开启 c结束
以用户名密码登录
NTT(config)#username smq password 123
NTT(config)#line vty 0 4
NTT(config-line)#transport input telnet #允许telnet登录
NTT(config-line)#password cisco #设置登录密码
NTT(config-line)#login local #以账户名-密码方式登录
Security
端口安全扩展
SW1(config-if)#switchport port-security mac-address sticky #动态粘制
SW1(config-if)#switchport port-security violation shutdown #违反规则惩罚,惩罚方式 关闭
SW1(config)#errdisable recovery cause psecure-violation #配置自动恢复,由端口安全导致的shutdown
SW1(config)#errdisable recovery interval 30 #恢复间隔30s
SSH
show ssh #查看ssh回话
Server:
SSH-Server(config)#ip domain name www.cisco.com #配置主机名字/域名
SSH-Server(config)#crypto key generate rsa modulus 2048 #生成rsa密钥对
SSH-Server(config)#username ssh password ssh123 #配置本地用户账户/口令
SSH-Server(config)#line vty 0 4
SSH-Server(config-line)#login local
SSH-Server(config-line)#transport input ssh #允许SSH登录
Client:
R2#ssh -l ssh 12.1.1.1 #username server地址
登录标语
SSH-Server(config)#banner login ^ #设置登录前标语
SSH-Server(config)#banner motd ^ #设置登录后标语
密码安全
R1(config)#enable password 123 #配置
R1(config)#enable secret 123
R1(config)#service password-encryption #对当前所有密码进行加密
DHCP
DHCPserver(config)#ip dhcp pool test #创建地址池
DHCPserver(config)#ip dhcp excluded-address 10.1.1.251 10.1.1.252 #排除这两个地址
DHCPserver(dhcp-config)#network 10.1.1.0 255.255.255.0 #宣告地址池范围
DHCPserver(dhcp-config)#default-router 10.1.1.254 #配置网关
DHCPserver(dhcp-config)#dns-server 8.8.8.8 #配置DNS服务器地址
DHCPserver(dhcp-config)#domain-name cisco.com #配置域名
DHCPserver(dhcp-config)#lease 2 12 30 #配置租期为2天12小时30分
DHCPserver(config)#ip dhcp relay information trust-all #设置中继信任
DHCPserver(config)#ip route 10.1.1.0 255.255.255.0 12.1.1.2
R(config-if)#ip helper-address 12.1.1.1 #配置中继接口(网关所在接口)
R2(config-if)#ip add dhcp
DHCP安全
show ip dhcp binding
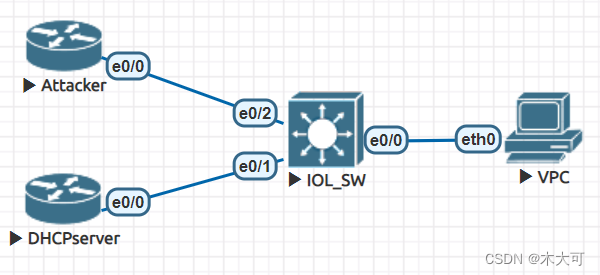
伪造IP
Attacker(config)#ip dhcp pool test
Attacker(dhcp-config)#network 192.168.1.0 255.255.255.0 #宣告地址池
Attacker(dhcp-config)#default-router 192.168.1.253 #网关地址
Attacker(config)#ip route 0.0.0.0 0.0.0.0 192.168.1.254
配置DHCP server
DHCPserver(config)#interface e0/0
DHCPserver(config-if)#ip add 192.168.1.254 255.255.255.0 #宣告地址池
DHCPserver(config)#interface loopback 0
DHCPserver(config-if)#ip add 8.8.8.8 255.255.255.255
配置防范命令
Switch(config)#ip dhcp snooping #开启DHCP全局监听功能
Switch(config)#ip dhcp snooping vlan 1 #在vlan 1 中开启监听功能
Switch(config)#inter e0/1
Switch(config-if)#ip dhcp snooping trust #配置交换机的信任端口
Switch(config)#no ip dhcp snooping information option #关闭option82(记录电路ID [interface 信息])插入
DHCPserver(config)#interface e0/0
DHCPserver(config-if)#ip dhcp relay information trusted #配置DHCP server信任
配置真实DHCP server
DHCPserver(config)#ip dhcp pool test
DHCPserver(dhcp-config)#network 192.168.1.0 255.255.255.0
DHCPserver(dhcp-config)#default-router 192.168.1.254
Switches
SW1#show mac address-table #查看交换机的MAC地址表
SW1#show vlan brief #查看VLAN状态
SW1#show running-config #查看当前的所有配置
SW1#show run interface ethernet 0/3 #查看e0/3接口配置
VLAN
SW1(config)#vlan 10 #创建VLAN
SW1(config-vlan)#name IT # VLAN 命名(可选)
SW1(config-vlan)#exit #必须exit,不然会创建不成功
划分接口模式
Access模式:
SW1(config)#interface e0/1
SW1(config-if)#switchport mode access #将接口划分为访问模式(链接终端:PC/server/Router)
SW1(config-if)#switchport access vlan 10 #将接口划分进VLAN10
SW1#copy running-config startup-config #保存配置
或者
SW1#write #保存配置;VLAN的参数保存 vlan.dat配置文件(自动保存)
SW2(config)#vlan 10,20,30,40 #间断VLAN创建
SW2(config)#vlan 40-45 #连续VLAN创建
SW2(config)#vlan 10,20,30,40-45,50 #自定义组合VLAN创建
Trunk模式:
SW1#show interfaces trunk #查看trunk接口
SW1(config)#interface Ethernet0/3
SW1(config-if)#switchport trunk encapsulation dot1q #配置封装模式
SW1(config-if)#switchport mode trunk #配置接口模式为trunk
SW1(config-if)#switchport trunk allowed vlan 100,200 #允许vlan100和200通过
SW1(config)#interface range ethernet 0/0-2 #进入端口范围,eth0/0- eth0/2 , 批量操作
本征vlan
SW1(config)#interface ethernet 0/3
SW1(config-if)#switchport trunk native vlan 10 #将接口的本征VLAN修改为VLAN10
VTP
SW1(config)#vtp version 2 #配置VTP版本2
SW1(config)#vtp domain cisco #配置VTP域名
SW1(config)#vtp mode server / transparent / client #配置vtp模式
SW1#show vtp status #查看VTP状态
STP
SW1#show spanning-tree #查看生成树状态
SW1(config)#spanning-tree mode rapid #更改生成树模式
SW1(config)#spanning-tree vlan 1 priority 4096 #修改当前交换机生成树vlan 1的优先级为4096
SW1(config)#spanning-tree vlan 10 root primary #把vlan配置为主根
SW1(config)#spanning-tree vlan 20 root secondary #把vlan 20配置为备根
端口聚合
SW1#show etherchannel port-channel #查看链路聚合详细信息
SW1#show etherchannel summary #查看链路聚合状态
静态捆绑
SW1(config)#interface port-channel 1 #创建聚合口,并且保持打开状态
SW1(config-if)#no shutdown
SW1(config)#interface range ethernet 0/0-1
SW1(config-if-range)#channel-group 1 mode on #静态捆绑
SW1#show etherchannel port-channel #查看链路聚合详细信息
SW1#show etherchannel summary #查看链路聚合状态
动态(LACP)
SW1(config)#interface range ethernet 0/0-1
SW1(config-if-range)#channel-group 12 mode #动态配置 SU成功,SD失败
SW1(config-if-range)#channel-group 12 mode active #SW1配置成主动端
SW2(config-if-range)#channel-group 12 mode passive #SW2配置成被动端
端口安全
SW1(config)#interface ethernet 0/0
SW1(config-if)#switchport mode access
SW1(config-if)#switchport port-security #开启端口安全
SW1(config-if)#switchport port-security maximum 1 #最大端口为1个
SW1(config-if)#switchport port-security mac-address 0000.1111.2222 #端口mac地址为0000.1111.2222
网关冗余
SW1(config)#spanning-tree portfast edge default #开启生成树的快速端口
VRRP
R1#show vrrp brief #查看VRRP简要信息
R1#debug ip icmp #动态查看VRRP,在整条命令前加no关掉
R1(config)#interface e0/0
R1(config-if)#ip address 192.168.1.251 255.255.255.0
R1(config-if)#vrrrp 1 ip 192.168.1.254 #配置VRRP备份组 组1,虚拟IP地址 192.168.1.254
R1(config-if)#vrrrp 1 priority 150 #配置优先级为150
R2(config)#interface e0/0
R2(config-if) #ip address 192.168.1.252 255.255.255.0
R2(config-if)#vrrrp 1 ip 192.168.1.254
HSRP
R1(config)#interface e0/0
R1(config-if)#ip address 192.168.1.251 255.255.255.0
R1(config-if)#standby 1 ip 192.168.1.254 #配置HSRP备份组 组1,V-IP 192.168.1.254
R1(config-if)#standby 1 priority 150 #配置优先级为150
R2(config)#interface e0/0
R2(config-if)#ip address 192.168.1.252 255.255.255.0
R2(config-if)#standby 1 ip 192.168.1.254
GLBP
R2(config-if)#glbp 1 ip 10.1.1.254 #配置GLBP
R2(config-if)#glbp 1 priority 150 #配置AVG优先级
R2(config-if)#glbp 1 preempt #配置AVG抢占
Routers
R1#show ip * neighbors #查看邻居
R1#show ip route
R1#show ip interface brief #查看路由接口信息
R1#show run | route/line #管道过滤查看的结果,路由/线路
R1#show ip protocols #查看路由协议
SW1(config)#ip routing #开启交换机路由功能
Vlan间路由
单臂路由:
Router(config)#Interface e0/0
Router(config-if)#Interface e0/0.1 #配置子接口
Router(config-subif)#encapsulation dot1Q 10
Router(config-subif)#ip address 192.168.10.254 255.255.255.0
配置三层交换机
SW1(config)#Interface vlan 10
SW1(config-if)#no switchport
SW1(config-if)#ip address 192.168.10.254 255.255.255.0
SW1(config-if)#no shutdown
静态路由
R1(config)#ip route 192.168.1.0 255.255.255.0 e0/1 12.1.1.2 #目标子网 mask 出接口 下一跳
环回地址
R1(config)#interface loopback 0
R1(config-if)#ip address 1.1.1.1 255.255.255.255
R1(config)#ip route 2.2.2.2 255.255.255.255 e0/1 12.1.1.2
R1#ping 2.2.2.2 source 1.1.1.1 #指定1.1.1.1为源,2.2.2.2为目的
R1(config)#no ip domain lookup #关闭乱解析
R1#traceroute 12.1.1.2 #查看到达12.1.1.2的路径
默认静态路由
R1(config)#ip route 0.0.0.0 0.0.0.0 e0/0 12.1.1.2 #任意网络 任意主机
R2(config)#ip route 0.0.0.0 0.0.0.0 e0/0 12.1.1.1 *严禁双向互写
路由备份
R1(config)#ip route 0.0.0.0 0.0.0.0 e0/0 12.1.1.2 10 #设置默认路由,出口为e0/0,下一跳为12.1.1.2的链路,管理距离(优先级为10)
路由负载均衡
R1(config)#no ip cef #在模拟器中敲,在真机中不能敲
RIP
R1#show run | section rip #查看rip
R1#show ip rip database #查看rip的本地数据库
R1#show ip protocols #查看路由协议
R1(config)#router rip #配置rip进程
R1(config-router)#version 2 #修改为版本2
R1(config-router)#no auto-summary #关闭自动汇总/聚合路由
R1(config-router)#network 12.1.1.1 #宣告网络接口(主类网络号)
OSPF
R1#show ip ospf neighbor #查看OSPF邻居
R1#show ip ospf interface brief #查看OSPF激活的接口
R1#show ip ospf interface e0/0 | in type #查看OSPF接口网络类型
R1#show ip ospf interface e0/0 | in Type #查看OSPF接口网络类型
R1(config)#router ospf 1 #进程号为1
激活接口的三种方式:建议第三种
R1(config-router)#network 12.1.1.1 0.0.0.0 area 0
R1(config-router)#network 12.1.1.0 0.0.0.255 area 0
R1(config)#interface e0/0
R1(config-if)#ip ospf 1 area 0 #进程号1 区域号0
show ip ospf neighbor #查看OSPF邻居
show ip ospf interface brief #查看OSPF激活的接口
修改RID
R1(config)#router ospf 1
R1(config-router)#router-id 1.1.1.1 #手工配置router-id
重启OSPF进程
R1#clear ip ospf process #重启OSPF进程,不会删配置
R1(config)#no router ospf 1
R1(config)#router ospf 1 #也是重启,会删除配置
R1#show ip protocols | in ID #查看当前的RID
修改参数
R1(config-if)#ip ospf network broadcast #修改网络类型
R1(config-if)#ip ospf priority 100 #修改优先级
R1(config-if)#ip ospf hello-interval 1 #修改hello时间为1s
R1(config-if)#ip ospf dead-interval 5 #修改死亡时间为5s(两端时间必须一致)
* 修改hello时间,默认自动修改死亡时间 dead=hello*4
修改dead时间,不会自动修改hello时间
所有参数全部修改,以手工配置参数为准
R1(config-if)#ip ospf cost 20 #修改OSPF接口开销
R1(config-router)#auto-cost reference-bandwidth 100000 #修改参考带宽为100G
认证
R1(config-if)#ip ospf authentication #激活接口明文认证
R1(config-if)# ip ospf authentication-key 123 #配置明文认证密码
R1(config)#router ospf 1
R1(config-router)#area 0 authentication #区域明文认证
R1(config-if)#ip ospf authentication message-digest #接口密文认证
R1(config-if)#ip ospf message-digest-key 1 md5 123 #key后面的钥匙号两端保持一致
多区域
R1(config-router)#default-information originate #下放默认路由
R1(config-router)#default-information originate always #总是下放默认路由
R1(config-router)#default-information originate always metric-type 1
R1(config-router)#area 1 stub #将区域1配置为stub区域(所有区域1都需要配置)
R1(config-router)#area 1 stub no-summary #将区域1配置为Tstub区域
R1(config-router)#no area 1 stub no-summary
R1(config-router)#area 1 nssa #将区域1配置为NSSA区域
R1(config-router)#area 1 nssa default-information-originate #手工下放默认路由
R1(config-router)#no compatible rfc1583 #关闭RFC1583选路
R1(config-router)#compatible rfc1587 #开启RFC1587规则
路由汇总
R2(config-router)#area 0 range 1.1.1.0 255.255.255.252 #路由汇总
R2(config-router)#area 0 range 1.1.1.0 255.255.255.252 not advertise #汇总+不通告(路由过滤)
R1(config-router)#summary-address 111.1.1.0 255.255.255.0 #LSA5汇总
R3(config-router)#summary-address 4.4.4.0 255.255.255.0 #LSA7汇总
虚连接
R2(config)#router ospf 1
R2(config-router)#area 2 virtual-link 100.3.3.3 #建立虚连接,对端RID,对端也需配置
重分布(LSA5)
R2(config-router)#redistribute rip metric-type 1 #修改LSA5的metric类型
R2(config-router)#redistribute rip metric-type 1 metric 10 #修改metric值
R2(config-router)#redistribute rip metric-type 1 metric 10 tag 123 #修改tag
EIGRP
R1#show eigrp protocols #查看EIGRP进程详细信息
R1#show ip eigrp topology 查看EIGRP TOP表
R1#show ip eigrp top all-links #查看所有EIGRP链路(包含非可行后继链路)
R1(config)#router eigrp 100 #配置EIGRP进程号
R1(config-router)#no auto-summary #关闭自动汇总/聚合路由
R1(config-router)#network 12.1.1.1 0.0.0.0 #激活接口(精确宣告)
R1(config-if)#bandwidth 10000 #修改带宽10000kbps
R1(config-if)#delay 200 #修改延时
R1(config-router)#variance 6 #修改变量为6倍(默认值为1,最大128)
R1(config-router)#eigrp router-id 100.1.1.1 #手工修改RID
R1(config-if)#ip hello-interval eigrp 100 10
R1(config-if)#ip hold-time eigrp 100
R1(config-router)#passive-interface default #更改所有接口为沉默端口
R1(config-router)#passive-interface g0/0 #更改指定端口为沉默端口
R1(config)#interface g0/0
R1(config-if)#ip summary-address eigrp 100 172.168.1.0 #手工汇总
R1(config-if)#ip summary-address eigrp 100 0.0.0.0 0.0.0.0 #默认路由
路由重分布
R2(config)#router eigrp 100
R2(config-router)#network 12.1.1.2 0.0.0.0
R2(config-router)#redistribute eigrp 200
R2(config)#router eigrp 200
R2(config-router)#network 23.1.1.2 0.0.0.0
R2(config-router)#redistribute eigrp 100
防环
R2(config)#interface e0/0
R2(config-if)#ip split-horizon eigrp 100 #开启水平分割(实现路由毒化,毒性反转)(默认)
R2(config-if)#no ip split-horizon eigrp 100 #关闭水平分割(路由毒化,毒性反转关闭)(EIGRP接口不使用防环机制) (DMVPN场景使用)
优化
R2(config-router)#timers active-time disabled
R2(config-router)#timers active-time 60 #调整EIGRP active时间
R3(config-router)#eigrp stub #设置为stub 路由器
MD5-Key-Chain Authentication
* 两端尽量一致
R1(config)#key chain cisco1 #钥匙串名称
R1(config-keychain)#key 1 #钥匙ID
R1(config-keychain-key)#key-string cisco123 #密码
R1(config-keychain-key)#accept-lifetime 00:00:00 Jan 1 2019 00:00:00 Jan 1 2020 #接收时间
R1(config-keychain-key)#send-lifetime 00:00:00 Jan 1 2019 00:00:00 Jan 1 2020 #发送时间
R2(config)#interface e0/0
R2(config-if)#ip authentication mode eigrp 100 md5 #接口下开启认证
R2(config-if)#ip authentication key-chain eigrp 100 cisco1 #接口下配置钥匙串
EIGRP For IPv6
* 使用link-local地址建立邻居
R3(config)#ipv6 unicast-routing #开启IPv6单播功能
R3(config)#ipv6 router eigrp 100 #配置进程
R3(config-rtr)#eigrp router-id 1.1.1.1 #配置RID
R3(config-rtr)#interface e0/1 #激活接口
R3(config-if)#ipv6 eigrp 100
R3(config-if)#ipv6 add 2001:12::5/64
命名EIGRP
R2(config)#router eigrp song #命名版本EIGRP进程,两端名字可以不一样
R2(config-router)#address-family ipv4 unicast autonomous-system 99 #进入IPv4家族
R2(config-router-af)#network 23.1.1.1 0.0.0.0
R2(config-router)#address-family ipv6 autonomous-system 99 #进入IPv6家族,命名版本EIGRP中ipv6,默认宣告所有
路由重分布(命名版)
R2(config)#router eigrp song
R2(config-router)#address-family ipv4 unicast autonomous-system 99
R2(config-router-af)#network 23.1.1.1 0.0.0.0
R2(config-router-af)#topology base #在子进程中重分布
R2(config-router-af-topology)#redistribute eigrp 100
PPP
R1#show ppp multilink #查看捆绑信息
R1#show interfaces serial 1/0 #查看s1/0接口的二层封装协议
R1(config-if)#encapsulation ppp #封装模式改为PPP
PAP认证服务端:
R1(config-if)#ppp authentication #接口开启pap认证
认证客户端:
R2(config-if)#ppp pap sent-username SMQ password 123 #设置账户名和密码
CHAP认证端:
R1(config)#username SMQ password 123
R1(config-if)#ppp authentication chap
认证客户端:
R2(config-if)#ppp chap hostname SMQ
R2(config-if)#ppp chap password 123
MLP:
创建multilink:
R1(config)#interface multilink 12
R1(config-if)#ppp multilink 12
R1(config-if)#ppp multilink group 12
划分物理接口,进入到multilink逻辑接口(所由接口都需要划分,IP地址配置在逻辑接口):
R1(config)#interface s1/0
R1(config-if)#ppp multilink 12
R1(config-if)#ppp multilink group 12
R1#show ppp multilink
NAT
先配默认路由
R2(config)#interface e0/0
R2(config-if)#ip nat inside #内部接口
R2(config)#interface e0/2
R2(config-if)#ip nat outside #外部接口
静态NAT
R2(config)#ip nat inside source static 192.168.1.1 202.1.1.10 #转换
R2#clear ip nat translation * #清空NAT转换表
动态NAT
R2(config)#ip access-list standard smq-in #私有地址段
R2(config-std-nacl)#permit 192.168.1.0 0.0.0.255
R2(config-std-nacl)#permit 192.168.2.0 .0.0.0.255
R2(config)#ip nat pool smq-out 202.1.1.11 202.1.1.12 netmask 255.255.255.0
#配置公有地址池,范围为202.1.1.11-12
R2(config)#ip nat inside source list smq-in pool smq-out #绑定私有地址段和公有地址池
NAPT
先配ACL,再配
R2(config)#ip nat inside source list smq-in interface e0/2 #将ACL绑定给出接口并执行NAPT
BGP
R1#show ip bgp summary #查看BGP邻居
R1#show ip bgp #查看BGP表
R1#clear ip bgp * in #软清(刷新路由信息)BGP本地路由表入方向
R1#clear ip bgp * #硬清(断开BGP邻居,重新建立)
R1(config)#router bgp 100 #配置BGP进程,属于AS100
R1(config)#router bgp 10.10 #配置BGP
R1(config-router)#bgp router-id 1.1.1.1 #修改RID
R1(config-router)#neighbor 12.1.1.2 remote-as 100 #手工配置邻居关系,对端IP与AS号
R1(config-router)#neighbor 2.2.2.2 ebgp-multihop 255 # 指定EBGP多跳(EBGP用环回口建邻居)
IBGP邻居
R1(config-if)#router bgp 100
R1(config-router)#bgp log-neighbor-changes
R1(config-router)#neighbor 2.2.2.2 remote-as 100
R1(config-router)#neighbor 2.2.2.2 update-source loopback 0 #指定更新源为环回接口
BGP路由发布(宣告)
R1(config-if)#router bgp 100
R1(config-router)#network 100.1.1.1 mask 255.255.255.255
Or redistribute
R1(config-router)#redistribute rip
R2(config-router)#neighbor 12.1.1.1 next-hop-self #IBGP优化
路由反射器
R2(config-router)#neighbor 1.1.1.1 route-reflector-client #配置1.1.1.1为当前设备的反射客户端
BGP联盟
R1(config)#router bgp 65001 #配置成员AS号码
R1(config-router)#bgp confederation identifier 123 #配置BGP联盟ID
R1(config-router)#bgp confederation peers 65002 #配置其它所有BGP成员ID
R1(config-router)#neighbor 14.1.1.4 remote 400
R1(config-router)#neighbor 2.2.2.2 remote 65001 #联盟内部建立BGP邻居时,使用成员AS号码
R1(config-router)#neighbor 2.2.2.2 update-source loopback 0
AS-Path
R1(config)#route-map R2-R1-as-path permit 10
R1(config-route-map)#set as-path prepend 500 500 #as-path叠加500 500
R1(config-route-map)#router bgp 100
R1(config-router)#neighbor 12.1.1.2 route-map R2-R1-as-path in #调用策略
R2(config)#route-map R2-R1-Ip permit 10
R2(config-route-map)#set local-preference 110 #修改LP值为110
R2(config-route-map)#router bgp 100
R2(config-router)#neighbor 12.1.1.1 route-map R2-R1-Ip in
权重
R1(config)#ip prefix-list test seq 5 permit 7.7.7.7/32
R1(config)#route-map 3-1-we permit 10
R1(config-route-map)#match ip address prefix-list test
R1(config-route-map)#set weight 1
R1(config-route-map)#route-map 3-1-we permit 999
认证
R1(config)#router bgp 100
R1(config-router)#neighbor 12.1.1.2 password cisco123
QoS
R1(config-if)#rate-limit input dscp 10 8000 1500 2000 conform-action transmit exceed-action drop #限速 入方向 AF11 8kbps 缓冲参数 顺从流量 转发 超支流量 丢弃
MQC
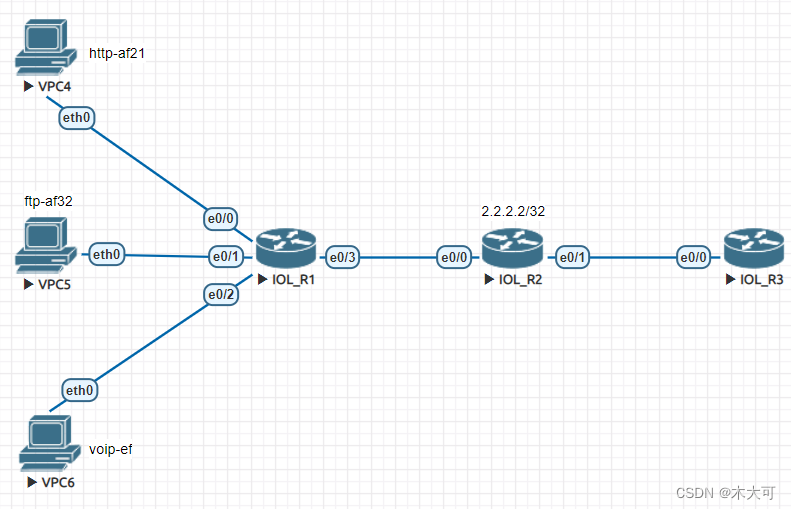
匹配流量(ACL)
R1(config)#ip access-list standard ftp
R1(config-std-nacl)#permit 192.168.2.1
R1(config-std-nacl)#ip access-list standard http
R1(config-std-nacl)#permit 192.168.1.1
R1(config-std-nacl)#ip access-list standard voip
R1(config-std-nacl)#permit 192.168.3.1
匹配映射
R1(config-std-nacl)#class-map http #定义http类
R1(config-cmap)#match access-group name http #匹配ACL名字http
R1(config-cmap)#class-map ftp
R1(config-cmap)#match access-group name ftp
R1(config-cmap)#class-map voip
R1(config-cmap)#match access-group name voip
策略映射
policy-map mark #定义策略映射名称
R1(config-pmap)#class http
R1(config-pmap-c)#set ip dscp af21
R1(config-pmap-c)#class ftp
R1(config-pmap-c)#set ip dscp af32
R1(config-pmap-c)#class voip
R1(config-pmap-c)#set dscp ef
接口调用策略
R1(config-pmap-c)#int e0/3
R1(config-if)#service-policy output mark #定义出方向(一个接口的一个方向只能包含一个策略)
LLQ
配置class map
R2(config)#class-map mat
R2(config)#class-map match-all
R2(config)#class-map match-all ftp
R2(config-cmap)#match ds
R2(config-cmap)#match dscp af32
R2(config-cmap)#class-map match-all http
R2(config-cmap)#match dscp af21
R2(config-cmap)#class-map match-all voip
R2(config-cmap)#match dscp ef
配置policy map
R2(config-cmap)#policy-map llp
R2(config-pmap)#class voip
R2(config-pmap-c)#priority
R2(config-pmap-c)#class http
R2(config-pmap-c)#bandwidth remaining percent 40
R2(config-pmap-c)#class ftp
R2(config-pmap-c)#bandwidth remaining percent 20
调用接口
R2(config-pmap-c)#int e0/1
R2(config-if)#service-policy output llq
WRED
R1(config)#policy-map llq+wred
R1(config-pmap)#class voice
R1(config-pmap-c)#priority
R1(config-pmap-c)#class http
R1(config-pmap-c)#bandwidth remaining percent 40
R1(config-pmap-c)#random-detect dscp-based # 基于DSCP早期随机检测
R1(config-pmap-c)#random-detect dscp af21 30 50 2 # 低门限 30 ,高门限50 , 丢弃概率1/2
R1(config-pmap)#class ftp
R1(config-pmap-c)#bandwidth remaining percent 20
R1(config-pmap-c)#random-detect dscp-based
R1(config-pmap-c)#random-detect dscp af32 20 60 3
R1(config)#interface Ethernet0/1
R1(config-if)#service-policy output llq+wred
R1(config)#interface Ethernet0/0
R1(config-if)#rate-limit output 8000 1500 2000 conform-action set-dscp-transmit 46 exceed-action set-dscp-transmit 46
基于接口总流量限速
R1(config)#int e0/0
R1(config-if)#rate-limit output 8000 1500 8000 conform-action transmit exceed-action drop
R1(config-if)#ip ospf 1 area 0
R1(config-if)#duplex auto
基于ACL的限速CAR
R1(config)#access-list 1 permit host 1.1.1.1
R1(config)#int e0/0
R1(config-if)#rate-limit output access-group 1 8000 1500 2000 conform-action transmit exceed-action drop
基于DSCP值CAR
CDP与LLDP
R1#show cdp neighbors #查看CDP邻居
R1(config)#no cdp run #全局关闭CDP
R1(config)#cdp run #全局开启CDP
R1(config-if)#cdp enable #开启接口CDP功能
R1(config)#lldp run #开启LLDP功能
R1(config-if)#no lldp transmit #关闭发送功能
R1(config-if)#no lldp receive #关闭接收功能
lldp reinit 5 #延时5s
GRE
R2(config)#interface tunnel 45 #配置隧道接口
R2(config-if)#ip add 192.168.45.5 255.0.0.0 #里层IP地址
R2(config-if)#tunnel source 35.1.1.2 #外层源IP地址
R2(config-if)#tunnel destination 14.1.1.2 #外层目的IP地址
配置隧道路由:
R1(config)#router eigrp 100
R1(config-router)#network 172.168.1.254 0.0.0.0
R1(config-router)#network 192.168.45.4 0.0.0.0
MPLS
R1#show ip route vrf dlcisco #查看VRF表
R1#show mpls forwarding-table #查看MPLS标签转发表
R1#show ip bgp vpnv4 all summary #查看邻居
R1#show ip bgp vpnv4 all
R1#show mpls ldp neighbor #查看MPLS LDP邻居
R1#show mpls interfaces #查看MPLS接口
R3(config)#mpls ip #全局激活MPLS功能(缺省激活)
R1(config)#mpls label range 100 199 #设置标签范围(选配)
R1(config)#mpls ldp router-id loopback 0 force #配置MPLS/LDP router-id
RID 接口必须存在地址,必须发布IGP中
R1(config-if)#mpls ip # 激活MPLS域物理接口
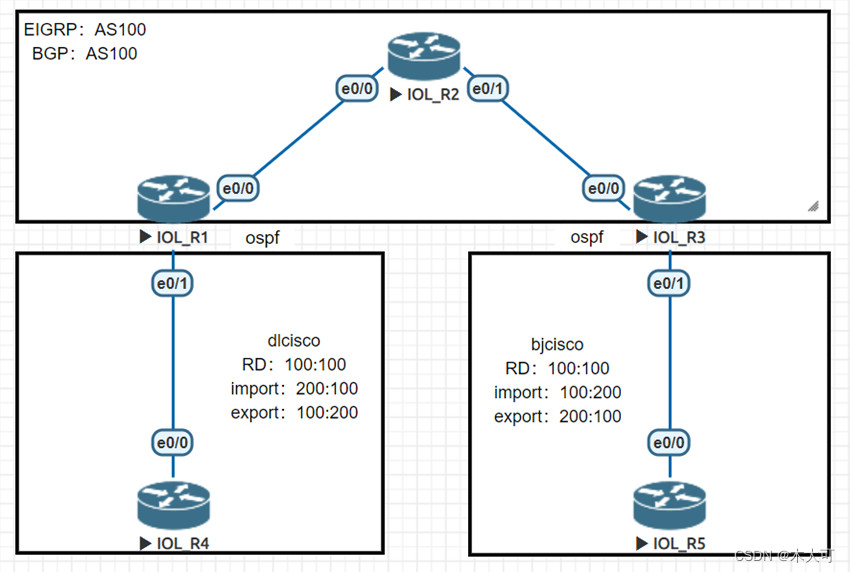
配置VRF,绑定RD,RT(R1&R3)
R1(config)#ip vrf dlcisco
R1(config-vrf)#rd 100:100
R1(config-vrf)#route-target import 200:100
R1(config-vrf)#route-target export 100:200
接口绑定VRF(R1&R3 e0/1)
R1(config-vrf)#int e0/1
R1(config-if)#ip vrf forwarding dlcisco
R1(config-if)#ip add 192.168.14.1 255.255.255.0
R1(config-if)#no shutdown
PE/CE运行IGP(R1&R3 e0/1)
R1(config-if)#router ospf 1 vrf dlcisco
R1(config-router)#network 192.168.14.1 0.0.0.0 area 0
建立BGP vpnv4邻居关系(R1&R3)
R1(config-router)#router bgp 100
R1(config-router)#neighbor 3.3.3.3 remote-as 100
R1(config-router)#neighbor 3.3.3.3 update-source loopback 0
R1(config-router)#address-family ipv4
R1(config-router-af)#no neighbor 3.3.3.3 activate
R1(config-router-af)#exit
R1(config-router)#address-family vpnv4
R1(config-router-af)#neighbor 3.3.3.3 activate
neighbor 3.3.3.3 next-hop-self
R1(config-router-af)#neighbor 3.3.3.3 send-community extended
IGP与BGP双点双向重分布(R1&R3)
R1(config)#router bgp 100
R1(config-router)#address-family ipv4 vrf dlcisco
R1(config-router-af)#redistribute ospf 1
R1(config)#router ospf 1 vrf dlcisco
R1(config-router)#redistribute bgp 100
运行MPLS/LDP(公网互连接口)
R1(config)#mpls ldp router-id loopback 0 force
R1(config)#int e0/0
R1(config-if)#mpls ip #激活接口MPLS
路由策略
路由重分布
分发列表
ACL抓路由
R1(config)#ip access-list standard filter
R1(config-std-nacl)#permit 2.2.2.1
过滤
R2(config)#router eigrp 100
R2(config-router)#distribute-list filter out e0/0 #使用分发列表在e0/0出方向路由过滤(filter ACL允许通过的路由)
ACL
编号
R1(config)#access-list 10 deny 192.168.2.0 0.0.0.255 #ACL序号10禁止源地址192.168.2.0网段
R1(config)#access-list permit any #允许其它
R1(config-if)#ip access-group 10 out #进入接口,定义出方向调用ACL 10(出入方向是对路由器本身而言)
隐式拒绝所有
命名
R2(config)#access-list standard smq1
R2(config-std-nacl)#deny 192.168.2.0 0.0.0.255
R2(config-std-nacl)#permit any
R2(config-if)#ip access-group smq1 in
show ip access-lists #查看ACL规则和匹配流量次数
show run | s ip access #查看当前ACL配置
扩展ACL
R2(config)#ip access-list extended smq1
R2(config-ext-nacl)#10 deny ip 192.168.2.0 0.0.0.255 172.16.20.5 0.0.0.0 #拒绝 源地址 目的地址
R2(config-ext-nacl)#20 permit ip any any #允许其它
R2(config)#ip access-list extended telnet
R2(config-ext-nacl)#deny tcp host 101.1.1.1 host 2.2.2.2 eq/gt/lt 23 #等于/大于/小于
前缀列表
R1(config)#ip prefix-list test seq 5 permit 1.1.1.0/24 ge 25 le 25
前缀ID 前缀长度 掩码需要等于25 掩码需要小于等于25
只书写ge,le默认为32;只书写le,ge默认等于前缀长度;都不书写,默认都等于前缀长度
只能匹配路由
Route-map
配置抓取工具
R2(config)#ip access-list standard e2o-1
R2(config-std-nacl)#permit 3.3.3.1
R2(config-std-nacl)#ip access-list standard e2o-2
R2(config-std-nacl)#permit 3.3.3.2
配置策略路由,调用抓取工具
R2(config)#route-map e2o permit 10 #父句
R2(config-route-map)#match ip address e2o-1 #子句
R2(config-route-map)#set metric 100
R2(config-route-map)#set metric-type type-1
R2(config-route-map)#set tag 100
R2(config-route-map)#route-map e2o permit 20
R2(config-route-map)#match ip address e2o-2
R2(config-route-map)#set metric 200
R2(config-route-map)#set metric-type type-2
R2(config-route-map)#set tag 200
调用route-map
R2(config)#router ospf 1
R2(config-router)#router-id 2.2.2.2
R2(config-router)#redistribute eigrp 100 subnets route-map e2o
1.不书写match,表示match所有
2.如果没有被任何父句下的子句匹配,隐式拒绝所有
3.一旦路由信息匹配到某一个父句,则直接继承该父句下的set属性
PBR

R4(config)#route-map test permit 10
R4(config-route-map)#match ip address pc1
R4(config-route-map)#set ip next-hop 24.1.1.2
R4(config-route-map)#int e0/1
R4(config-if)#ip policy route-map test #接口配置PBR,针对源选路
IPv6
R2(config)#ipv6 unicast-routing #开启IPv6路由功能,支持IPv6数据转发
R1(config-if)#ipv6 enable #激活接口IPv6功能
R1(config-if)#ipv6 address 2001:12::1/64 #手工配置IPv6地址
R2(config-if)#ipv6 address 2001:12::1/64 eui-64 #自动获取接口ID
R1#show ipv6 interface brief
IPv6静态路由
R1(config)#ipv6 route 2001::2/128 e0/0 2001:12::2 #目的子网前缀号/目的前缀长度,出接口,下一跳
R2(config)#ipv6 unicast-routing #开启IPv6路由功能,支持IPv6数据转发
R1(config-if)#ipv6 enable #激活接口IPv6功能,生成IPv6 link local地址
R1(config)#ipv6 route ::/0 e0/0 2001:12::2
RIPng
R1(config)#ipv6 router rip smq #配置rip进程
R1(config#interface range e0/0,loopback0
R1(config-if)#ipv6 rip smq enable #激活接口
OSPFv3
R1(config)#ipv6 router ospf 1 #配置OSPFv3进程
R1(config-rtr)#router-id 1.1.1.1 #配置router-ID
R1(config-rtr)#interface range e0/0,loopback0
R1(config-if-range)#ipv6 ospf 1 area 0
EIGRP for IPv6
R3(config)#ipv6 router eigrp 100 #配置EIGRP for IPv6进程
R3(config-rtr)#eigrp router-id 3.3.3.3 #配置RID
R3(config)#interface range e0/0,loopback 0
R3(config-if-range)#ipv6 eigrp 100 #配置接口激活
系统配置
SW#dir #显示当前文件
SW#copy tftp flash: #复制tftp文件到flash
Address or name of remote host []? 192.168.1.1 #TFTP server IP
Source filename []? c2950-i6q4l2-mz.121-22.EA8.bin #源文件名字
Destination filename []? c2950-i6q4l2-mz.121-22.EA8.bin #目的文件名字
!!!!!! [OK] 31568712 #文件copy成功
SW#delete flash: c2950-i6q4l2-mz.121-22.EA4.bin
R1#reload #重新启动
设备管理 NTP
NTPclient#show ntp status #查看NTP状态
NTPclient#show clock #查看时钟
Server :
NTPserver(config)#ntp master 1 # 配置NTP时间源 level-1
NTPserver(config)#ntp source e0/0 #使用 e0/0接口作为NTP时钟源地址
Client :
NTPclient(config)#ntp server 192.168.1.1 #配置NTP时钟
NTPclient(config)#service timestamps debug datetime msec
NTPclient(config)#service timestamps log datetime msec
NTPclient(config)#clock timezone beijing 8 0 #设置时区,北京时区 +8小时
NTP认证:
NTPclient(config)#ntp authenticate
NTPclient(config)#ntp authentication-key 1 md5 cisco
NTPclient(config)#ntp server 192.168.1.1 key 1
NTPserver(config)#ntp authentication-key 1 md5 cisco
NTPserver(config)#ntp trusted-key 1
系统日志:
R1(config)#logging on #开启syslog
R1(config)#logging host 192.168.1.1 #设置日志服务器地址
R1(config)#logging trap debugging #设置上传日志级别 0-7(值越小级别越高)
故障恢复
R1#dir #显示当前文件
R1#copy tftp flash: #复制tftp文件到flash
Address or name of remote host []? 192.168.1.1 #TFTP server IP
Source filename []? c2950-i6q4l2-mz.121-22.EA8.bin #源文件名字
Destination filename []? c2950-i6q4l2-mz.121-22.EA8.bin #目的文件名字
!!!!!! [OK] 31568712 #文件copy成功
R1#delete flash: c2950-i6q4l2-mz.121-22.EA4.bin #删除flash镜像
R1#reload #重新启动
MINIOS
rommon 1 > ip_address=192.168.1.2
rommon 2 > ip_subnet_mask=255.255.255.0
rommon 3 > default_gateway=192.168.1.254
rommon 4 > tftp_server=192.168.1.1
rommon 5 > tftp_file=c2900-universalk9-mz.SPA.151-4.M4.bin
rommon 6 > tftpdnld
IP_ADDRESS: 192.168.1.2
IP_SUBNET_MASK: 255.255.255.0
DEFAULT_GATEWAY: 192.168.1.254
TFTP_SERVER: 192.168.1.1
TFTP_FILE: c2900-universalk9-mz.SPA.151-4.M4.bin
Invoke this command for disaster recovery only.
WARNING: all existing data in all partitions on flash will be lost!
rommon 11 > reset #重启
密码破解
配置主机名 密码
Reload重启
使用开关重启
Ctrl+c 进入mini OS
Confreg 0x2142
Reset
R1#copy startup-config running-config
R1(config)#enable secret 123
R1#copy running-config startup-config
Reload 重启
Ctrl+c 进入mini OS
Confreg 0x2102
Reset 重启
AAA
Radius
R(config)#aaa new-model #开启服务
R(config)#radius-server host 192.168.1.1
R(config)#radius-server key 123
R(config)#aaa authentication login test-radius group radius #定义登录认证 test-radius组,只允许radius登录
R(config)#line vty 0 4
R(config-line)#transport input telnet
R(config-line)#login authentication test-radius #使用test-radius组认证
TACACS+
R(config)#aaa new-model
R(config)#tacacs-server host 192.168.1.1
R(config)#tacacs-server key 123
R(config)#aaa authentication login test-tacacs group tacacs+ #定义登录认证 test-tacacs组,只允许tacacs登录
R(config-line)#login authentication test-radius #使用test-tacacs组认证
智能推荐
使用nginx解决浏览器跨域问题_nginx不停的xhr-程序员宅基地
文章浏览阅读1k次。通过使用ajax方法跨域请求是浏览器所不允许的,浏览器出于安全考虑是禁止的。警告信息如下:不过jQuery对跨域问题也有解决方案,使用jsonp的方式解决,方法如下:$.ajax({ async:false, url: 'http://www.mysite.com/demo.do', // 跨域URL ty..._nginx不停的xhr
在 Oracle 中配置 extproc 以访问 ST_Geometry-程序员宅基地
文章浏览阅读2k次。关于在 Oracle 中配置 extproc 以访问 ST_Geometry,也就是我们所说的 使用空间SQL 的方法,官方文档链接如下。http://desktop.arcgis.com/zh-cn/arcmap/latest/manage-data/gdbs-in-oracle/configure-oracle-extproc.htm其实简单总结一下,主要就分为以下几个步骤。..._extproc
Linux C++ gbk转为utf-8_linux c++ gbk->utf8-程序员宅基地
文章浏览阅读1.5w次。linux下没有上面的两个函数,需要使用函数 mbstowcs和wcstombsmbstowcs将多字节编码转换为宽字节编码wcstombs将宽字节编码转换为多字节编码这两个函数,转换过程中受到系统编码类型的影响,需要通过设置来设定转换前和转换后的编码类型。通过函数setlocale进行系统编码的设置。linux下输入命名locale -a查看系统支持的编码_linux c++ gbk->utf8
IMP-00009: 导出文件异常结束-程序员宅基地
文章浏览阅读750次。今天准备从生产库向测试库进行数据导入,结果在imp导入的时候遇到“ IMP-00009:导出文件异常结束” 错误,google一下,发现可能有如下原因导致imp的数据太大,没有写buffer和commit两个数据库字符集不同从低版本exp的dmp文件,向高版本imp导出的dmp文件出错传输dmp文件时,文件损坏解决办法:imp时指定..._imp-00009导出文件异常结束
python程序员需要深入掌握的技能_Python用数据说明程序员需要掌握的技能-程序员宅基地
文章浏览阅读143次。当下是一个大数据的时代,各个行业都离不开数据的支持。因此,网络爬虫就应运而生。网络爬虫当下最为火热的是Python,Python开发爬虫相对简单,而且功能库相当完善,力压众多开发语言。本次教程我们爬取前程无忧的招聘信息来分析Python程序员需要掌握那些编程技术。首先在谷歌浏览器打开前程无忧的首页,按F12打开浏览器的开发者工具。浏览器开发者工具是用于捕捉网站的请求信息,通过分析请求信息可以了解请..._初级python程序员能力要求
Spring @Service生成bean名称的规则(当类的名字是以两个或以上的大写字母开头的话,bean的名字会与类名保持一致)_@service beanname-程序员宅基地
文章浏览阅读7.6k次,点赞2次,收藏6次。@Service标注的bean,类名:ABDemoService查看源码后发现,原来是经过一个特殊处理:当类的名字是以两个或以上的大写字母开头的话,bean的名字会与类名保持一致public class AnnotationBeanNameGenerator implements BeanNameGenerator { private static final String C..._@service beanname
随便推点
二叉树的各种创建方法_二叉树的建立-程序员宅基地
文章浏览阅读6.9w次,点赞73次,收藏463次。1.前序创建#include<stdio.h>#include<string.h>#include<stdlib.h>#include<malloc.h>#include<iostream>#include<stack>#include<queue>using namespace std;typed_二叉树的建立
解决asp.net导出excel时中文文件名乱码_asp.net utf8 导出中文字符乱码-程序员宅基地
文章浏览阅读7.1k次。在Asp.net上使用Excel导出功能,如果文件名出现中文,便会以乱码视之。 解决方法: fileName = HttpUtility.UrlEncode(fileName, System.Text.Encoding.UTF8);_asp.net utf8 导出中文字符乱码
笔记-编译原理-实验一-词法分析器设计_对pl/0作以下修改扩充。增加单词-程序员宅基地
文章浏览阅读2.1k次,点赞4次,收藏23次。第一次实验 词法分析实验报告设计思想词法分析的主要任务是根据文法的词汇表以及对应约定的编码进行一定的识别,找出文件中所有的合法的单词,并给出一定的信息作为最后的结果,用于后续语法分析程序的使用;本实验针对 PL/0 语言 的文法、词汇表编写一个词法分析程序,对于每个单词根据词汇表输出: (单词种类, 单词的值) 二元对。词汇表:种别编码单词符号助记符0beginb..._对pl/0作以下修改扩充。增加单词
android adb shell 权限,android adb shell权限被拒绝-程序员宅基地
文章浏览阅读773次。我在使用adb.exe时遇到了麻烦.我想使用与bash相同的adb.exe shell提示符,所以我决定更改默认的bash二进制文件(当然二进制文件是交叉编译的,一切都很完美)更改bash二进制文件遵循以下顺序> adb remount> adb push bash / system / bin /> adb shell> cd / system / bin> chm..._adb shell mv 权限
投影仪-相机标定_相机-投影仪标定-程序员宅基地
文章浏览阅读6.8k次,点赞12次,收藏125次。1. 单目相机标定引言相机标定已经研究多年,标定的算法可以分为基于摄影测量的标定和自标定。其中,应用最为广泛的还是张正友标定法。这是一种简单灵活、高鲁棒性、低成本的相机标定算法。仅需要一台相机和一块平面标定板构建相机标定系统,在标定过程中,相机拍摄多个角度下(至少两个角度,推荐10~20个角度)的标定板图像(相机和标定板都可以移动),即可对相机的内外参数进行标定。下面介绍张氏标定法(以下也这么称呼)的原理。原理相机模型和单应矩阵相机标定,就是对相机的内外参数进行计算的过程,从而得到物体到图像的投影_相机-投影仪标定
Wayland架构、渲染、硬件支持-程序员宅基地
文章浏览阅读2.2k次。文章目录Wayland 架构Wayland 渲染Wayland的 硬件支持简 述: 翻译一篇关于和 wayland 有关的技术文章, 其英文标题为Wayland Architecture .Wayland 架构若是想要更好的理解 Wayland 架构及其与 X (X11 or X Window System) 结构;一种很好的方法是将事件从输入设备就开始跟踪, 查看期间所有的屏幕上出现的变化。这就是我们现在对 X 的理解。 内核是从一个输入设备中获取一个事件,并通过 evdev 输入_wayland