SSM三大框架Spring_后端框架三大框架-程序员宅基地
技术标签: spring spring boot springmvc
一、三大框架基本结构
1.为什么需要框架
说明: 如果生产环境下的项目,都是从头(从底层写起)开发,难度太大了,并且开发的效率极其低下. 所以为了让项目快速的上线部署. 将某些特定的功能.进行了高级的封装. 那么我们如果需要使用封装后的API.,则必须按照人家的要求编码
2.框架的分类:
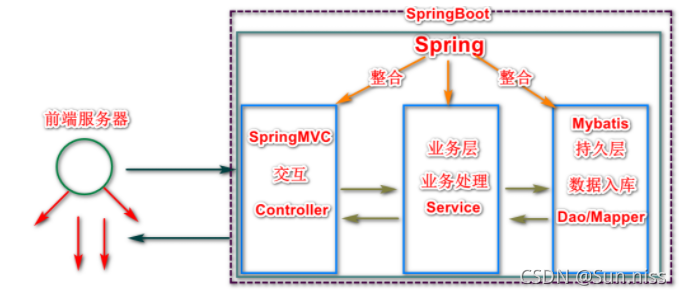
1.Spring框架:整个框架中负责“宏观调控”的(主导),负责整合其它的第三方的框架
2.SpringMVC框架:主要负责实现前后端数据的交互
3.Mybatis框架/MybatisPlus框架:持久层框架,简化了JDBC操作数据库的方式,提高效率
4.SpringBoot框架/工具:SpringBoo采用了一种更加简化的方式封装了之前的框架,让程序变得更加简单
3.框架调用流程图
二、Spring框架讲解
1.Spring介绍
Spring框架是一个开放源代码的J2EE应用程序框架,由Rod Johnson发起,是针对bean的生命周期进行管理的轻量级容器(lightweight container)。
Spring解决了开发者在J2EE开发中遇到的许多常见的问题,提供了功能强大IOC、AOP及Web MVC等功能。Spring可以单独应用于构筑应用程序,也可以和Struts、Webwork、Tapestry等众多Web框架组合使用,并且可以与 Swing等桌面应用程序AP组合。因此, Spring不仅仅能应用于JEE应用程序之中,也可以应用于桌面应用程序以及小应用程序之中。Spring框架主要由七部分组成,分别是 Spring Core、 Spring AOP、 Spring ORM、 Spring DAO、Spring Context、 Spring Web和 Spring Web MVC。
小结:Spring框架时针对bean的生命周期进行管理的轻量级容器。其中核心技术是IOC、AOP
2.Spring-IOC
1.IOC介绍
Ioc全称Inversion of Control,即“控制反转”,这是一种设计思想。对象创建的权利由Spring框架完成。由容器管理对象的生命周期。

小结:
①原来的对象的创建都是由用户自己手动创建,这样的方式耦合性 高,如果类发生变化,则代码都得变。
②现在所有的对象都交给spring容器管理,用户无需关心对象是如何实例化,容器负责对象的注入即可, 以后几乎不用修改任何代码, 降低了代码的耦合性。
2.创建User类
package com.jt.demo;

public class User {
    public void say(){
        System.out.println("我是User对象,被spring容器管理");
    }
}
3.编辑spring.xml配置文件
说明:由于需要使用spring的框架,所以需要准备spring的配置文件
在resources文件夹下创建spring.xml文件
<?xml version="1.0" encoding="UTF-8"?>
<beans xmlns="http://www.springframework.org/schema/beans"
       xmlns:xsi="http://www.w3.org/2001/XMLSchema-instance"
       xsi:schemaLocation="http://www.springframework.org/schema/beans http://www.springframework.org/schema/beans/spring-beans.xsd">
    <!--
        知识点讲解:该配置文件作用是管理对象
            术语: bean  被spring容器管理的对象称之为bean
            属性说明:
                  id:是spring容器中对象的唯一标识符,不能重复
                  class:对象的全路径
    -->
    <bean id="user" class="com.jt.demo.User"></bean>
</beans>
4.编辑test测试类
package com.jt;
import com.jt.demo.User;
import org.junit.Test;
import org.springframework.context.ApplicationContext;
import org.springframework.context.support.ClassPathXmlApplicationContext;
public class TestSpring {
@Test
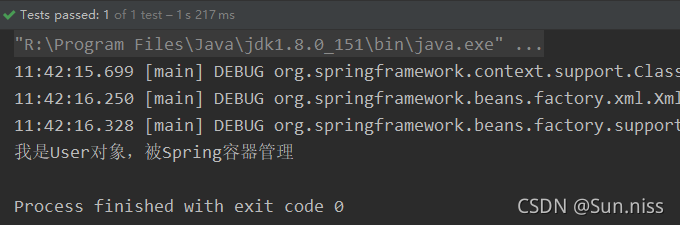
public void TestDemo1(){
String resource = "spring.xml";
//创建spring容器,并且加载指定的配置文件 ,对象已经交给容器管理
ApplicationContext context = new ClassPathXmlApplicationContext(resource);
//从容器中获取对象方式1 根据ID获取对象
User user1 = (User) context.getBean("user");
//根据类型获取数据
User user2 = context.getBean(User.class);
user1.say();
}
}
测试结果:
3.关于spring容器说明
解释:spring容器的数据结构是Map集合,Map<key,value>,
key=“bean中id的值”,value=“通过反射机制实例化的对象”

4.了解反射源码
说明:反射的机制在框架中使用较多,给定类型的路径就可以获取其中的对象,但是要求必须有无参构造,否则程序运行必报错。
反射方法创建对象时,必然调用对象的无参构造!!!
    @Test
    public void TestDemo2() throws Exception{
        User user =(User) Class.forName("com.jt.demo.User").newInstance();
        user.say();
    }
三、Spring注解开发
1.编辑User类
package com.jt.demo;

public class User {
    public void say(){
        System.out.println("使用全注解方式");
    }
}
2.编辑配置类
package com.jt.config;

import com.jt.demo.User;
import org.springframework.context.annotation.Bean;
import org.springframework.context.annotation.Configuration;

@Configuration //将当前类标识为配置类
public class SpringConfig {//xml
    /**1.xml形式
     *      <bean id="user" class="com.jt.demo.User"></bean>
     * 2.注解形式
     *      Map集合的机构 Map<方法名,方法的返回值>
     */
    @Bean
    public User user(){
        return new User();//反射机制
    }


}
3.编辑测试类
package com.jt;

import com.jt.config.SpringConfig;
import com.jt.demo.User;
import org.junit.jupiter.api.Test;
import org.springframework.context.ApplicationContext;
import org.springframework.context.annotation.AnnotationConfigApplicationContext;
import org.springframework.context.annotation.Configuration;

@Configuration
public class TestSpring {
    //利用注解的 方式管理对象
    @Test
    public void testDemo1(){
        //1.利用注解方式启动spring容器
        ApplicationContext context = new AnnotationConfigApplicationContext(SpringConfig.class);
        //2.从容器中获取对象
        User user = context.getBean(User.class);
        //3.对象调用方法
        user.say();

    }
}
4.关于IOC总结
1.什么是IOC 由Spring容器管理对象的生命周期,降低代码耦合性
2.xml配置文件管理对象
1.准备xxx.xml配置文件
2.准备bean标签
3.spring容器管理对象
ApplicationContext容器顶级接口
ClassPathXmlApplicationContext 加载配置文件的实现类对象
3.全注解的方式管理对象
1.准备配置类@Configuration+@Bean
2.要求方法 必须有返回值
3.容器对象
ApplicationContext容器顶级接口
AnnotationConfigApplicationContext
万能语法:根据当前spring的配置规则,实例化接口对象,我一般不屑这些代码,但是可以通过ApplicationContext查找指定的实现类。
四、工厂模式(重要)
1.关于对象管理问题说明
问题:任意对象都可以通过new的关键字 实例化嘛?
答案:不是,抽象类对象,不可以直接实例化。
2.关于spring中注解说明
1.@Component将当前的类,交给spring容器管理,对象的创建是由spring通过反射机制自动创建对象。
2.@ComponentScan("com.jt") 指定扫描的包路径,可以扫描它的子孙包,用在配置类中
1.编辑User类
package com.jt.demo;

import org.springframework.stereotype.Component;

@Component//将对象交给Spring容器管理,如果不指定则默认就是类名字母小写
public class User {
    public void say(){
        System.out.printf("工厂模式");
    }

}
2.编辑配置类
package com.jt.config;

import org.springframework.context.annotation.ComponentScan;
import org.springframework.context.annotation.Configuration;

@Configuration//标识这是一个配置类
@ComponentScan("com.jt")//给对象指定key的名称
public class SpringConfig {

}
3.编辑测试类
    @Test
    public void testDemo1(){
        ApplicationContext context = new AnnotationConfigApplicationContext(SpringConfig.class);

        User user = context.getBean(User.class);

        user.say();

    }
3.利用工厂模式创建对象
1.业务说明
Spring中管理的对象,大部分可以通过new/反射进行对象的创建. 但是有些对象由于特殊的原因.不能直接new/实例化。这时需要考虑是否可以通过工厂模式实现。
例如: Calendar 该类是一个抽象类 所以不能直接实例化
2.创建工场模式
package com.jt.factory;

import org.springframework.beans.factory.FactoryBean;
import org.springframework.stereotype.Component;

import java.util.Calendar;

/**
 * FactoryBean是spring提供的接口,spring自动完成调用,获取指定对象
 *
 * 难点讲解:
 * 1.@Component 标识类 则将该类交给spring容器管理
 * 2.spring中的FactoryBean的讲解  如果spring加载的时候遇到FactoryBean接口时,
 * 则会自动执行重写方法
 * 3.工厂模式说明:
 *      Map<key=calendar,value=calendar对象>
 * 核心功能:
 *      1.key:就时当前类型(如果自己编辑注解以注解为准)
 *      2.value:调用getObject获取返回值对象
 *      将上述的数据,交给Sprig容器管理
 * 该功能什么时候使用:
 *      1.某些对象不能直接实例化
 *      2.整合其他第三方框架对象时,经常使用
 */
@Component("calendar")
//@Component("calendar111")
public class CalendarFactory implements FactoryBean<Calendar> {

    public CalendarFactory(){
        System.out.println("工厂模式的无参构造");
    }

    //动态执行该方法,获取返回值对象
    @Override
    public Calendar getObject() throws Exception {
        //利用calendar的工具API,实现对象的创建
        return Calendar.getInstance();
    }

    @Override
    public Class<?> getObjectType() {
        //固定写法,一般直接xxx。calss
        return Calendar.class;
    }
}
3.编辑测试API
    @Test
    public void testDemo2(){
        ApplicationContext context = new AnnotationConfigApplicationContext(SpringConfig.class);

        Calendar calendar = context.getBean(Calendar.class);
        //Calendar calendar =(Calendar) context.getBean("calendar111");
        System.out.println("获取当前时间:"+calendar.getTime());
        System.out.println("获取年:"+calendar.getWeekYear());

    }
4.注解复习
1.@Configuration 标识配置类
2.@Bean 将自己方法的返回值交给Spring容器管理
3.@component 将该类交给Spring容器管理,通过反射自动实例化对象
4.@ComponentScan("com.jt") 包扫描的注解,使Spring注解有效
五、Spring框架讲解
1.单例多例
1.关于单例和多利说明
单例模式:
Spring容器中管理对象,在内存中只有一份。
多例模式:
Spring容器中管理对象,在内存中有多份。
2.测试
编辑User类
package com.jt.demo;


public class User {
    public User(){
        System.out.println("我是无参构造创建对象");
    }

    public void say(){
        System.out.println("测试对象单例还是多例");
    }
}
编辑配置类
package com.jt.config;

import com.jt.demo.User;
import org.springframework.context.annotation.Bean;
import org.springframework.context.annotation.ComponentScan;
import org.springframework.context.annotation.Configuration;
import org.springframework.context.annotation.Scope;

@Configuration  //标识这是配置类
@ComponentScan("com.jt")
public class SpringConfig {

    @Bean
    //@Scope("singleton")  //默认值  单例模式
    @Scope("prototype")  //多例模式
    public User user(){
        return new User();
    }

}
编辑测试类
    @Test
    public void testDemo1() {

        ApplicationContext context = new AnnotationConfigApplicationContext(SpringConfig.class);

        User user1 = context.getBean(User.class);
        User user2 = context.getBean(User.class);


        user1.say();
        System.out.println(user1 == user2);
    }
3.关于单例多例的测试
规则1:Spring默认的测试 @Scope("singleton") 默认值 单例模式
规则2: @Scope("prototype") 设置为多例模式
2.懒加载机制
1.懒加载说明
说明:如果Spring容器创建,对象立即创建则该加载方式为“立即加载”, (容器启动创建)
如果Spring容器创建,对象在被使用的时候才创建,则被称为“懒加载”。 (用时创建)
注解@Lazy 添加标识改为懒加载
测试说明:主要测试对象中的无参构造什么时候执行!
2.测试
配置类
package com.jt.config;

import com.jt.demo.User;
import org.springframework.context.annotation.*;

@Configuration  //标识这是配置类
@ComponentScan("com.jt")
public class SpringConfig {

    @Bean
    //@Scope("singleton")  //默认值  单例模式
    //@Scope("prototype")  //多例模式
    @Lazy      //懒加载
    public User user(){
        return new User();
    }

}
3.多例与懒加载的关系
说明:只要对象是多例模式,则都是懒加载,在单例模式中控制懒加载才“有效”。
规则说明:
单例模式:有@Lazy注解时,有效,为懒加载,无@Lazy注解时,为立即加载
多例模式:有无@#Lazy无影响,都是懒加载
4.关于Lazy使用场景说明
1.服务器启动时,如果加载太多资源,则必然导致服务器启动慢,适当的将不重要的资源设置为懒加载。
2.有时用户会需要一些特殊的 “链接”,而这些链接的创建需要很长的时间,可以使用懒加载。
3.Spring生命周期管理
1.关于生命周期说明
说明:一个对象从创建到消亡,可以划分为四个阶段,如果需要对程序进行干预,则可以通过周期方法进行干预。(回调函数/钩子函数/接口回调)
生命周期函数的作用:主要作用可以在各个时期对对象进行干预
##2.生命周期函数方法的使用
1.编辑Person类
package com.jt.demo;

import org.springframework.stereotype.Component;

import javax.annotation.PostConstruct;
import javax.annotation.PreDestroy;

@Component  //将对象交给spring容器管理 key=Person value:反射对象
public class Person {
    public Person(){
        System.out.println("张三出生,资质拉满");
    }

    @PostConstruct  //在对象创建之后立即调用    初始化
    public void init(){
        System.out.println("张三成为少年奇才");
    }

    //业务方法
    public void doWork(){
        System.out.println("迎娶TXL美人鱼!");
    }

    @PreDestroy //对象消亡时调用
    public void destroy(){
        System.out.println("销毁:奥利给`");
    }
}
2.编辑测试类 , 容器对象使用AnnotationConfigApplicationContext类,
容器销毁:context.close()
    @Test
    public void testDemo3Init() {
        //容器启动,对象创建
        AnnotationConfigApplicationContext context = new AnnotationConfigApplicationContext(SpringConfig.class);
        //从容器中获取对象(要用)
        Person person = context.getBean(Person.class);

        person.doWork();
        //将容器关闭,销毁
        context.close();
    }
3.使用注解
@PostConstruct 在对象创建之后调用(初始化)
@PreDestroy 对象消亡时调用(销毁)
4.依赖注入(Dependency Injection ,简称DI)
1.项目结构

2.创建结构
1.创建Cat类 Dog类 User类
说明:Dog/Cat类进行对象的注入功能
3.@Autowired注解
功能:可以将Spring容器中的对象,自动注入到属性中
注入方式:
1.默认按照方式注入,如果注入的属性是接口,则自动注入实现类。
2.按照名称注入(key),一般条件下不用。
重要前提:如果需要依赖注入,则对象必须交给Spring容器管理。
1.编辑Pet接口:
package com.jt.demo;

public interface Pet {
    void hello();
}
2.编辑Cat类
package com.jt.demo;

import org.springframework.stereotype.Component;

@Component  //将对象交给Spring容器管理  key:Cat value:反射Cat对象
public class Cat implements Pet{
    @Override
    public void hello(){
        System.out.println("猫子叫");
    }
}
3.编辑User类
package com.jt.demo;

import org.springframework.beans.factory.annotation.Autowired;
import org.springframework.stereotype.Component;

@Component  //将User交给Spring容器管理
public class User {

    @Autowired  //效果:将当前接口的实现类自动注入
    private Pet pet;

    public void say(){
        //调用宠物方法
        pet.hello();

    }


}
4.编辑配置类
package com.jt.config;

import org.springframework.context.annotation.ComponentScan;
import org.springframework.context.annotation.Configuration;

@Configuration //标识配置类
@ComponentScan("com.jt") //包扫描
public class SpringConfig {
}
5.编辑测试类
    @Test
    public void testDemo1(){
        AnnotationConfigApplicationContext context = new AnnotationConfigApplicationContext(SpringConfig.class);

        User user = context.getBean(User.class);
        user.say();
    }
6.报错说明:一个接口一个只有一个实现类,否则Spring程序无法选择。
如果有多个实现类,在@Autowired后加@Qualifier("小写类名")注解,选择哪个实现类加哪个类名。 @Resource(name = "dog")和以上两个 结果相同,但最好不用

5.MVC设计思想
1.MVC思想说明
经典MVC模式中,M是指业务模型,V是指用户界面,C则是控制器,使用MVC的目的是将M和V的实现代码分离,从而使同一个程序可以使用不同的表现形式。其中,View的定义比较清晰,就是用户界面。
M:model 业务模型
V:view 用户界面
C:controller 控制层
小结:
1.MVC是一种设计思想,在编码中降低代码的耦合性。
2.前端专注于开发页面view
3.后端专注于开发后端model
4.2者通过controller进行控制
2.层级代码结构
说明:MVC设计思想,实现了前端和后端的松耦合。为了很好的实现MVC设计思想,所以后端代码也应该分层。
分层说明:
1.控制层 Controller 与前端页面交互 @Controller
2.业务层 Service 编辑业务逻辑 @Service
3.持久层 Mapper 实现数据库的相关操作 暂时:@Repository
3.创建项目

1.编辑Dao层/Mapper层
编辑UserMapper接口和实现类
package com.jt.mapper;

//面向接口开发
public interface UserMapper {

    void addUser();
}
package com.jt.mapper;
import org.springframework.stereotype.Repository;
@Repository //为了让程序员开发更有层级的概念
public class UserMapperImpl implements UserMapper {
@Override
public void addUser() {
System.out.println("新增用户TXL");
}
}2.编辑Service层
编辑UserService接口及实现类
package com.jt.service;

public interface UserService {
    void addUser();
}
package com.jt.service;
import com.jt.mapper.UserMapper;
import org.springframework.beans.factory.annotation.Autowired;
import org.springframework.stereotype.Service;
@Service
public class UserServiceImpl implements UserService {
@Autowired
private UserMapper userMapperr; //默认按照类型注入
@Override
public void addUser() {
userMapperr.addUser();
}
}
3.编辑Controller层
package com.jt.controller;

import com.jt.service.UserService;
import org.springframework.beans.factory.annotation.Autowired;
import org.springframework.stereotype.Controller;

@Controller
public class UserController {

    @Autowired
    private UserService userService;

    public void insert(){
        userService.addUser();
    }
}
4.编辑测试类
    @Test
    public void testDemoMVC1(){
        ApplicationContext context = new AnnotationConfigApplicationContext(SpringConfig.class);
        UserController controller = context.getBean(UserController.class);
        controller.insert();
    }
6.请谈一下对IOC/DI的看法
历史:传统代码其中的属性对象一般都通过new关键字手动创建,这样的代码耦合性高,不方便扩展。
功能:
1.IOC:由Spring容器管理对象的生命周期
2.使得对象与对象之间的耦合性降低
3.DI是依赖注入,只有被Spring容器管理的对象才可以被依赖注入,默认条件下采用类型注入,如果有特殊需求也可以采用名称注入@Qualifier("cat")。
4.Spring中 IOC和DI相互配合 ,可以极大程度上降低耦合性
意义:Spring由于采用了IOC/DI的设计方式,可以整合其它的第三方框架,使得程序的调用浑然一体。
7.@Value注解说明
说明:@Value注解 可以直接为 基本类型 和 String类型赋值
问题:如果像图中赋值,则耦合性依然很高,不通用
1.编辑user.properties
说明:对象中的属性一般都是业务数据,如果需要为业务数据赋值,则一般采用properties文件,更加灵活。
位置:在resources下创建user.properties
配置文件的内容:
user.id=008
user.name=张三
2.@Value为属性赋值
package com.jt.mapper;

import org.springframework.beans.factory.annotation.Value;
import org.springframework.context.annotation.PropertySource;
import org.springframework.stereotype.Repository;

@Repository  //为了让程序员开发更有层级概念
@PropertySource(value = "classpath:/user.properties",encoding = "utf-8")  //  :/ 代表资源加载路径
public class UserMapperImpl implements UserMapper{

    //耦合性,动态赋值
    //表达式: 固定写法${}  springel表达式 取值方式 缩写spel表达式
    //规则:通过表达式动态获取spring容器中的value
    @Value("${user.id1}")
    private int id1;
    @Value("${user.name1}")
    private String name1;

    @Override
    public void addUser() {
        System.out.println("新增用户id:"+id1+"新增用户姓名:"+name1);
    }
}
六、代理模式
1.创建项目

2.Spring-AOP
AOP介绍
AOP为Aspect Oriented Programming的缩写,意为:面向切面编程,通过预编译方式和运行期间动态代理实现程序功能的统一维护的一种技术。AOP是OOP的延续,是软件开发中的一个热点,也是Spring框架中的一个重要内容,是函数式编程的一种衍生范型。利用AOP可以对业务逻辑的各个部分进行隔离,从而使得业务逻辑各部分之间的耦合度降低,提高程序的可重用性,同时提高了开发的效率。
AOP主要作用: 在不修改原有代码的条件下 对方法进行扩展
3.业务层如何控制事务
事务:可以保证数据的原子性、一致性、持久性、隔离性
    @Override
    public void addUser() {
        try{
        System.out.println("开启数据库事务");
        System.out.println("新增用户");
        System.out.println("提交数据库事务");
        }catch (Exception e){
            System.out.println("事务回滚");
        }
    }
1.业务代码-问题
1.如果有多个方法,则每个方法都需要控制事务,代码重复率很高
2.业务层service,应该只处理业务,不要和事务代码耦合在一起,否则扩展性不好,耦合性高。
如何解决:采用代理机制解决
4.代理机制
1.代理模式说明
说明:一般采用代理模式,主要目的就是为了解耦,将公共的通用的方法(功能/业务)放到代理对象中,由业务层专注于业务执行即可。
2.代理特点
1.为什么使用代理?因为自己不方便(没有资源)
2.代理作用? 代理要解决(扩展)某些实际问题
3.用户最终执行目标方法!

3.动态代理-JDK模式(Spring整合Mybatis用的是JDK代理模式)
1.JDK代理的说明
1.JDK代理模式是java原生提供的AOI,无需导包
2.JDK代理要求:被代理者必须 要么是接口要么实现接口 接口
3.灵活:代理对象 应该看起来和被代理者一模一样(方法相同)
2.编辑代理类
package com.jt.proxy;

import java.lang.reflect.InvocationHandler;
import java.lang.reflect.Method;
import java.lang.reflect.Proxy;

public class JDKProxy {

    //传入target目标对象,获取代理对象
    //利用代理对象 实现方法的扩展
    public static Object getProxy(Object target) {
        //1.获取类加载器(先得到类型,再得到类加载器)
        ClassLoader classLoader = target.getClass().getClassLoader();
        //2.获取接口的数组类型
        Class<?>[] interfaces = target.getClass().getInterfaces();
        //3.代理对象执行方法时的回调方法(代理对象调用方法时,执行InvocationHandler)
        return Proxy.newProxyInstance(classLoader, interfaces, invocationHandler(target));
    }

    //要求必须传递目标对象
    public static InvocationHandler invocationHandler(Object target) {
        return new InvocationHandler() {
            /**
             * 参数说明:
             *  1.proxy代理对象
             *  2.method执行当前的目标方法
             *  3.Object[] args 参数数组
             *  */
            @Override
            public Object invoke(Object proxy, Method method, Object[] args) throws Throwable {
                System.out.println("事务开始");
                //执行目标方法,获取目标方法的返回值
                Object result = method.invoke(target, args);
                System.out.println("事务提交");
                return result;
            }
        };
    }
}
4.动态代理-CGLIB代理(SpringBoot默认代理机制)
1.CGLIB说明
jdk代理:要求必须有/实现接口,如果没有接口,则JDK代理不能正常运行
cglib代理:要求被代理者有无接口都可以,代理对象是目标对象的子类 重写子类方法
2.编辑代理类
package com.jt.proxy;

import org.springframework.cglib.proxy.Enhancer;
import org.springframework.cglib.proxy.MethodInterceptor;
import org.springframework.cglib.proxy.MethodProxy;

import java.lang.reflect.Method;

public class CGlibProxy {

    public static Object getProxy(Object target){
        //1.创建增强器对象
        Enhancer enhancer = new Enhancer();
        //2.设定父级 目标对象
        enhancer.setSuperclass(target.getClass());
        //3.定义回调的方法 代理对象执行目标方法时调用
        enhancer.setCallback(getMethodInterceptor(target));
        //4.创建代理对象
        return enhancer.create();

    }
    public static MethodInterceptor getMethodInterceptor(Object target){
        return new MethodInterceptor() {
            @Override
            public Object intercept(Object o, Method method, Object[] objects, MethodProxy methodProxy) throws Throwable {
                System.out.println("事务开始");
                Object result = method.invoke(target, objects);
                System.out.println("事务提交");
                return null;

            }
        };
    }
}
5.关于JDK代理和CGLIB代理总结
1.JDK要求必须有/实现接口,cgblib有无接口都可以创建代理对象,代理对象是目标对象的子类
2.JDK代理根据API:Proxy.newProxyInstance(类加载器,接口数组,invocationHandle接口)
3.CGLIB代理工具API:Enhancer 增强器对象 获取代理对象:enhancer.create()
回调接口:MethodInterceptor接口
4.JDK中必须执行目标方法:method.invoke(target,args)
CGLIB必须执行的目标方法:method.invoke(target,args)
5.Spring AOP介绍
1.引入jar包
            <!--引入AOPjar包文件-->
            <dependency>
                <groupId>org.springframework.boot</groupId>
                <artifactId>spring-boot-starter-aop</artifactId>
            </dependency>
2.AOP介绍
在软件业,AOP为Aspect Oriented Programming的缩写,意为:面向切面编程,通过预编译方式和运行期间动态代理实现程序功能的统一维护的一种技术。AOP是OOP的延续,是软件开发中的一个热点,也是Spring框架中的一个重要内容,是函数式编程的一种衍生范型。利用AOP可以对业务逻辑的各个部分进行隔离,从而使得业务逻辑各部分之间的耦合度降低,提高程序的可重用性,同时提高了开发的效率。
总结: Spring中的AOP 利用代理对象在不修改源代码的条件下,对方法进行扩展。

3.AOP中专业术语
1.连接点:用户可以被扩展的方法
2.切入点:用户实际扩展的方法
3.通知:扩展方法的具体体现
4.切面:将通知应用到切入点过程
4.AOP入门案例
1.编辑配置类
package com.jt.config;

import org.springframework.context.annotation.ComponentScan;
import org.springframework.context.annotation.Configuration;
import org.springframework.context.annotation.EnableAspectJAutoProxy;

@Configuration
@ComponentScan("com.jt")
@EnableAspectJAutoProxy //开启AOP,启用切面自动注解
public class SpringConfig {
}
2.编辑切面类1
package com.jt.aop;

import org.aspectj.lang.ProceedingJoinPoint;
import org.aspectj.lang.annotation.*;
import org.springframework.stereotype.Component;


@Component    //将该类交给spring容器管理
@Aspect   //定义切面类
public class SpringAOP {
    /**
     * 公式: 切面=切入点表达式 + 停止方法
     * 切入点表达式:如果目标对象满足切入点表达式的判断
     *              则spring自动为其创建代理对象
     * 目标对象的bean的id:userServiceImpl
     * 切入点表达式:@Pointcut
     *      1.bean("bean的ID")
     *  AOP规则:如果目标对象满足切入点表达式,则执行通知方法
     *
     * */
    @Pointcut("bean(userServiceImpl)")
    public void pointcut(){

    }
    //1.前置通知:在目标方法执行之前执行
    @Before("pointcut()")
    public void before(){
        System.out.println("我是前置通知");
    }
    //2.后置通知:在目标方法执行之后执行
    @AfterReturning("pointcut()")
    public void afterReturning(){
        System.out.println("我是后置通知");
    }
    //3.异常通知:目标方法执行报错时,执行该通知
    @AfterThrowing("pointcut()")
    public void afterThrow(){
        System.out.println("我是异常通知");
    }
    //4.最终通知:目标方法之后都要执行的通知
    @After("pointcut()")
    public void after(){
        System.out.println("我是最终通知,都要执行");
    }
    //5.(重点)环绕通知:在目标方法执行前后都要执行,控制目标方法
    @Around("pointcut()")
    public Object around(ProceedingJoinPoint joinPoint)throws Throwable{
        System.out.println("环绕通知执行前");
        Object result = joinPoint.proceed();
        System.out.println("环绕通知执行后");
        return result;
    }

}
5.切入点表达式
1.bean标签
说明:根据bean的ID匹配
2.within标签
说明:按照类型匹配,可以使用通配符 * 号
语法:
1.@Pointcut("within(com.jt.service.UserServiceImpl)") //拦截UserServiceImpl这个类
2.@Pointcut("within(com.jt.service.*)") //拦截com.jt.service下的所有的类(一个点,拦截所有类)
3.@Pointcut("within(com.jt.service..*)") //(两个点,拦截所有,包括子包里的类)
4.@Pointcut("within(com.*.service..*)") //com包下的所有包含service包的所有
3.execution表达式
作用: 粒度比较细,可以按照方法参数进行匹配
@Pointcut("execution(返回值类型 包名.类名.方法名(参数列表))")
1. 按照类型方法匹配
@Pointcut("execution(* com.jt.service.UserServiceImpl.addUser())")
2. 要求返回值任意, com.jt.service包下的所有的子孙类中的任意方法的任意参数要求拦截.
@Pointcut("execution(* com.jt.service..*.*(..))")
3. 要求返回值任意, com.jt.service包下的所有的子孙类中的add开头的方法并且参数1个是int类型 进行拦截
@Pointcut("execution(* com.jt.service..*.add*(int))")
4.@annotation表达式
1.完成自定义注解Gjh
@Pointcut("@annotation(com.jt.anno.Gjh)")
package com.jt.anno;

import java.lang.annotation.ElementType;
import java.lang.annotation.Retention;
import java.lang.annotation.RetentionPolicy;
import java.lang.annotation.Target;

@Retention(RetentionPolicy.RUNTIME)//注解运行期有效
@Target(ElementType.METHOD)         //注解标识方法
public @interface Gjh {
    String name() default "gjh";
    int age();
}
2.完成标记注解
给delUser()方法加上自定义注解@Gjh就能加上通知
public class UserServiceImpl implements UserService{
    @Override
    @Gjh(age = 23)
    public void addUser() {
        System.out.println("新增用户");
        //int a = 1/0;
    }
    @Gjh(age = 23)
    @Override
    public void delUser() {
        System.out.println("删除用户");
    }
}
6.关于通知
1.关于AOP通知的用法
第一类:
1.@Before通知:目标方法执行前执行
2.@AfterReturning通知:目标方法执行后执行
3.@AfterThrowing通知:目标方法报错时执行
4.@After通知:目标方法执行之后,最后执行
日志系统:可以记录程序执行的各个过程,为日志提供记录
第二类:
5.@Around环绕通知,可以控制目标方法是否执行,环绕通知可以控制业务流转的过程。
例子:
1.权限的校验
2.缓存系统
3.异常处理
2.通知中常用API
ProceedingJoinPoint 只能用在环绕通知中
    //1.前置通知:在目标方法执行之前执行
    @Before("pointcut()")
    public void before(JoinPoint joinPoint){//连接点:获取方法中的数据
        //获取目标对象的类型
        Class<?> targetClass = joinPoint.getTarget().getClass();
        //获取方法名称
        String methodName = joinPoint.getSignature().getName();
        //获取类名
        String className = joinPoint.getSignature().getDeclaringTypeName();
        Object[] objs = joinPoint.getArgs();
        System.out.println("我是前置通知");
        System.out.println("类型"+targetClass);
        System.out.println("方法名称"+methodName);
        System.out.println("类名"+className);
        System.out.println("方法中携带的参数"+ Arrays.toString(objs
        ));
    }
3.后置通知
需求:记录目标方法的返回值
说明:通过属性returning获取方法的返回值
    //2.后置通知:在目标方法执行之后执行
    //通过returning = "result"属性,获取目标方法的返回值,当作参数传给result
    @AfterReturning(value = "pointcut()",returning = "result")
    public void afterReturning(Object result){
        System.out.println("我是后置通知");
        System.out.println("用户的返回值为:"+result);
    }
4.异常通知
说明:如果用户执行业务方法时,报错了,可以使用异常通知记录日志
    //3.异常通知:目标方法执行报错时,执行该通知
    @AfterThrowing(value = "pointcut()",throwing = "exception")
    public void afterThrow(Exception exception){
        System.out.println("我是异常通知");
        System.out.println("获取异常信息"+exception.getMessage());
        exception.printStackTrace();//所有异常
    }
7.AOP执行顺序(切面排序)
@Order(数字) 数字越小越靠前执行
编辑AOP类1
package com.jt.aop;

import org.aspectj.lang.JoinPoint;
import org.aspectj.lang.ProceedingJoinPoint;
import org.aspectj.lang.annotation.*;
import org.springframework.core.annotation.Order;
import org.springframework.stereotype.Component;

import java.util.Arrays;


@Component    //将该类交给spring容器管理
@Aspect   //定义切面类
@Order(2)  //执行顺序AOP第二个执行,数字越小越靠前
public class SpringAOP {
    /**
     * 公式: 切面=切入点表达式 + 停止方法
     * 切入点表达式:如果目标对象满足切入点表达式的判断
     *              则spring自动为其创建代理对象
     * 目标对象的bean的id:userServiceImpl
     * 切入点表达式:@Pointcut
     *      1.bean("bean的ID")
     *  AOP规则:如果目标对象满足切入点表达式,则执行通知方法
     *
     * */
    //@Pointcut("bean(userServiceImpl)")
    //@Pointcut("within(com.jt.service.UserServiceImpl)")
    //@Pointcut("within(com.jt.service..*)")
    //@Pointcut("execution(* com.jt.service.UserServiceImpl.addUser())")
    //@Pointcut("execution(* com.jt.service..*.*(..))")
    @Pointcut("@annotation(com.jt.anno.Gjh)")
    public void pointcut(){

    }
    //1.前置通知:在目标方法执行之前执行
    @Before("pointcut()")
    public void before(JoinPoint joinPoint){//连接点:获取方法中的数据
        //获取目标对象的类型
        Class<?> targetClass = joinPoint.getTarget().getClass();
        //获取方法名称
        String methodName = joinPoint.getSignature().getName();
        //获取类名
        String className = joinPoint.getSignature().getDeclaringTypeName();
        Object[] objs = joinPoint.getArgs();
        System.out.println("我是前置通知");
        System.out.println("类型"+targetClass);
        System.out.println("方法名称"+methodName);
        System.out.println("类名"+className);
        System.out.println("方法中携带的参数"+ Arrays.toString(objs
        ));
    }
    //2.后置通知:在目标方法执行之后执行
    //通过returning = "result"属性,获取目标方法的返回值,当作参数传给result
    @AfterReturning(value = "pointcut()",returning = "result")
    public void afterReturning(Object result){
        System.out.println("我是后置通知");
        System.out.println("用户的返回值为:"+result);
    }
    //3.异常通知:目标方法执行报错时,执行该通知
    @AfterThrowing(value = "pointcut()",throwing = "exception")
    public void afterThrow(Exception exception){
        System.out.println("我是异常通知");
        System.out.println("获取异常信息"+exception.getMessage());
        exception.printStackTrace();//所有异常
    }
    //4.最终通知:目标方法之后都要执行的通知
    @After("pointcut()")
    public void after(){
        System.out.println("我是最终通知,都要执行");
    }
    //5.(重点)环绕通知:在目标方法执行前后都要执行,控制目标方法
    @Around("pointcut()")
    public Object around(ProceedingJoinPoint joinPoint)throws Throwable{
        System.out.println("环绕通知执行前");
        Object result = joinPoint.proceed();
        System.out.println("环绕通知执行后");
        return result;
    }

}
编辑AOP类2
package com.jt.aop;

import org.aspectj.lang.ProceedingJoinPoint;
import org.aspectj.lang.annotation.Around;
import org.aspectj.lang.annotation.Aspect;
import org.springframework.core.annotation.Order;
import org.springframework.stereotype.Component;

@Component   //将该类交给spring容器管理
@Aspect      //标识切面类
@Order(1)  //第一个执行
public class SpringAOP2 {
    //通过环绕通知 指定切入点表达式
    @Around("@annotation(com.jt.anno.Gjh)")
    public Object around(ProceedingJoinPoint joinPoint) throws Throwable{
        //1.如果有下一个通知,则执行通知方法,没有通知,则执行目标方法
        System.out.println("执行环绕通知B开始");
        Object result = joinPoint.proceed();
        System.out.println("执行环绕通知B结束");
        return result;
    }

}
8.关于代理对象生成策略说明
默认策略:
1.Spring中默认采用的动态代理的规则是JDK代理。
2.如果需要修改为CGLIB代理,则添加以下代码。(SpringBoot默认代理模式采用CGLIB代理,如果需要修改为JDK代理,则需要修改配置文件)
@Configuration
@ComponentScan("com.jt")
@EnableAspectJAutoProxy(proxyTargetClass = true) //开启AOP,启用切面自动注解
public class SpringConfig {
}
七、关于Spring总结
1.为什么学习Spring框架
让程序设计实现松耦合
2.什么是面向接口编程
以后对象中的属性一般写接口,java中多态的体现,属性类型更加灵活 松耦合
3.什么是IOC
IOC为控制反转
4.Spring容器启动方式
1.xml方式 2.注解方式
5.什么时候使用工程模式:
1.对象不能直接实例化的时候
2.spring框架整合其他第三方框架时使用
6.单例/多例模式
1.@Scope("singleton") 单例模式 默认
2.@Scope("prototype") 多例模式
7.懒加载规则
默认规则下,懒加载无效,添加注解@Lazy 有效,只对单例模式有效,多例默认是懒加载
8.Spring生命周期管理
4个过程: 1.对象创建 2.对象初始化@PostConstruct init() 3.业务调用 4.对象销毁@PreDestroy destroy()
9.Spring中依赖注入的注解@Autowired
1.默认按照类型注入
2.可以按照名称注入 再叫ai@Qualifier("cat")
3.@Resource注解
10.MVC设计思想
View视图层 Model业务层 Control控制层
根据MVC设计思想:层级代码结构Controller/Service/Mapper|Dao
11.@Value
Spring为属性动态复制 基本类型和String和集合(几乎不用)
12.动态代理
·JDK动态代理/CGLIB动态代理
13.AOP 面向切面编程
1.在不改变源码的条件下对方法进行扩展
2.@Aspect 标识切面
3.@Pointcut 标识切入点表达式 4种写法 2种常用
4.五个通知注解:@Before() @AfterReturning @AfterThrowing @After @Around
5.@EnableAspectJAutoProxy 开启AOP
6.@Order 排序注解
14.配置pom.xml文件,以下配置将默认激活-dev.yml配置文件
14.1pom文件
<profiles>
        <profile>
            <id>dev</id>
            <activation>
                <!--默认激活-->
                <activeByDefault>true</activeByDefault>
            </activation>
            <properties>
                <spring.profiles.active>dev</spring.profiles.active>
            </properties>
        </profile>
        <profile>
            <id>prod</id>
            <properties>
                <spring.profiles.active>prod</spring.profiles.active>
            </properties>
        </profile>
    </profiles>
14.2yml文件中写入:spring: profiles: active: dev
14.3. 项目启动的时候也可以设置 Java -jar xxxxxx.jar spring.profiles.actiove=prod 也可以这样启动设置配置文件,但是这只是用于开发和测试。
14.4. 配置文件数据的读取:
比如我在文件中配置了一个
massage:
  data:
    name: qibaoyi
我在类中想要获取他 需要这样去写:
@Value("${message.data.name}") private String name; 后面你取到变量name 的值就是配置文件中配置的值。
智能推荐
解决Unity开启多个协程卡顿问题_unity 多个协程-程序员宅基地
文章浏览阅读3.1k次。Unity开启多个协程往往造成卡顿,因此需要每完成一个协程再新开启一个协程。for (int i = 0; i < result.result.Count; i++) { try { BaseStation responses = JsonMapper.ToObject<BaseStation>(JsonMapper.ToJson(result.result[i])); ..._unity 多个协程
spring+SpringMvc+Mybaits配置多个数据库_springmvc+mybatis配置多个数据库-程序员宅基地
文章浏览阅读410次。一、配置文件二、创建一个实体类,切换数据库三、切换数据库的代码_springmvc+mybatis配置多个数据库
前端框架们_阿里 前端框架 乌米-程序员宅基地
文章浏览阅读675次。我司打算搞个地图应用,领导发给我一份ppt,里面有个前端的技术架构图:what!前端技术都进化得这么复杂啦?就搞一个前端,至于用到这么多框架?就问你晕不晕!底部的es6,fetch是基础的语法,这个没什么好讲的。arcgis jsapi,是地图服务接口,也没什么好说的。webpack,打包工具,还行吧。顶部的echarts,经常用,很好用,不错。但ant design是蚂蚁金服的东东,与r..._阿里 前端框架 乌米
Turn on ClearType。打开ClearType看英文资料不再那么费眼。-程序员宅基地
文章浏览阅读64次。下面是微软提供的在线打开ClearType 网址,装好插件之后按提示一步一步的点下去。发现还是比较爽的。呵呵~http://www.microsoft.com/typography/cleartype/tuner/Step1.aspx转载于:https://www.cnblogs.com/zwwon/archive/2007/07/10/812598.html..._chrome 英文和数字显示cleartype
jQuery.template.js 简单使用-程序员宅基地
文章浏览阅读125次。之前看了一篇文章《我们为什么要尝试前后端分离》,深有同感,并有了下面的评论:我最近也和前端同事在讨论这个问题,比如有时候前端写好页面给后端了,然后后端把这些页面拆分成很多的 views,有时候还会在这些 view 中写一些 c# 代码,突然有一天前端页面的样式出错了,但前端那里并没有问题,然后后端把前端叫过来,说你在我这里调吧,因为你没有后端的调试环境,然后前端就会很不爽,然后。。。你懂的!..._/template/pc/skin/js/jquery.js
天池:零基础入门NLP - 新闻文本分类_天池学习赛零基础入门nlp - 新闻文本分类完成-程序员宅基地
文章浏览阅读256次。天池:零基础入门NLP - 新闻文本分类赛题理解解题思路赛题理解赛题链接:https://tianchi.aliyun.com/competition/entrance/531810/information划重点:字符级匿名处理(防止人工标注答案)、14个分类类别(0-13)、评价标准为类别f1_score的均值(越大越好)解题思路【难点】数据形式是匿名化字符,无法分词【分析】文本数据是典型的非结构化数据,可能涉及特征提取和分类模型两个部分【思路】TF-IDF + 机器学习分类器_天池学习赛零基础入门nlp - 新闻文本分类完成
随便推点
react Link跳转无效_React Native开发之react-navigation详解-程序员宅基地
文章浏览阅读299次。众所周知,在多页面应用程序中,页面的跳转是通过路由或导航器来实现的。在0.44版本之前,开发者可以直接使用官方提供的Navigator组件来实现页面的跳转,不过从0.44版本开始,Navigator被官方从react native的核心组件库中剥离出来,放到react-native-deprecated-custom-components的模块中。 如果开发者需要继续使用Navigator,则需要..._react navigate(-1) url不生效
python倒计时60,Python微项目分享之重要事件倒计时-程序员宅基地
文章浏览阅读109次。作者:JiawuZhang出品:JiawuLab(ID:jiawulab)微项目系列是JiawuLab原创栏目,每期选取一个自创项目或发现有趣的项目,进行代码、逻辑分析,达到python学习目的。大家好,我是JiawuZhang,本期微项目是——事件倒计时。项目介绍“11月11日0点0分0秒!”你是不是也在等着这个时间?看看电视,玩玩手机,刷刷购物车,只为等着这个时间到来。图片来自网络我老婆也是这..._python倒计时60秒
Could not connect to https://mirrors.tuna.tsinghua.edu.edu.cn/anaconda/pkgs/free/noarch/_could not connect to mirrors.tuna.tsinghua.edu.cn-程序员宅基地
文章浏览阅读5k次。解决方法:删除 .condarc文件 。 .condarc以点开头,一般表示 conda 应用程序的配置文件,在用户的根目录 (windows:C:\users\username\,linux:/home/username/)。但对于.condarc配置文件,是一种可选的(optional)运行期配置文件,其默认情况下是不存在的。 ..._could not connect to mirrors.tuna.tsinghua.edu.cn
MAC安装git的三种方式-程序员宅基地
文章浏览阅读1.7w次,点赞7次,收藏25次。以上是在MAC操作系统中安装Git的三种不同方式。Homebrew是最方便的方式之一,但如果您不想使用Homebrew,则可以选择从官方Git网站下载安装程序或使用Xcode Command Line Tools安装Git。无论您选择哪种方法,都应该能够很容易地安装和使用Git。_mac安装git
基于风控特征相关度,挖掘贷中等场景中的存量客户价值|来看看相关实操_风控 建立存量客户的特征标签-程序员宅基地
文章浏览阅读836次。基于风控特征相关度,挖掘贷中等场景中的存量客户价值|来看看相关实操_风控 建立存量客户的特征标签
Internet Download Manager v6.36 Build 3 Final 注册版-IDM下载工具_ternet_download_manager 注册版-程序员宅基地
文章浏览阅读1.9k次。亲测可用Internet Download Manager(简称IDM)下载速度最多达其他下载工具5倍的下载具。Internet Download Manager的续传功能可以恢复因为断线、网络问题、计算机当机甚至无预警的停电导致下传到一半的软件。此程序具有动态档案分割、多重下载点技术,而且它会重复使用现有的联机,而不需再重新联机登入一遍。聪明的in-speed技术会动态地将所有设定应用到某种..._ternet_download_manager 注册版