PostgreSQL数据库_pg数据库-程序员宅基地
技术标签: postgresql 数据库 sql
PostgreSQL数据库
一、PG简介
PostgreSQL是一个免费的对象·关系型数据库服务器(ORDBMS),在灵活的BSD许可证下发行。
PostgreSQL开发者把它念作post-gress-Q-L。
PostgreSQL的Slogan是“世界上最先进的开源关系型数据库”。
“开源界的Oracle”,去O首选。
PostgreSQL官网:
http://www.postgresql.org/
PosetgreSQL中文社区:
http://www.postgres.cn/v2/home
全球数据库排行:
http://db-engines.com/en/
国产数据库排行:
http://www.modb.pro/dbRank
1.PG的历史
PostgreSQL最初设想于1986年,当时被叫做Berkley Postgres Project。该项目一直到1994年都处于演进和修改中,直到开发人员在Postgres中添加了一个SQL翻译程序,该版本叫做Postgres95,在开放源代码社区发放。开始以社区的形式运作。
1996年,再次对Postgres95做了较大的改动,并将其作为PostgreSQL6.0版发布,该版本的Postgres提高了后端的速度,包括增强型SQL92标准以及重要的后端特征(包括子选择、默认值、约束和触发器)。
2005年,发布8.0版本,开始支持windows系统环境。
PostgreSQL 9.0:支持64位windows系统,异步流数据复制、Hot Standby;
PostgreSQL 9.1:支持数据同步复制,unlogged tables、serializable snapshot isolation、FDW外部表。
此版本后,PostgreSQL开始得到中国多个行业用户的关注,开始有应用于电信、保险、制造业等边缘系统。
2021-09-30,PostgreSQL全球开发组宣布,功能最为强大的开源数据库,PostgreSQL 14版本正式发布。
2022-08-11,PostgreSQL全球开发组发布了所有受支持的PostgreSQL版本的更新,包括14.5,13.8,12.12,11.17和10.22,以及PostgreSQL 15的第三个beta版本。
2.PG的社区
PG为什么没有被商业公司控制?
纯社区
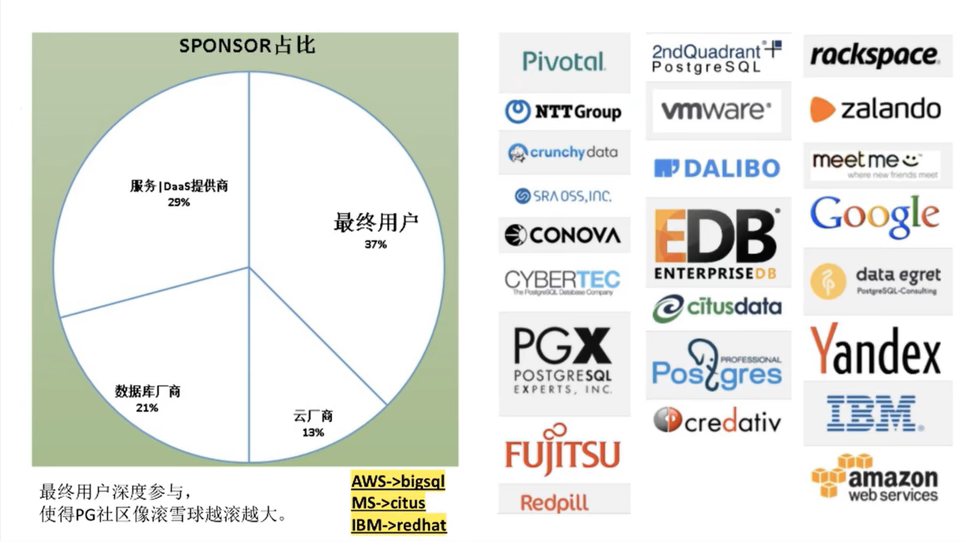
他们为什么会贡献核心源码?
最终用户
希望社区长久,期望可以享受免费的、可持续发展的、开源的、不被任何商业公司、不被任何国家控制的企业级数据库,去O,去DB2,去Sybase。
不考数据库赚钱,PG用到的人越多,越多人背书,使用越靠谱;抛砖引玉,企业投入两个研发持续贡献(一年可能一两百万),实际上整个PG社区有数千人在贡献,对最终用户来说,肯定赚到了,使用商业数据库,除了LICENSE等成本,依旧需要投管理、研发、外包资源,一年数千万甚至上亿,公司越大,越有动力去贡献社区,从趋势来看,给PG贡献代码的大客户只会越来越多。
云厂商
开源数据库与云厂商发生利益冲突,纷纷改协议;
数据库市场巨大;
自研是最佳选择,但是自研有一些问题,比如需要培养生态,需要市场背书,需要大量研发资源,可能需要重复造轮子。
Base PG的好处:
免去自己培养生态;避免重复造轮子;PG的代码基础非常不错(开源界的Oracle);防止其他厂商控制PG失去市场主导能力(AWS,google,IBM,微软都已成为PG社区的赞助商)
数据库厂商
推一款新的商业数据库,通常都需要背书,但是小厂的产品没有人愿意。
1、有技术的厂商,很难挑战已有的数据库市场格局。
2、有渠道的厂商,需要抓住窗口期,快速占领市场。
需要一款可以无法律风险,二次分发的开源数据库,唯有PG。
数据库服务|DAAS服务提供商
开源产品的服务提供商,能力如何体现?
当然是你的架构,优化能力,管理能力,FIX BUG的能力
最好能贡献核心代码,有PG为你背书。
开源许可独特性
(Postgres遵守BSD许可证发行)却使开发者们得以获取源代码并进一步开发系统。
跟其他条款相比,从GNU通用公共许可证 (GPL) 到限制重重的著作权(Copyright),BSD许可证比较宽松,甚至跟公有领域更为接近。“Take it down to the copy center
BSD许可协议(英语:Berkeley Software Distribution license) 是自由软件中使用最广泛的许可协议之一。 BSD就是遵照这个许可发布,也因此而得名 BSD许可协议。BSD包最初所有者是加州大学的董事会,这是由于 BSD 源自加州大学伯克利分校。BSD开始后, BSD许可协议得以修正,使得以后许多BSD变种,都采用类似风格的条款。跟其他条款相比,从GNU通用公共许可证 (GPL) 到限制重重的著作权(Copyright) , BSD许可证比较宽松,县至跟公有领域更为接近。“Take it down to the copy centerand make as many copies as you want”。可以说, GPL强迫后续版本必须一样是自由软件,BSD的后续版本可以选择要继续是BSD或其他自由软件条款或封闭软件等等。
众所周知,MySQL被Oracle所控制,MySQL同时使用了GPL和一种商业许可(称为双重许可)。该软件商用与否是没关系的。如果无法满足GPL,就需要获得商业许可,通过与Oracle公司联系,制定解决方案,受Oracle公司约束。
同为开源软件,PostgreSQL源码使用自由友好,商业应用不受任何公司实体所控制,而MySQL则一定程度上有所限制。
3.PostgreSQL和MySQL的比较
PostgreSQL相对于MySQL的优势
● 在SQL的标准实现上要比MySQL完善,而且功能实现较为严谨。
● 对表连接支持较为完整,优化器的功能较完整,支持的索引类型很多,复杂查询能力较强。
● PG主表采用堆表存放,MySQL采用索引组织表,能够支持比MySQL更大的数据量。(了解)
● PG的主备复制属于物理复制,相对于MySQL基于binlog的逻辑复制,数据的一致性更加可靠,复制性能更高,对主机性能的影响也更小。(底层了解)
● PostgreSQL支持JSON和其他的NoSQL功能,如本机XML支持和使用HSTORE的键值对。它还支持索引JSON数据加快访问速度,特别是10版本JSONB更是强大。
● PostgreSQL完全免费,而且是BSD协议,如果把PostgreSQL改一改,然后再拿去卖钱,也没有人管你,这一点很重要,这表明了PostgreSQL数据库不会被其他公司控制。相反,MySQL现在主要是被Oracle公司控制。
MySQL相对于PG的优势
● innodb的基于回滚段实现的MVCC机制,相对PG新老数据一起存放的基于XID的MVCC机制,是占优的。新老机制一起存放,需要定时触发VACUUM,会带来多余的IO和数据库对象加锁开销,引起数据库整体的并发能力下降。而且VACUUM清理不及时,还会引发数据膨胀。
● MySQL采用索引组织表,这种存储方法非常适合基于主键匹配的查询、删改操作,但是对表结构设计存在约束。
● MySQL的优化器较为简单,系统表、运算符、数据类型的实现都很精简,非常适合简单的查询操作。
● MySQL相对于PG在国内的流行度更高。
● MySQL的存储引擎插件化机制,使得它的应用场景更加广泛,比如除了innodb适合事务处理场景外,myisam适合静态数据的查询场景。
总结
从应用场景来说,PG更适合严格的企业应用场景(比如金融、电信、ERP、CRM),但不仅仅限制于此,PostgreSQL的json,jsonb,hstore等数据格式,特别适用于一些大数据格式的分析;而MySQL更加适合业务逻辑相对简单、数据可靠性要求较低的互联网场景(比如Google、Facebook、alibaba),当然现在MySQL在innodb引擎的大力发展,功能表现良好。
二、在Linux系统上配置安装PostgreSQL
1.下载安装
访问官网下载地址:http://www.postgresql.org/

根据自己的系统版本,以及需要安装的版本选择,我这里使用的是CentOS7,下载PostgreSQL14版本:
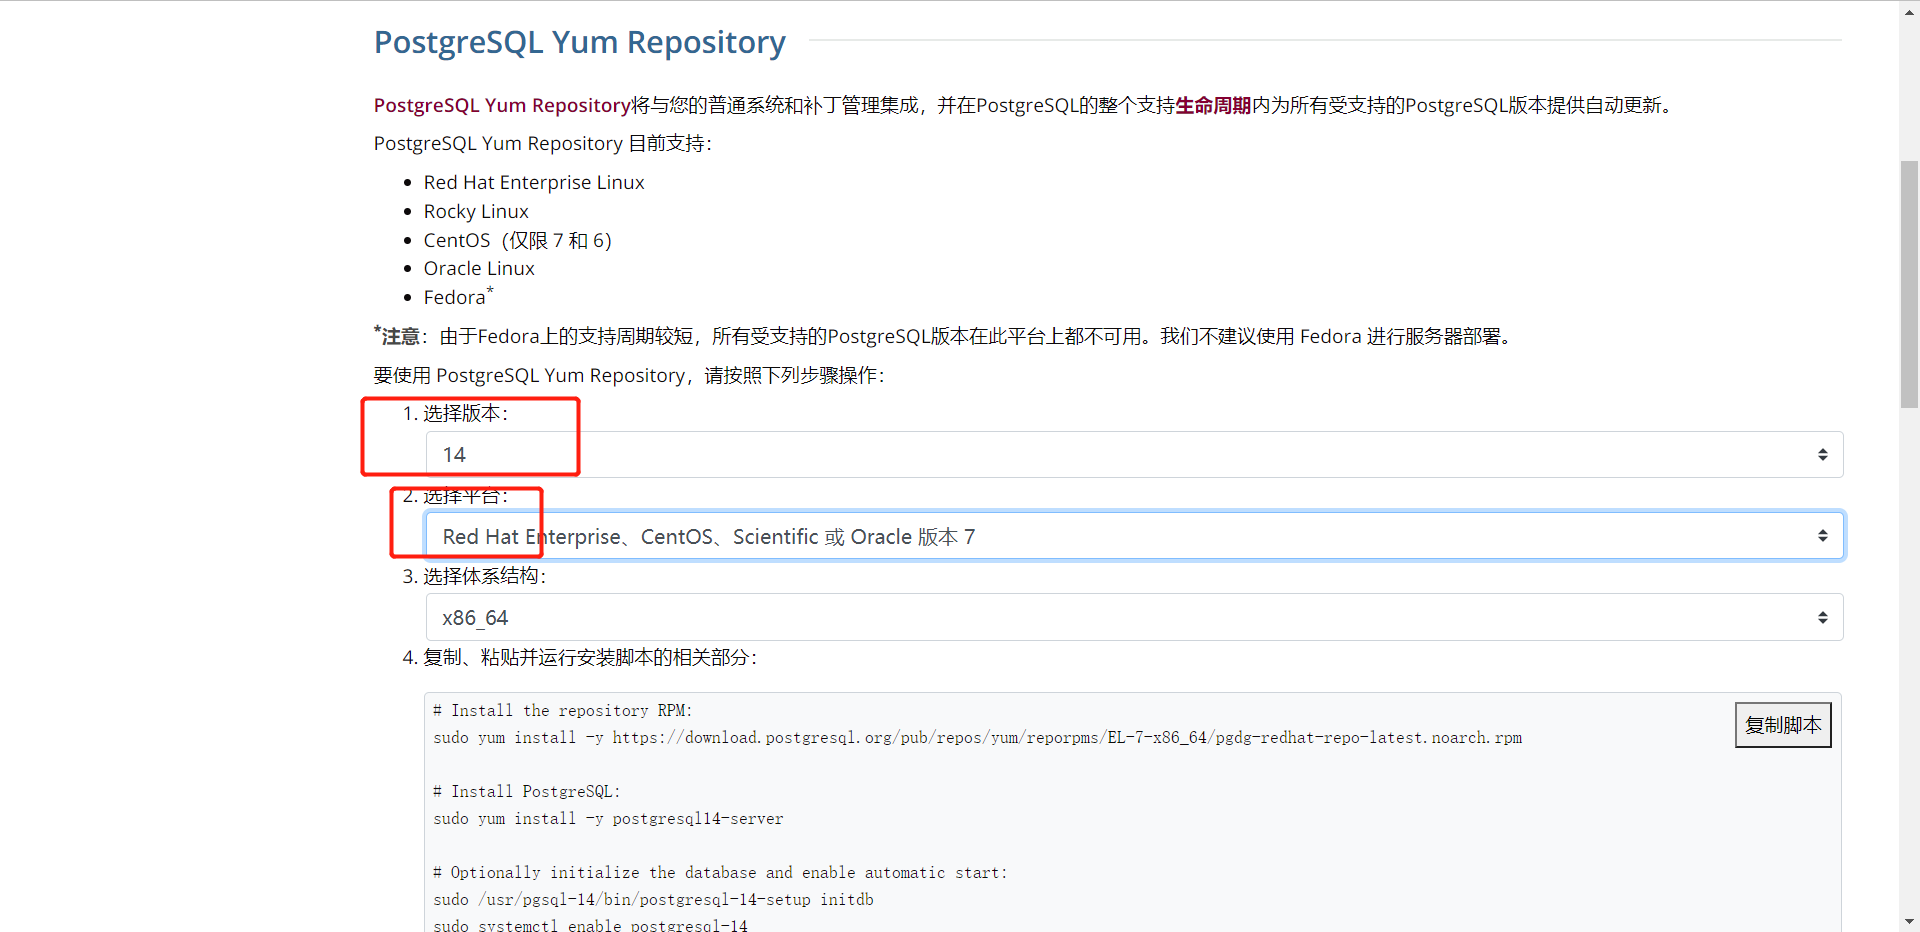
下面会有相应的下载步骤教程:
#安装rpm库
sudo yum install -y https://download.postgresql.org/pub/repos/yum/reporpms/EL-7-x86_64/pgdg-redhat-repo-latest.noarch.rpm
#下载服务
sudo yum install -y postgresql14-server
#初始化数据库
sudo /usr/pgsql-14/bin/postgresql-14-setup initdb
#开启服务
  systemctl enable postgresql.service
  systemctl start postgresql.service
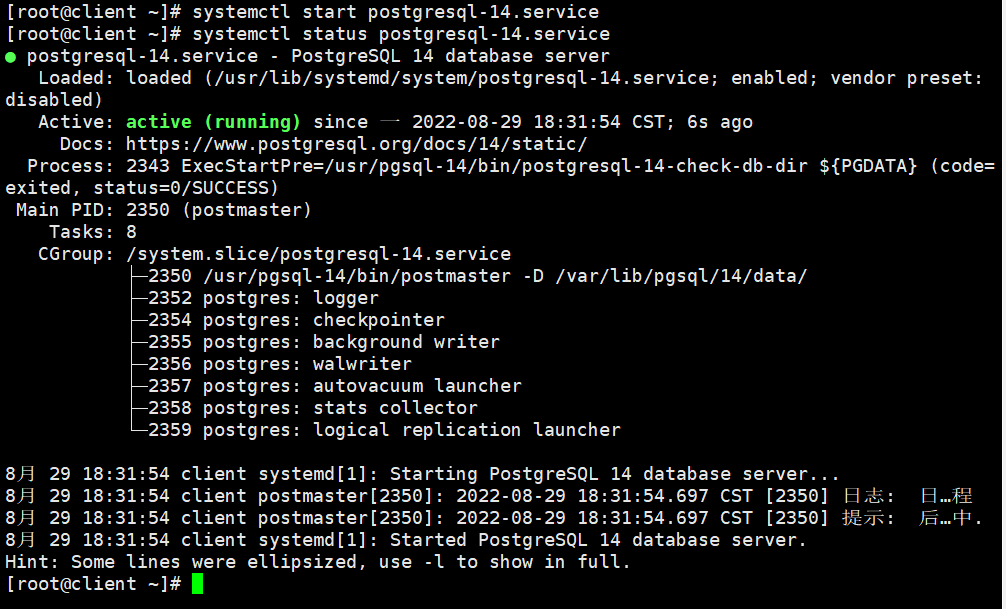
安装成功
2.修改Postgres账号密码
PostgreSQL安装成功之后,会默认创建一个名为postgres的Linux用户,初始化数据库后,会有名为postgres的数据库,来存储数据库的基础信息,例如用户信息等等,相当于MySQL中默认的名为mysql数据库。postgres数据库中会初始化一名超级用户 postgres为了方便我们使用postgres账号进行管理,我们可以修改该账号的密码:
[root@client ~]# su postgres
bash-4.2$ psql
postgres=# alter user postgres with password 'postgres';
ALTER ROLE

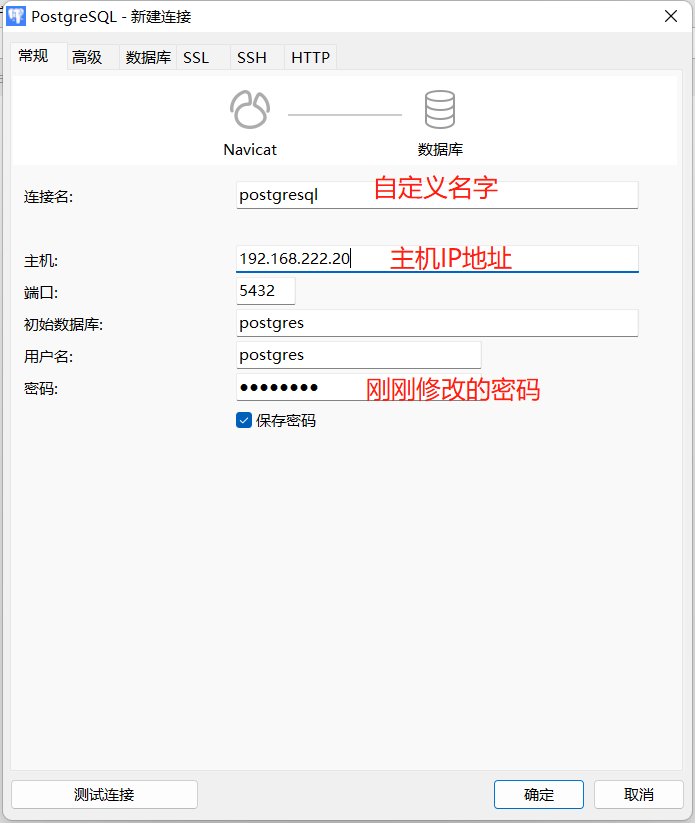
3.配置远程访问
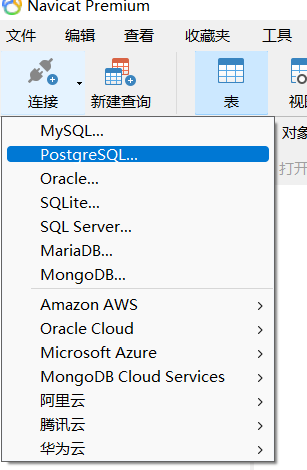
使用数据库管理工具Navicat登录:
开放端口
#修改配置文件
[root@client ~]# vim /var/lib/pgsql/14/data/postgresql.conf

#将监听地址改为*
#默认listen_addresses配置是注释掉的,所以可以直接在配置文件开头加入该行
listen_addresses = '*'

允许所有IP访问
#修改配置文件
[root@client ~]# vim /var/lib/pgsql/14/data/pg_hba.conf

#在文件结尾加入
host	all		all 0.0.0.0/0 md5
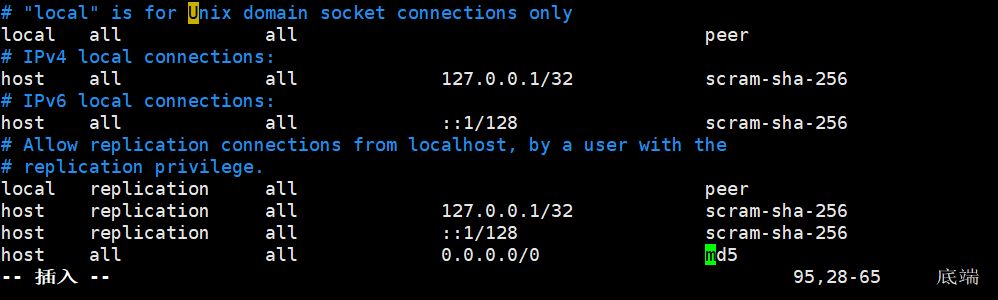
重启PostgreSQL服务
[root@client ~]# systemctl restart postgresql-14.service
在Navicat上进行链接:

三、PostgreSQL基本使用
1.登入登出
#登入postgres用户
[root@client ~]# su - postgres
#psql -h 服务器 -U 用户名 -d 数据库 -p 端口
-bash-4.2$ psql -U dbuser -d demo -h 127.0.0.1 -p 5432

-bash-4.2$ psql		#链接数据库,默认用户和数据库都是postgres
#相当于系统用户postgres以同名数据库用户的身份登录数据库,这时不用输入密码的,如果一切正常,系统提示符会变成postgres=# ,表示这时已经进入了数据库控制台

#登出
postgres=# \q或exit

2.数据库操作
#创建数据库
postgres=# create database 库名;

#查看所有数据库
postgres=# \l

#切换当前数据库
postgres=# \c 库名

#删除数据库
postgres=# drop database 库名;

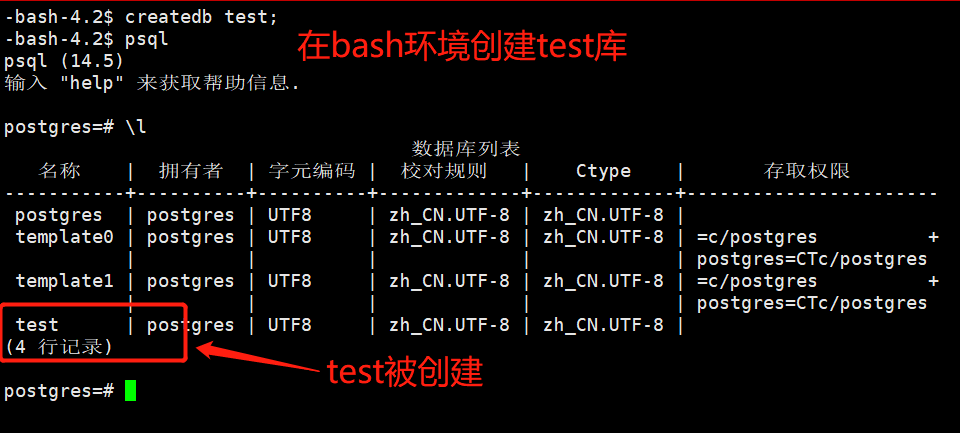
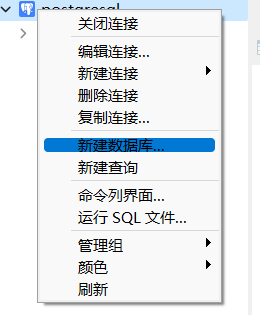
其他创建操作库的方法:
1.在bash环境中创建
2.在Navicat软件中创建
3.数据表操作
创建表格时每列都必须使用数据类型,PostgreSQL中主要有三类数据类型:
● 数值数据类型
● 字符串数据类型
● 日期/时间数据类型
常用数值类型:
| 名字 | 存储长度 | 描述 | 范围 |
|---|---|---|---|
| smallint | 2字节 | 小范围整数 | -32768到32767 |
| int(integer) | 4字节 | 常用的整数 | -2147483648到2147483647 |
| bigint | 8字节 | 大范围整数 | -9223372036854775808到9223372036854775807 |
| decimal | 可变长 | 用户指定的精度,精确 | 小数点前131072位;小数点后16383位 |
| numeric | 可变长 | 用户指定的精度,精确 | 小数点前131072位;小数点后16383位 |
| real | 4字节 | 可变精度,不精确 | 6位十进制数字精度 |
| double | 8字节 | 可变精度,不精确 | 15位十进制数字精度 |
字符串类型包括:
| 名字 | 描述 |
|---|---|
| char(size) | 固定长度字符串,size规定了需存储的字符数,由右边的空格补齐 |
| varchar | 可变长度字符串,size规定了需存储的字符数 |
| text | 可变长度字符串 |
日期/时间:
| 名字 | 描述 |
|---|---|
| timestamp | 日期和时间 |
| data | 日期,无时间 |
| time | 时间 |
其他数据类型还有布尔值boolean(false或true),货币数额(money)和几何数据等。
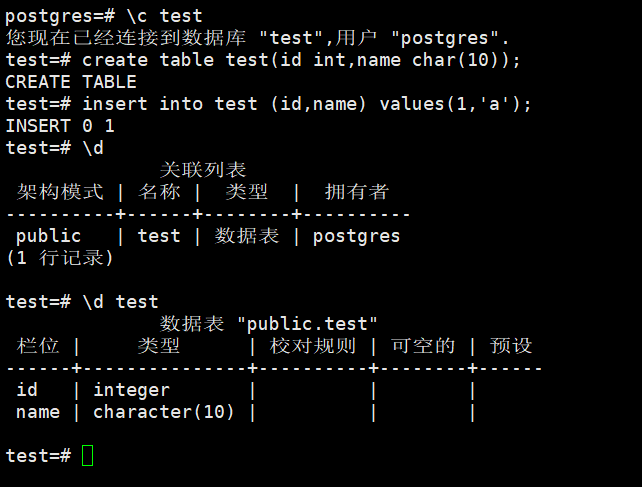
#创建表
create table test(id int,name char(10));

#在表中插入数据
insert into test(id,body) values(1,'a');

#查看当前数据库下所有表
\d

#查看表结构,相当于desc
\d test
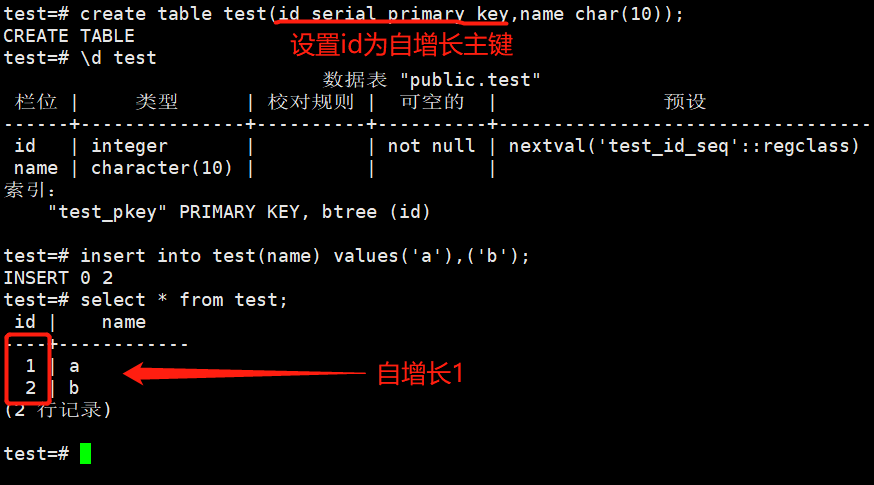
PostgreSQL使用序列来标识的自增长,数据类型有smailserial、serial和bigserial。这些属性类似于Mysql数据库支持的auto_increment属性:
| 伪类型 | 存储大小 | 范围 |
|---|---|---|
| smailserial | 2字节 | 1到32767 |
| serial | 4字节 | 1到2147483647 |
| bigserial | 8字节 | 1到9223372036854775807 |
其他语句基本与Mysql一致,如:update,select,delete等。
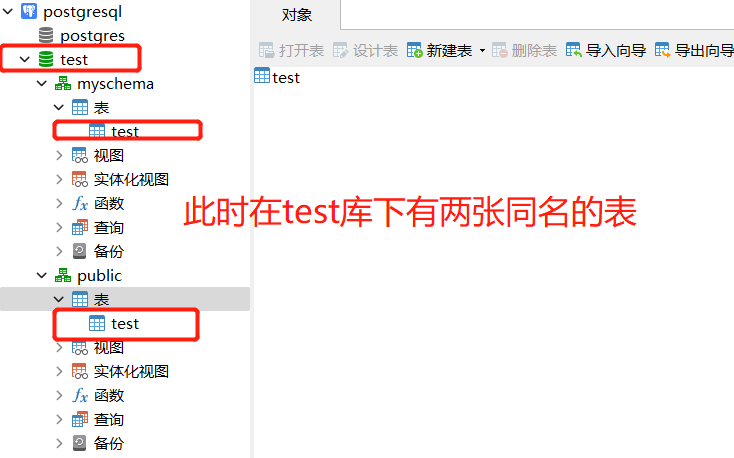
4.Schema
PostgreSQL模式(schema)可以看作是一个表的集合。
一个模式可以包含视图、索引、数据类型、函数和操作符等。
相同的对象名称可以被用于不同的模式中而不会出现冲突,例如test库和myschema库都可以包含名为test的表。
使用模式的优势:
● 允许多个用户使用一个数据可并且不会相互干扰。
● 将数据库对象组织成逻辑组以便更容易管理。
● 第三方应用的对象可以放在独立的模式中,这样它们就不会与其他对象的名称发生冲突。
模式类似于操作系统层的目录,但是模式不能嵌套。


当数据库中的表特别多想进行分开管理的话,可以使用模式(schema)。
5.如何备份PostgreSQL数据库
如果在生产环境中使用PostgreSQL,请务必采取预防措施以确保用户的数据不会丢失。
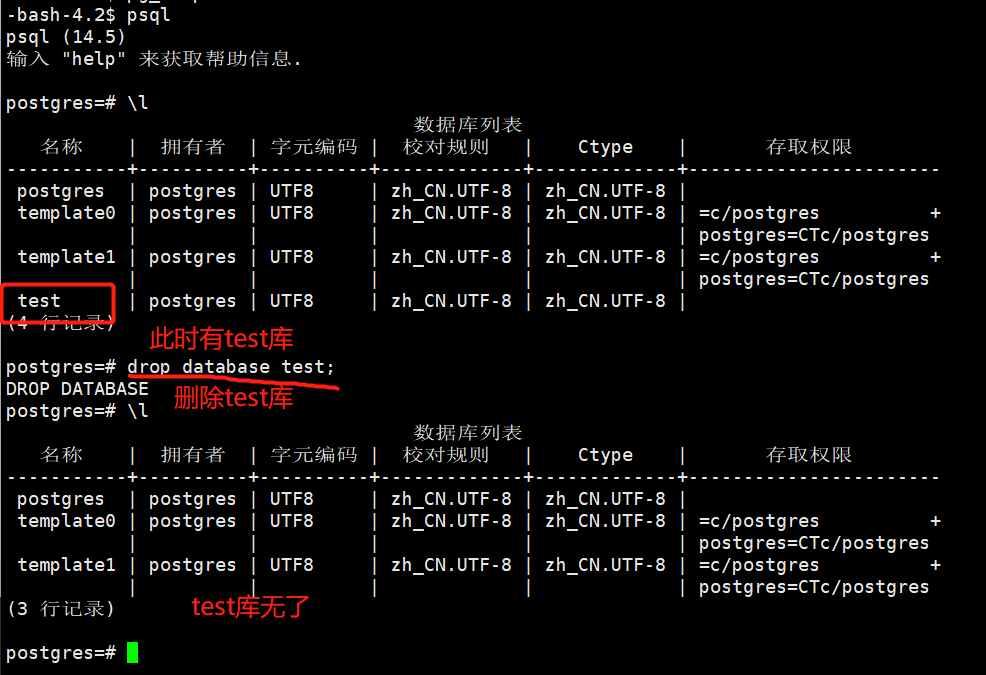
单数据库
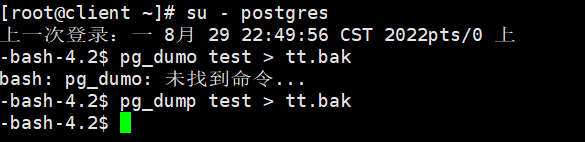
PostgreSQL提供了pg_dump实用程序来简化备份单个数据库的过程。必须以对要备份的数据库具有读取权限的用户身份运行此命令:
以postgres用户身份进行登录
[root@client ~]# su - postgres
通过运行以下命令将数据库的内容转存到文件中。替换dbname为要备份的数据库的名称。
-bash-4.2$ pg_dumo 数据库名 > 自定义名.bak
生成的备份文件*.bak可以使用scp传输到另一台主机也可以存储在本地以供之后使用。
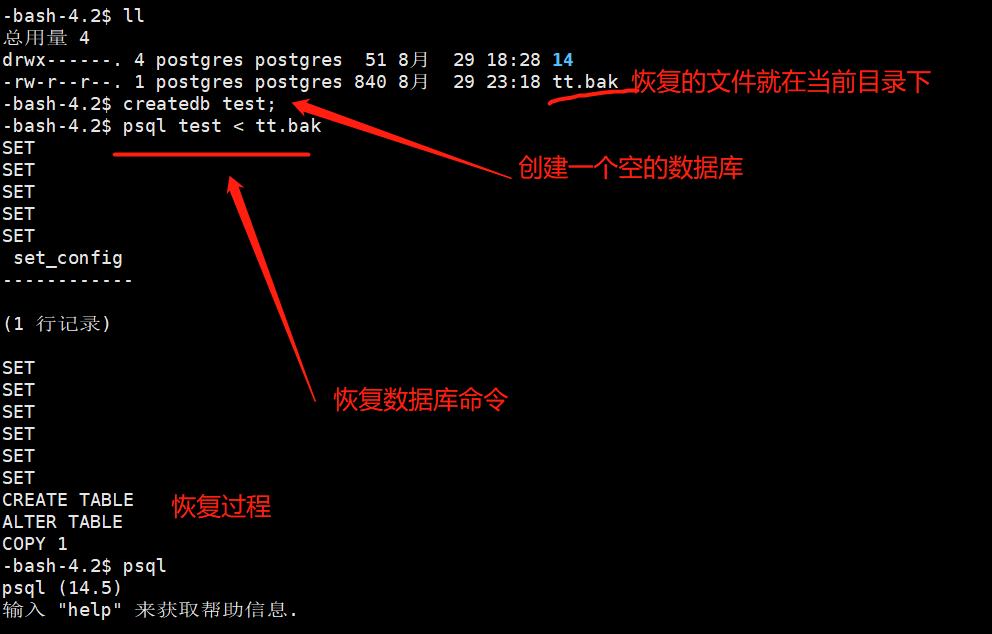
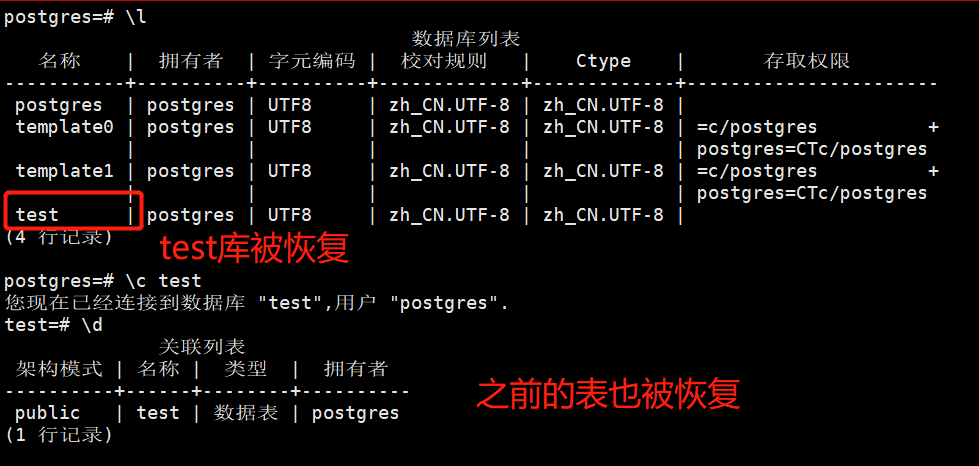
使用psql恢复数据库:
-bash-4.2$ psql 数据库名 < 自定义名.bak
备份格式有几种选择:
①.bak:压缩二进制格式
②.sql:明文转储
③.tar:tarball
在默认情况下,PostgreSQL将忽略备份过程中发生的任何错误,这可能导致备份不完整,要防止这种情况,可以使用-1选项运行pg_dump命令。这会将整个备份过程视为单个事务,将在发生错误时阻止部分备份。
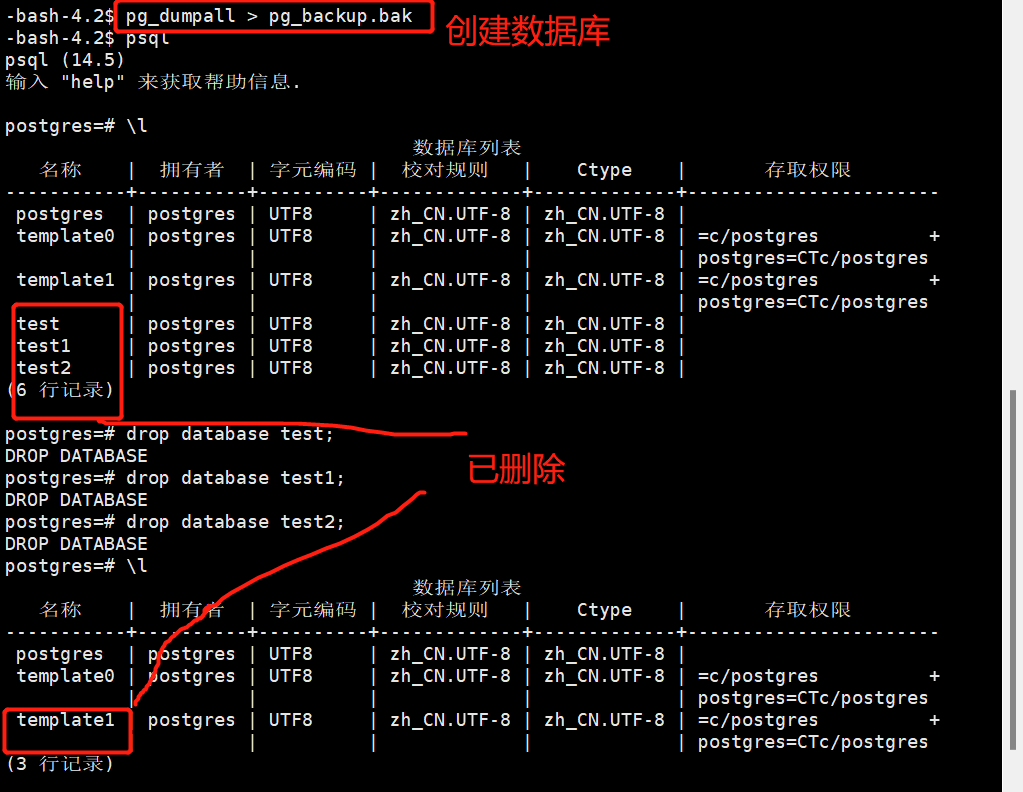
所有数据库
由于pg_dump一次只创建一个数据库的备份,因此他不会存储有关数据库角色或其他集群范围配置的信息,要存储此信息并同时备份所有数据库,可以使用pg-dumpall。
创建配置文件:
-bash-4.2$ pg_dumpall > pg_backup.bak
从备份还原所有数据库:
-bash-4.2$ psql -f pg_backup.bak postgres


##备份数据库
##导出数据库保存为……
$ pg_dump -U 用户名 -f 备份文件 库名
##导出数据库中某表保存为……
$ pg_dump -U postgres -f 备份文件 -t 表名 库名
##导出数据库以tar格式压缩保存为……
$ pg_dump -U postgres -F t -f 备份文件 库名

##恢复数据库
##恢复备份文件到指定库
$ psql -U postgres -f 备份文件 库名
##从pg_dump创建的备份文件中恢复数据库,用于恢复由pg_dump转储的任何非纯文本格式中的数据库。
#pg_restore --
##恢复备份文件到指定数据库
$ pg_restore -U 用户名 -d 库名 备份文件
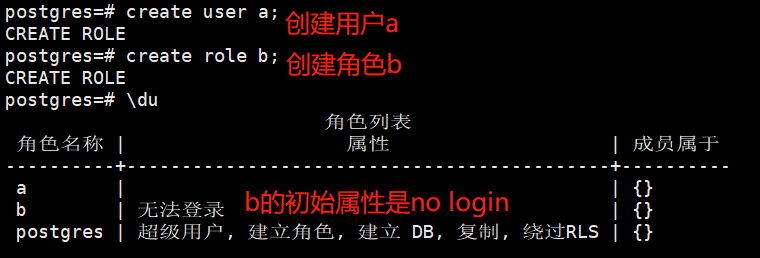
6.PostgreSQL用户管理
在postgresql里没有区分用户和角色的概念,create user是create role的别名,这两个命令几乎是完全相同的,唯一的区别就是create user命令创建的用户默认带有login属性,而create role命令创建的用户不带login属性。
| 角色属性 | 说明 |
|---|---|
| login | 只有具有login属性的角色可以用作数据库链接的初始角色名 |
| superuser | 超级用户 |
| createdb | 创建数据库权限 |
| createrole | 允许创建或删除其他普通用户角色(超级用户除外) |
| replication | 做流复制时用到的一个用户属性,一般单独设定 |
| password | 在登录时要求指定密码时才会起作用,跟客户端的链接认证方式有关 |
| inherit | 用户组对组员的一个继承标志,成员可以继承用户组的权限特性 |
7.控制台常用命令总结
| 命令 | 说明 |
|---|---|
| \password | 设置当前密码 |
| \q | 退出 |
| \h | 查看sql命令的解释,如\h select |
| ? | 查看psql命令列表 |
| \l | 列出所有数据库 |
| \c [database_name] | 链接其他数据库 |
| \d | 列出当前数据库的所有表格 |
| \d [table_name] | 列出某一张表格的结构 |
| \du | 列出所有用户 |
四、主从架构(postres-XL集群)
参考网址:什么是Postgres-XL?
1.什么是Postgres-XL?
Postgres-XL是一个开源项目,为PostgreSQL透明地提供写入可扩展性和大规模并行处理。它是紧密耦合的数据库组件的集合,可以安装在多个系统或虚拟机上。
写可扩展意味着Postgres-XL可以根据需要配置任意数量的数据库服务器,并且处理比单个独立数据库服务器更多的写入(更新SQL语句)。可以有多个提供单个数据库视图的数据库服务器。来自任何数据库服务器的任何数据库更新对于在不同服务器上运行的任何其他事务都是立即可见的。透明意味着您不必担心数据在内部的多个数据库服务器中的存储方式。
您可以将 Postgres-XL 配置为在多台计算机上运行。它以分布式方式存储数据,即根据为每个表选择的内容进行分区或复制。当您发出查询时,Postgres-XL会确定目标数据的存储位置,并将相应的计划调度到包含目标数据的服务器。
在典型的 Web 系统中,您可以拥有任意数量的 Web 服务器或应用程序服务器来处理事务。但是,通常不能对数据库服务器执行此操作,因为所有更改的数据都必须对所有事务可见。与其他数据库集群解决方案不同,Postgres-XL 提供了此功能。您可以根据需要安装任意数量的数据库服务器。每个数据库服务器都为应用程序提供统一的数据视图。来自任何服务器的任何数据库更新对于从其他服务器连接数据库的应用程序立即可见。这是Postgres-XL最重要的功能之一。
Postgres-XL的另一个重要特性是MPP并行性。您可以使用 Postgres-XL 处理商业智能、数据仓库或大数据的工作负载。在Postgres-XL中,计划在协调器上生成一次,然后发送到各个数据节点。然后执行此操作,数据节点直接相互通信,其中每个节点都了解期望从哪里接收它需要交付的任何元组,以及它需要发送到其他人的位置。
Postgres-XL 是一个完全符合 ACID 的事务数据库,它不仅始终为您提供完全一致的数据视图,还使用集群范围的多版本并发控制 (MVCC)。当您在 Postgres-XL 中启动事务或查询时,您将看到整个集群中数据的一致版本。在一个连接上读取数据时,您可能正在更新同一个表,甚至在没有任何锁定的情况下更新另一个连接中的行。由于全局事务标识符和快照,这两个连接都在使用它们自己的行版本。读取器不会阻止写入器,编写器不会阻止读取器。
Postgres-XL(可扩展格)允许您跨多个节点对表进行分区或复制它们。分区(或分发)表允许跨多个节点的写入可伸缩性,以及针对大数据类型工作负载的大规模并行处理 (MPP)。
复制的表通常是静态数据,不会经常更改。复制它们可实现读取可伸缩性。
2.Postgres-XL的目标
Postgres-XL 的最终目标是在所有类型的数据库工作负载中提供具有 ACID 一致性的数据库可伸缩性。也就是说,Postgres-XL应提供以下功能:
- Postgres-XL应提供多个服务器来接受来自应用程序的事务和语句,这些事务和语句称为“协调器”进程。
- 任何协调器都应为应用程序提供一致的数据库视图。来自任何协调员的任何更新都必须实时可见,就好像此类更新是在单个PostgreSQL服务器中完成的一样。
- Postgres-XL应该允许Datanodes以高效和并行的方式直接相互通信,执行查询。
- 表应该能够存储在指定为复制或分布式的数据库(称为片段或分区)中。复制和分发对应用程序应该是透明的;也就是说,此类复制和分布式表被视为单个表,并且每个记录/元组的副本的位置或数量由Postgres-XL管理,并且对应用程序不可见。
- Postgres-XL为应用程序提供了兼容的PostgreSQL API。
- Postgres-XL应该提供底层PostgreSQL数据库服务器的单一和统一视图,以便SQL语句不依赖于表的实际存储方式。
3. Postgres-XL 关键组件
在本节中,我们将介绍Postgres-XL的主要组件。
Postgres-XL由三个主要组件组成:GTM(全局事务管理器),Coordinator和Datanode。它们的特性将在以下各节中介绍。
3.1. GTM(全局事务管理器)
GTM是Postgres-XL的关键组件,可提供一致的事务管理和元组可见性控制。
如本手册后面所述,PostgreSQL的事务管理基于MVCC(多版本并发控制)技术。Postgres-XL将该技术提取到单独的组件(如GTM)中,以便任何Postgres-XL组件的事务管理都基于单个全局状态。
3.2. Coordinator(协调员)
协调器是应用程序数据库的接口。它的行为类似于传统的PostgreSQL后端进程,但是协调器不存储任何实际数据。实际数据由数据节点存储,如下所述。协调器接收 SQL 语句,根据需要获取全局事务 ID 和全局快照,确定涉及哪些 Datanode 并要求它们执行(部分)语句。向 Datanode 发出语句时,它与 GXID 和全局快照相关联,以便多版本并发控制 (MVCC) 属性扩展到集群范围。
3.3. Data Node(数据节点)
数据节点实际上存储用户数据。表可以在数据节点之间分布,也可以复制到所有数据节点。Datanode没有整个数据库的全局视图,它只是处理本地存储的数据。协调员将按照下述方式检查传入的语句,并制定子计划。然后根据需要,这些与GXID和全局快照一起传输到所涉及的每个数据节点。数据节点可以在单独的会话中接收来自各个协调器的请求。但是,由于每个事务都是唯一标识的,并且与一致的(全局)快照相关联,因此每个 Datanode 都可以在其事务和快照上下文中正确执行。
4. Postgres-XL 继承自 PostgreSQL
Postgres-XL是PostgreSQL的扩展,继承了它的大部分功能。
它是PostgreSQL及其原始伯克利代码的开源后代。它支持SQL标准的很大一部分,并提供许多现代功能:
- 复杂查询
- 键
- 触发器
- 视图
- 事务完整性,SSI 除外,其支持不完整
- 多版本并发控制
此外,与PostgreSQL类似,Postgres-XL可以由用户以多种方式扩展,例如通过添加新的
- 数据类型
- 功能
- 运营商
- 聚合函数
- 索引方法
- 过程语言
PS:Postgres-XL在当前版本中不支持触发器以及Postgres-XL的外键用法有一些限制。
5.PostgreSQL -XL集群搭建
官方安装文档:Linux 上的 Postgres-XL 安装示例
| IP | 主机名 |
|---|---|
| 192.168.222.10 | postgres1 |
| 192.168.222.20 | postgres2 |
| 192.168.222.40 | postgres3 |
在所有机器修改/etc/hosts文件:

下载依赖包:
yum install -y flex bison readline-devel zlib-devel openjade docbook-style-dsssl git gcc

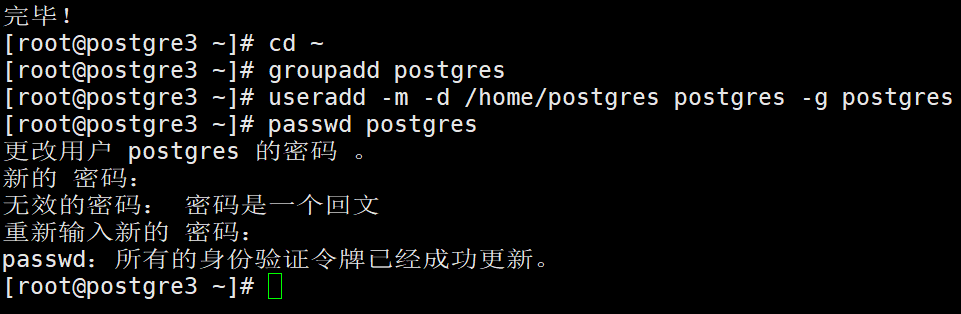
每个节点建立postgres组和用户:
[root@postgre3 ~]# groupadd postgres
[root@postgre3 ~]# useradd -m -d /home/postgres postgres -g postgres
[root@postgre3 ~]# passwd postgres
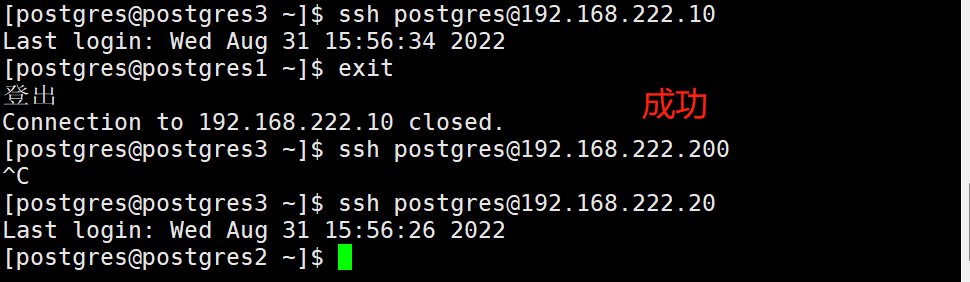
在gtm节点服务器做ssh免密登陆:
[root@postgres3 ~]# su - postgres
[postgres@postgres3 ~]$ mkdir ~/.ssh
[postgres@postgres3 ~]$ ssh-keygen -t rsa
[postgres@postgres3 ~]$ cat ~/.ssh/id_rsa.pub >> ~/.ssh/authorized_keys
[postgres@postgres3 ~]$ scp ~/.ssh/authorized_keys [email protected]:~/.ssh/
[postgres@postgres3 ~]$ scp ~/.ssh/authorized_keys [email protected]:~/.ssh/
#在所有节点中
[postgres@postgres3 .ssh]$ chmod 700 ~/.ssh
[postgres@postgres3 .ssh]$ chmod 600 ~/.ssh/authorized_keys
#测试:在gtm节点服务器上尝试连接node服务器,确保不需要密码

上传XL安装包并解压(三台机器都需要安装XL)
下载地址:Postgres-XL |开源可扩展 SQL 数据库集群
#切换安装目录
[root@postgre3 ~]# cd /usr/local
#解压安装包
[root@postgre3 local]# tar zxf postgres-xl-10r1.1.tar.gz
#修改目录属主属组
[root@postgre3 local]# chown -R postgres:postgres postgres-xl-10r1.1
#切换到postgres用户
[root@postgre3 local]# su - postgres

#创建pgxl10目录
[postgres@postgre3 ~]$ mkdir -p /home/postgres/pgxl10
#切换到xl目录编译安装
[postgres@postgre3 ~]$ cd /usr/local/postgres-xl-10r1.1/
[postgres@postgre3 postgres-xl-10r1.1]$ ./configure --prefix=/home/postgres/pgxl10
[postgres@postgre3 postgres-xl-10r1.1]$ make && make install
#仅gtm服务器
[postgres@postgre3 postgres-xl-10r1.1]$ cd contrib/
[postgres@postgre3 contrib]$ make && make install
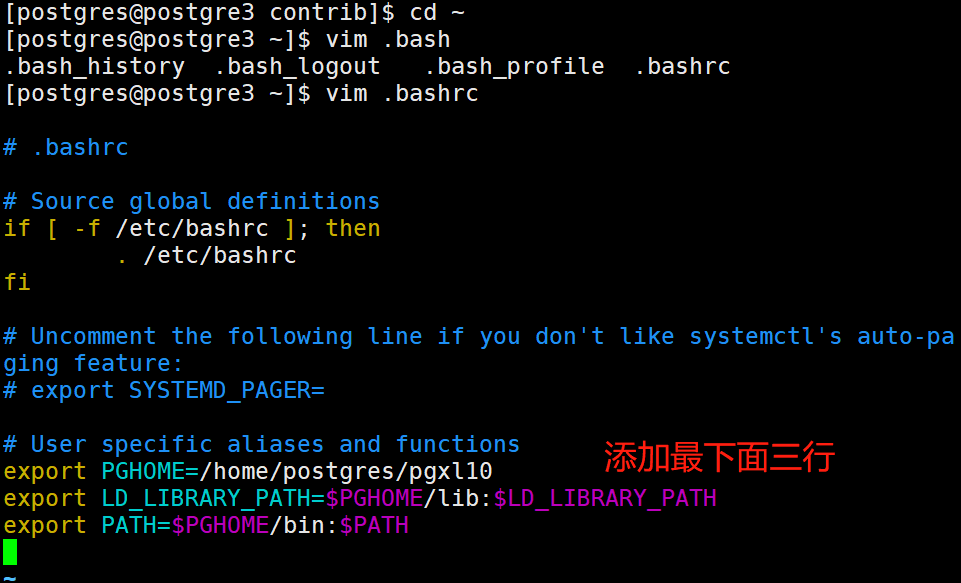
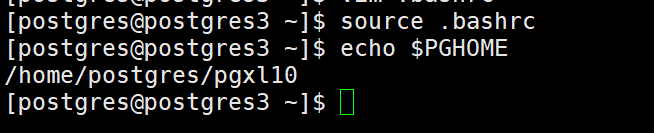
配置基础环境变量:
[postgres@postgre3 contrib]$ cd ~
[postgres@postgre3 ~]$ vim .bashrc
…………
export PGHOME=/home/postgres/pgxl10
export LD_LIBRARY_PATH=$PGHOME/lib:$LD_LIBRARY_PATH
export PATH=$PGHOME/bin:$PATH
[postgres@postgres3 ~]$ source .bashrc
基础环境安装完成,以下步骤为集群配置,集群发起从GTM所在服务器进行执行即可。
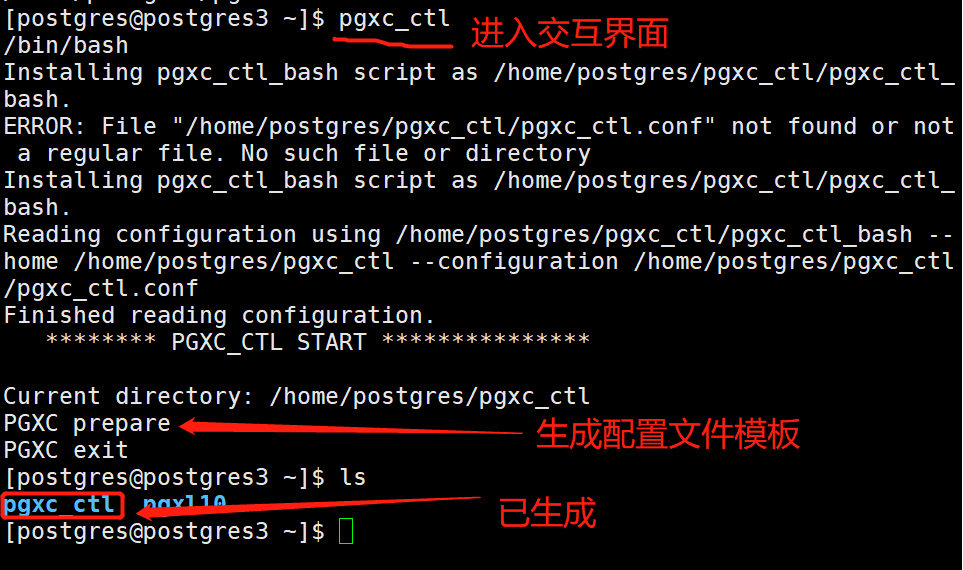
在postgres用户根目录下生成pgxc_ctl配置文件,创建集群文件存放目录和备份目录:
#初次执行,会提示error没有配置文件,忽略即可
[postgres@postgres3 ~]$ pgxc_ctl
#执行该命令会生成一份配置文件模板
PGXC prepare
#退出pgxc_ctl交互窗口
PGXC exit
修改pgxc_ctl.conf文件配置
[postgres@postgres3 ~]$ cd pgxc_ctl/
[postgres@postgres3 pgxc_ctl]$ vim pgxc_ctl.conf
#!/usr/bin/env bash
#
# Postgres-XC Configuration file for pgxc_ctl utility.
#
# Configuration file can be specified as -c option from pgxc_ctl command.   Default is
# $PGXC_CTL_HOME/pgxc_ctl.org.
#
# This is bash script so you can make any addition for your convenience to configure
# your Postgres-XC cluster.
#
# Please understand that pgxc_ctl provides only a subset of configuration which pgxc_ctl
# provide.  Here's several several assumptions/restrictions pgxc_ctl depends on.
#
# 1) All the resources of pgxc nodes has to be owned by the same user.   Same user means
#    user with the same user name.  User ID may be different from server to server.
#    This must be specified as a variable $pgxcOwner.
#
# 2) All the servers must be reacheable via ssh without password.   It is highly recommended
#    to setup key-based authentication among all the servers.
#
# 3) All the databases in coordinator/datanode has at least one same superuser.  Pgxc_ctl
#    uses this user to connect to coordinators and datanodes.   Again, no password should
#    be used to connect.  You have many options to do this, pg_hba.conf, pg_ident.conf and
#    others.  Pgxc_ctl provides a way to configure pg_hba.conf but not pg_ident.conf.   This
#    will be implemented in the later releases.
#
# 4) Gtm master and slave can have different port to listen, while coordinator and datanode
#    slave should be assigned the same port number as master.
#
# 5) Port nuber of a coordinator slave must be the same as its master.
#
# 6) Master and slave are connected using synchronous replication.  Asynchronous replication
#    have slight (almost none) chance to bring total cluster into inconsistent state.
#    This chance is very low and may be negligible.  Support of asynchronous replication
#    may be supported in the later release.
#
# 7) Each coordinator and datanode can have only one slave each.  Cascaded replication and
#    multiple slave are not supported in the current pgxc_ctl.
#
# 8) Killing nodes may end up with IPC resource leak, such as semafor and shared memory.
#    Only listening port (socket) will be cleaned with clean command.
#
# 9) Backup and restore are not supported in pgxc_ctl at present.   This is a big task and
#    may need considerable resource.
#
#========================================================================================
#
#
# pgxcInstallDir variable is needed if you invoke "deploy" command from pgxc_ctl utility.
# If don't you don't need this variable.
pgxcInstallDir=$HOME/pgxc
#---- OVERALL -----------------------------------------------------------------------------
#
pgxcOwner=$USER			# owner of the Postgres-XC databaseo cluster.  Here, we use this
						# both as linus user and database user.  This must be
						# the super user of each coordinator and datanode.
pgxcUser=$pgxcOwner		# OS user of Postgres-XC owner

tmpDir=/tmp					# temporary dir used in XC servers
localTmpDir=$tmpDir			# temporary dir used here locally

configBackup=y					# If you want config file backup, specify y to this value.
configBackupHost=pgxc-linker	# host to backup config file
configBackupDir=$HOME/pgxc		# Backup directory
configBackupFile=pgxc_ctl.bak	# Backup file name --> Need to synchronize when original changed.

#---- GTM ------------------------------------------------------------------------------------

# GTM is mandatory.  You must have at least (and only) one GTM master in your Postgres-XC cluster.
# If GTM crashes and you need to reconfigure it, you can do it by pgxc_update_gtm command to update
# GTM master with others.   Of course, we provide pgxc_remove_gtm command to remove it.  This command
# will not stop the current GTM.  It is up to the operator.


#---- GTM Master -----------------------------------------------

#---- Overall ----
gtmName=gtm
gtmMasterServer=192.168.222.40
gtmMasterPort=20001
gtmMasterDir=$HOME/pgxc/nodes/gtm

#---- Configuration ---
gtmExtraConfig=none			# Will be added gtm.conf for both Master and Slave (done at initilization only)
gtmMasterSpecificExtraConfig=none	# Will be added to Master's gtm.conf (done at initialization only)

#---- GTM Slave -----------------------------------------------

# Because GTM is a key component to maintain database consistency, you may want to configure GTM slave
# for backup.

#---- Overall ------
gtmSlave=n					# Specify y if you configure GTM Slave.   Otherwise, GTM slave will not be configured and
							# all the following variables will be reset.
gtmSlaveName=gtmSlave
gtmSlaveServer=node12		# value none means GTM slave is not available.  Give none if you don't configure GTM Slave.
gtmSlavePort=20001			# Not used if you don't configure GTM slave.
gtmSlaveDir=$HOME/pgxc/nodes/gtm	# Not used if you don't configure GTM slave.
# Please note that when you have GTM failover, then there will be no slave available until you configure the slave
# again. (pgxc_add_gtm_slave function will handle it)

#---- Configuration ----
gtmSlaveSpecificExtraConfig=none # Will be added to Slave's gtm.conf (done at initialization only)

#---- GTM Proxy -------------------------------------------------------------------------------------------------------
# GTM proxy will be selected based upon which server each component runs on.
# When fails over to the slave, the slave inherits its master's gtm proxy.  It should be
# reconfigured based upon the new location.
#
# To do so, slave should be restarted.   So pg_ctl promote -> (edit postgresql.conf and recovery.conf) -> pg_ctl restart
#
# You don't have to configure GTM Proxy if you dont' configure GTM slave or you are happy if every component connects
# to GTM Master directly.  If you configure GTL slave, you must configure GTM proxy too.

#---- Shortcuts ------
gtmProxyDir=$HOME/pgxc/nodes/gtm_pxy

#---- Overall -------
gtmProxy=y				# Specify y if you conifugre at least one GTM proxy.   You may not configure gtm proxies
						# only when you dont' configure GTM slaves.
						# If you specify this value not to y, the following parameters will be set to default empty values.
						# If we find there're no valid Proxy server names (means, every servers are specified
						# as none), then gtmProxy value will be set to "n" and all the entries will be set to
						# empty values.
gtmProxyNames=(gtm_pxy1 gtm_pxy2)	# No used if it is not configured
gtmProxyServers=(192.168.222.10 192.168.222.20)			# Specify none if you dont' configure it.
gtmProxyPorts=(20001 20001)				# Not used if it is not configured.
gtmProxyDirs=($gtmProxyDir $gtmProxyDir)	# Not used if it is not configured.

#---- Configuration ----
gtmPxyExtraConfig=none		# Extra configuration parameter for gtm_proxy.  Coordinator section has an example.
gtmPxySpecificExtraConfig=(none none none none)

#---- Coordinators ----------------------------------------------------------------------------------------------------

#---- shortcuts ----------
coordMasterDir=$HOME/pgxc/nodes/coord
coordSlaveDir=$HOME/pgxc/nodes/coord_slave
coordArchLogDir=$HOME/pgxc/nodes/coord_archlog

#---- Overall ------------
coordNames=(coord1 coord2)		# Master and slave use the same name
coordPorts=(20004 20005)			# Master ports
poolerPorts=(20010 20011)			# Master pooler ports
coordPgHbaEntries=(192.168.1.0/24)				# Assumes that all the coordinator (master/slave) accepts
												# the same connection
												# This entry allows only $pgxcOwner to connect.
												# If you'd like to setup another connection, you should
												# supply these entries through files specified below.
# Note: The above parameter is extracted as "host all all 0.0.0.0/0 trust".   If you don't want
# such setups, specify the value () to this variable and suplly what you want using coordExtraPgHba
# and/or coordSpecificExtraPgHba variables.
#coordPgHbaEntries=(::1/128)	# Same as above but for IPv6 addresses

#---- Master -------------
coordMasterServers=(192.168.222.10 192.168.222.20)		# none means this master is not available
coordMasterDirs=($coordMasterDir $coordMasterDir)
coordMaxWALsernder=5	# max_wal_senders: needed to configure slave. If zero value is specified,
						# it is expected to supply this parameter explicitly by external files
						# specified in the following.	If you don't configure slaves, leave this value to zero.
coordMaxWALSenders=($coordMaxWALsernder $coordMaxWALsernder)
						# max_wal_senders configuration for each coordinator.

#---- Slave -------------
coordSlave=n			# Specify y if you configure at least one coordiantor slave.  Otherwise, the following
						# configuration parameters will be set to empty values.
						# If no effective server names are found (that is, every servers are specified as none),
						# then coordSlave value will be set to n and all the following values will be set to
						# empty values.

coordUserDefinedBackupSettings=n	# Specify whether to update backup/recovery
									# settings during standby addition/removal.

coordSlaveSync=y		# Specify to connect with synchronized mode.
coordSlaveServers=(192.168.222.10 192.168.222.20)			# none means this slave is not available
coordSlavePorts=(20004 20005)			# Master ports
coordSlavePoolerPorts=(20010 20011)			# Master pooler ports
coordSlaveDirs=($coordSlaveDir $coordSlaveDir)
coordArchLogDirs=($coordArchLogDir $coordArchLogDir)

#---- Configuration files---
# Need these when you'd like setup specific non-default configuration
# These files will go to corresponding files for the master.
# You may supply your bash script to setup extra config lines and extra pg_hba.conf entries
# Or you may supply these files manually.
coordExtraConfig=coordExtraConfig	# Extra configuration file for coordinators.
						# This file will be added to all the coordinators'
						# postgresql.conf
# Pleae note that the following sets up minimum parameters which you may want to change.
# You can put your postgresql.conf lines here.
cat > $coordExtraConfig <<EOF
#================================================
# Added to all the coordinator postgresql.conf
# Original: $coordExtraConfig
log_destination = 'stderr'
logging_collector = on
log_directory = 'pg_log'
listen_addresses = '*'
max_connections = 100
EOF

# Additional Configuration file for specific coordinator master.
# You can define each setting by similar means as above.
coordSpecificExtraConfig=(none none)
coordExtraPgHba=none	# Extra entry for pg_hba.conf.  This file will be added to all the coordinators' pg_hba.conf
coordSpecificExtraPgHba=(none none)

#----- Additional Slaves -----
#
# Please note that this section is just a suggestion how we extend the configuration for
# multiple and cascaded replication.   They're not used in the current version.
#
coordAdditionalSlaves=n		# Additional slave can be specified as follows: where you
coordAdditionalSlaveSet=(cad1)		# Each specifies set of slaves.   This case, two set of slaves are
											# configured
cad1_Sync=n		  		# All the slaves at "cad1" are connected with asynchronous mode.
							# If not, specify "y"
							# The following lines specifies detailed configuration for each
							# slave tag, cad1.  You can define cad2 similarly.
cad1_Servers=(node08 node09 node06 node07)	# Hosts
cad1_dir=$HOME/pgxc/nodes/coord_slave_cad1
cad1_Dirs=($cad1_dir $cad1_dir $cad1_dir $cad1_dir)
cad1_ArchLogDir=$HOME/pgxc/nodes/coord_archlog_cad1
cad1_ArchLogDirs=($cad1_ArchLogDir $cad1_ArchLogDir $cad1_ArchLogDir $cad1_ArchLogDir)


#---- Datanodes -------------------------------------------------------------------------------------------------------

#---- Shortcuts --------------
datanodeMasterDir=$HOME/pgxc/nodes/dn_master
datanodeSlaveDir=$HOME/pgxc/nodes/dn_slave
datanodeArchLogDir=$HOME/pgxc/nodes/datanode_archlog

#---- Overall ---------------
#primaryDatanode=datanode1				# Primary Node.
# At present, xc has a priblem to issue ALTER NODE against the primay node.  Until it is fixed, the test will be done
# without this feature.
primaryDatanode=datanode1				# Primary Node.
datanodeNames=(datanode1 datanode2)
datanodePorts=(20008 20009)	# Master ports
datanodePoolerPorts=(20012 20013)	# Master pooler ports
datanodePgHbaEntries=(192.168.1.0/24)	# Assumes that all the coordinator (master/slave) accepts
										# the same connection
										# This list sets up pg_hba.conf for $pgxcOwner user.
										# If you'd like to setup other entries, supply them
										# through extra configuration files specified below.
# Note: The above parameter is extracted as "host all all 0.0.0.0/0 trust".   If you don't want
# such setups, specify the value () to this variable and suplly what you want using datanodeExtraPgHba
# and/or datanodeSpecificExtraPgHba variables.
#datanodePgHbaEntries=(::1/128)	# Same as above but for IPv6 addresses

#---- Master ----------------
datanodeMasterServers=(192.168.222.10 192.168.222.20)	# none means this master is not available.
													# This means that there should be the master but is down.
													# The cluster is not operational until the master is
													# recovered and ready to run.
datanodeMasterDirs=($datanodeMasterDir $datanodeMasterDir)
datanodeMaxWalSender=5								# max_wal_senders: needed to configure slave. If zero value is
													# specified, it is expected this parameter is explicitly supplied
													# by external configuration files.
													# If you don't configure slaves, leave this value zero.
datanodeMaxWALSenders=($datanodeMaxWalSender $datanodeMaxWalSender)
						# max_wal_senders configuration for each datanode

#---- Slave -----------------
datanodeSlave=n			# Specify y if you configure at least one coordiantor slave.  Otherwise, the following
						# configuration parameters will be set to empty values.
						# If no effective server names are found (that is, every servers are specified as none),
						# then datanodeSlave value will be set to n and all the following values will be set to
						# empty values.

datanodeUserDefinedBackupSettings=n	# Specify whether to update backup/recovery
									# settings during standby addition/removal.

datanodeSlaveServers=(192.168.222.10 192.168.222.20)	# value none means this slave is not available
datanodeSlavePorts=(20008 20009)	# value none means this slave is not available
datanodeSlavePoolerPorts=(20012 20013)	# value none means this slave is not available
datanodeSlaveSync=y		# If datanode slave is connected in synchronized mode
datanodeSlaveDirs=($datanodeSlaveDir $datanodeSlaveDir)
datanodeArchLogDirs=( $datanodeArchLogDir $datanodeArchLogDir )

# ---- Configuration files ---
# You may supply your bash script to setup extra config lines and extra pg_hba.conf entries here.
# These files will go to corresponding files for the master.
# Or you may supply these files manually.
datanodeExtraConfig=none	# Extra configuration file for datanodes.  This file will be added to all the
							# datanodes' postgresql.conf
datanodeSpecificExtraConfig=(none none)
datanodeExtraPgHba=none		# Extra entry for pg_hba.conf.  This file will be added to all the datanodes' postgresql.conf
datanodeSpecificExtraPgHba=(none none)

#----- Additional Slaves -----
datanodeAdditionalSlaves=n	# Additional slave can be specified as follows: where you
# datanodeAdditionalSlaveSet=(dad1 dad2)		# Each specifies set of slaves.   This case, two set of slaves are
											# configured
# dad1_Sync=n		  		# All the slaves at "cad1" are connected with asynchronous mode.
							# If not, specify "y"
							# The following lines specifies detailed configuration for each
							# slave tag, cad1.  You can define cad2 similarly.
# dad1_Servers=(node08 node09 node06 node07)	# Hosts
# dad1_dir=$HOME/pgxc/nodes/coord_slave_cad1
# dad1_Dirs=($cad1_dir $cad1_dir $cad1_dir $cad1_dir)
# dad1_ArchLogDir=$HOME/pgxc/nodes/coord_archlog_cad1
# dad1_ArchLogDirs=($cad1_ArchLogDir $cad1_ArchLogDir $cad1_ArchLogDir $cad1_ArchLogDir)

#---- WAL archives -------------------------------------------------------------------------------------------------
walArchive=y	# If you'd like to configure WAL archive, edit this section.
				# Pgxc_ctl assumes that if you configure WAL archive, you configure it
				# for all the coordinators and datanodes.
				# Default is "no".   Please specify "y" here to turn it on.
#
#		End of Configuration Section
#
#==========================================================================================================================

#========================================================================================================================
# The following is for extension.  Just demonstrate how to write such extension.  There's no code
# which takes care of them so please ignore the following lines.  They are simply ignored by pgxc_ctl.
# No side effects.
#=============<< Beginning of future extension demonistration >> ========================================================
# You can setup more than one backup set for various purposes, such as disaster recovery.
walArchiveSet=(war1 war2)
war1_source=(master)	# you can specify master, slave or ano other additional slaves as a source of WAL archive.
					# Default is the master
wal1_source=(slave)
wal1_source=(additiona_coordinator_slave_set additional_datanode_slave_set)
war1_host=node10	# All the nodes are backed up at the same host for a given archive set
war1_backupdir=$HOME/pgxc/backup_war1
wal2_source=(master)
war2_host=node11
war2_backupdir=$HOME/pgxc/backup_war2
#=============<< End of future extension demonistration >> ========================================================
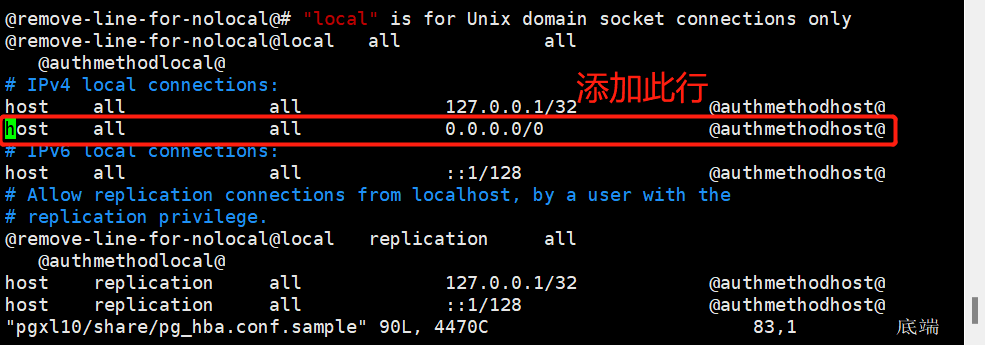
#在所有主机上编辑以下文件
[postgres@postgres3 ~]$ vim pgxl10/share/pg_hba.conf.sample
# IPv4 local connections:
host    all             all             127.0.0.1/32            @authmethodhost@
#添加以下行
host    all             all             0.0.0.0/0               @authmethodhost@
#初始化集群(gtm)操作
[postgres@postgres3 pgxc_ctl]$  pgxc_ctl -c /home/postgres/pgxc_ctl/pgxc_ctl.conf init all
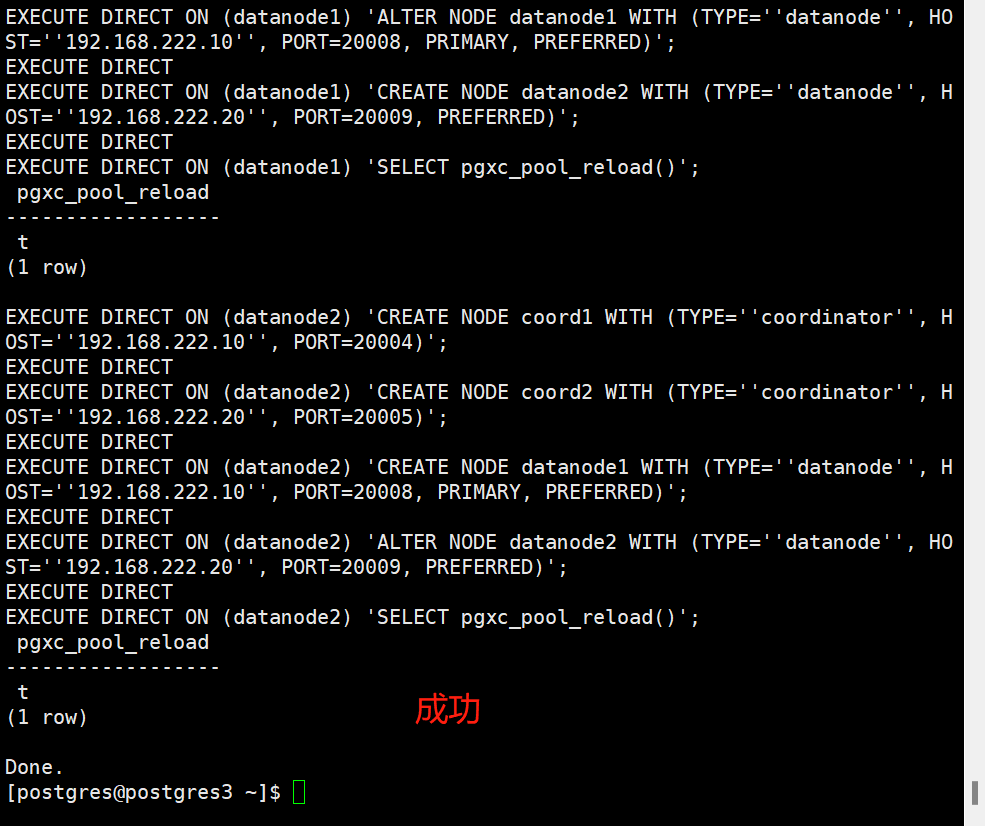
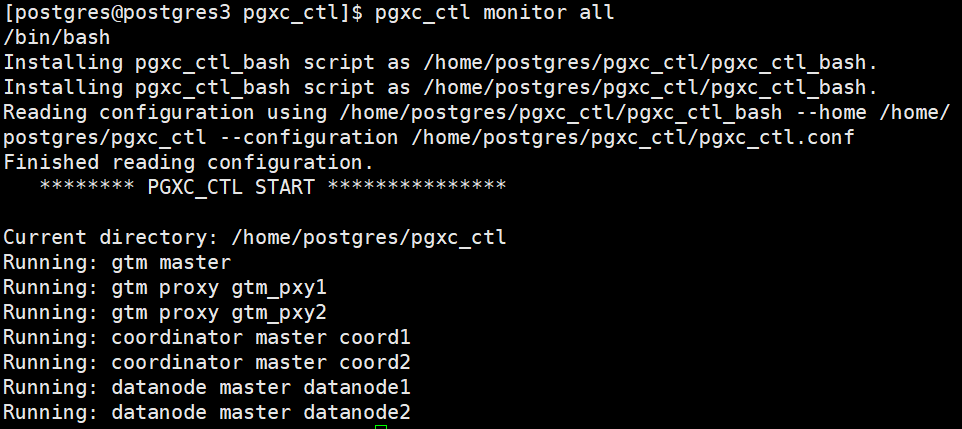
#查看所有节点状态
[postgres@postgres3 pgxc_ctl]$ pgxc_ctl monitor all
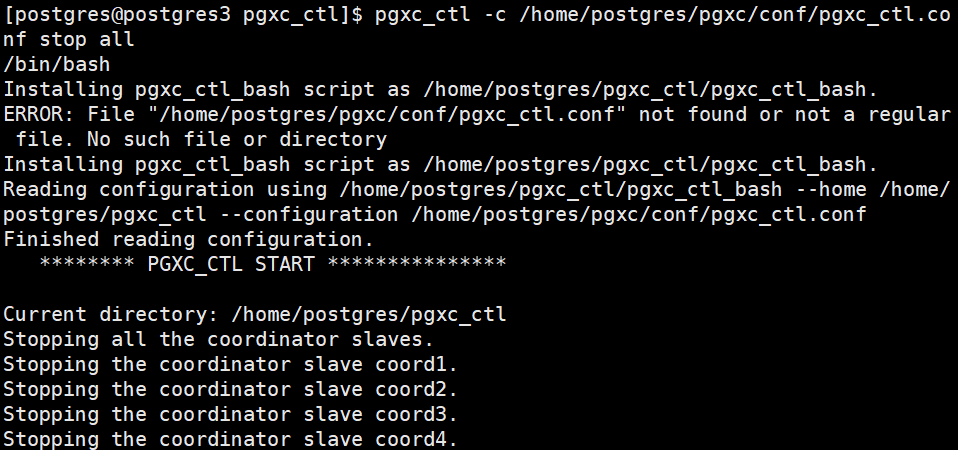
#停止/开启服务
[postgres@postgres3 pgxc_ctl]$ pgxc_ctl -c /home/postgres/pgxc/conf/pgxc_ctl.conf stop/start all
END
智能推荐
量化投资之工具篇一:Backtrader从入门到精通(7)-Indicator类源代码解读(2)_dst[i] = math.fsum(src[i - period + 1:i + 1]) / pe-程序员宅基地
文章浏览阅读6.4k次,点赞20次,收藏54次。接上一篇继续。系统内置Indicator的介绍Backtrader提供了很多内置的Indicator,了解这些Indicator对我们自定义指标、理解现有指标以及制定策略具有重要作用。基本操作类Backtrader提供了很多基本操作类,作为定义其他指标的基准。先看PeriodN,这个类是所有需要使用周期进行计算指标(例如移动平均)的基类:class PeriodN(Indicator): ''' Base class for indicators which take a per_dst[i] = math.fsum(src[i - period + 1:i + 1]) / period indexerror: array ass
N76E003使用syn6288_n76e003 开发环境-程序员宅基地
文章浏览阅读312次。代码如下:/*---------------------------------------------------------------------------------------------------------*//* *//* Copyright(c) 2015 Nuvoton T_n76e003 开发环境
转载:Ubuntu16.04安装视觉SLAM环境(g2o)-程序员宅基地
文章浏览阅读102次。原文链接https://www.cnblogs.com/ambition921009/p/10551959.html1、首先在github上下载g2o图优化库git clone https://github.com/RainerKuemmerle/g2o.git2、运行安装以下依赖库sudo apt-get install libcholmod3.0.6sudo apt-get ...
2021最全大数据学习路线(建议收藏)_大数据先学数学还是先学编程-程序员宅基地
文章浏览阅读9.2w次,点赞895次,收藏6.5k次。大数据是未来的趋势,在数字化转型时代,把握大数据是关键的!_大数据先学数学还是先学编程
Mybatis中使用list集合或者数组array作为查询参数,进行查询是foreach标签中的collection怎么写?_mybatisplus根据list集合查询参数-程序员宅基地
文章浏览阅读1.3k次。一直用的的mybatis进行查询数据,对于有些内容容易忘记,这里整理一下,如果有纰漏请指正!先上简单的代码<select id="getUsernameList" parameterType="java.util.List" resultType="java.lang.String"> select username from sys_user su where su.user_id in <f._mybatisplus根据list集合查询参数
few-shot learning 小样本学习---综述_[7] wang y, yao q. few-shot learning: a survey[j].-程序员宅基地
文章浏览阅读8k次,点赞3次,收藏49次。小样本学习(Few-shot Learning)综述 (出自阿里巴巴团队2019年4月)Few-shot Learning: A Survey YAQING WANG1,2 , QUANMING YAO 2019_[7] wang y, yao q. few-shot learning: a survey[j]. 2019.
随便推点
11级_Java_曹建波 03.02 Struts2_事物管理&文件上传-程序员宅基地
文章浏览阅读98次。在实现登陆后对admin的增删改查的操作中。http客户端------------->web容器----->struts2过滤器------->struts.xml--->Action----service-->dao->J数据库登陆Action中验证用户是否登陆成功Adminentity;getEntity(){returnen..._java struts2事物
scrapy实践二(selenium爬取腾讯漫画【失败】)-程序员宅基地
文章浏览阅读544次。前言一个月前曾学习过爬取腾讯动漫全站的示例代码,现在再用scrapy尝试过程新建spider爬虫编写普通selenium爬虫爬取漫画观察网页本次目标是爬取热门排行下的漫画右键检查可以发现漫画标题和链接可以轻松获取(前提是用selenium)一步from selenium import webdriverfrom selenium.webdriver.support.ui import WebDriverWaitfrom selenium.webdriver.common.by i
根据面要素图层迭代出面要素批量裁切(掩膜提取)影像_迭代要素 批量掩膜-程序员宅基地
文章浏览阅读2.8k次。看了虾神的文章,大数据之:影像提取中深度学习样本库获取的思考,http://blog.csdn.net/hailiannanhai/article/details/78130042。忍不住自己要试试。下面就写一下试试的过程,用一个矢量要素图层(包含多个面要素),一副影像为基础,用迭代做裁切,循环裁切出一幅一幅的影像。模型图如下所示。左边要素为面矢量要素层,里面含有多个面要素_迭代要素 批量掩膜
(五)QString和数字的转换_数字转qstring-程序员宅基地
文章浏览阅读1.4w次,点赞7次,收藏35次。1.QString转数字QString类提供了非常方便的数字类型转换,包括常用的int float double等,也包括不常用的long long等,具体转换如下: QString string = "1"; int int_string = string.toInt();//int类型 long long_string = string.toLong();//long float float_string = string.toFloat();//float s_数字转qstring
数据挖掘工程师的基本职责。_数据挖掘工程师的能力-程序员宅基地
文章浏览阅读1.7k次。转载自品略图书馆http://www.pinlue.com/article/2020/03/1707/2210031765835.html数据挖掘工程师负责科技数据挖掘算法模型的构建、应用、评测、报告。下面是第一范文网小编为您精心整理的数据挖掘工程师的基本职责。 数据挖掘工程师的基本职责1 职责: 1、参与K12教育行业大数据分析、大数据处理、数据挖掘等系统的设计和开..._数据挖掘工程师的能力
【C++ STL应用与实现】23: 如何使用std::mem_fn (since C++11)_aux_source_directory called with incorrect-程序员宅基地
文章浏览阅读2w次,点赞9次,收藏20次。本文总结了STL中函数适配器:`mem_fn`系列函数的用法,它们是:`mem_fun (c++98)`, `mem_fun_ref (c++98)`, `mem_fn (c++11)`. 文中给出了它们各自的使用范围及代码示例,提到了mem_fn的使用限制,使用bind来解决这个限制。_aux_source_directory called with incorrect