UEFI 基础教程 (一) - 基于QEMU搭建UEFI开发环境(win/linux)_qemu 怎么跑uefi-程序员宅基地
技术标签: 固件开发 15_固件开发 UEFI FirmWare
一、EDKII windows 环境搭建
1. 下载UEFI开源代码
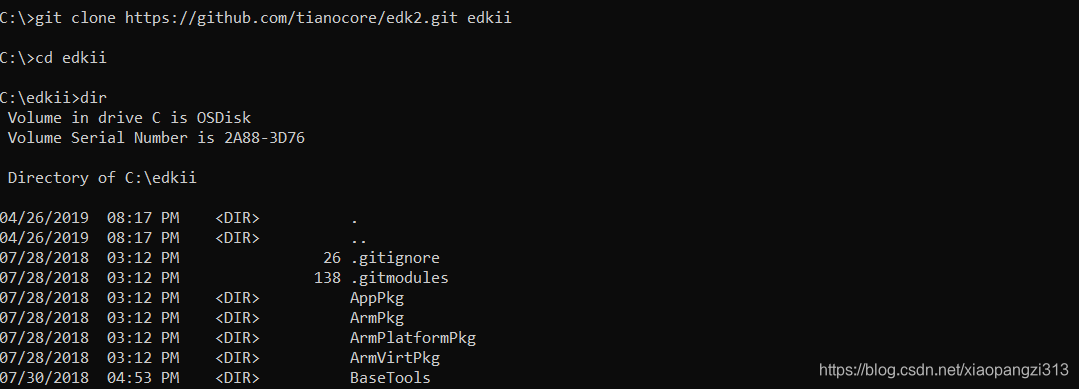
cmd进入C盘根目录,git clone https://github.com/tianocore/edk2.git edkii && cd edkii && git submodule update --init
(太慢的话,使用gitee, git clone https://gitee.com/xiaopangzi313/edk2.git)
2. 安装ASL编译器
下载 iasl-win-20190405.zip,然后解压至C:\asl。
3. 安装NASM编译器
下载 nasm-2.14.02-win64.zip,解压nasm-2.14.02-win64.zip到C:\nasm
4. 安装VS2013或者VS2015(过程略)
5. 修改启动脚本edksetup.bat
进入edk2目录,在edksetup.bat最后一行添加
build -a X64 -p OvmfPkg\OvmfPkgX64.dsc -D DEBUG_ON_SERIAL_PORT
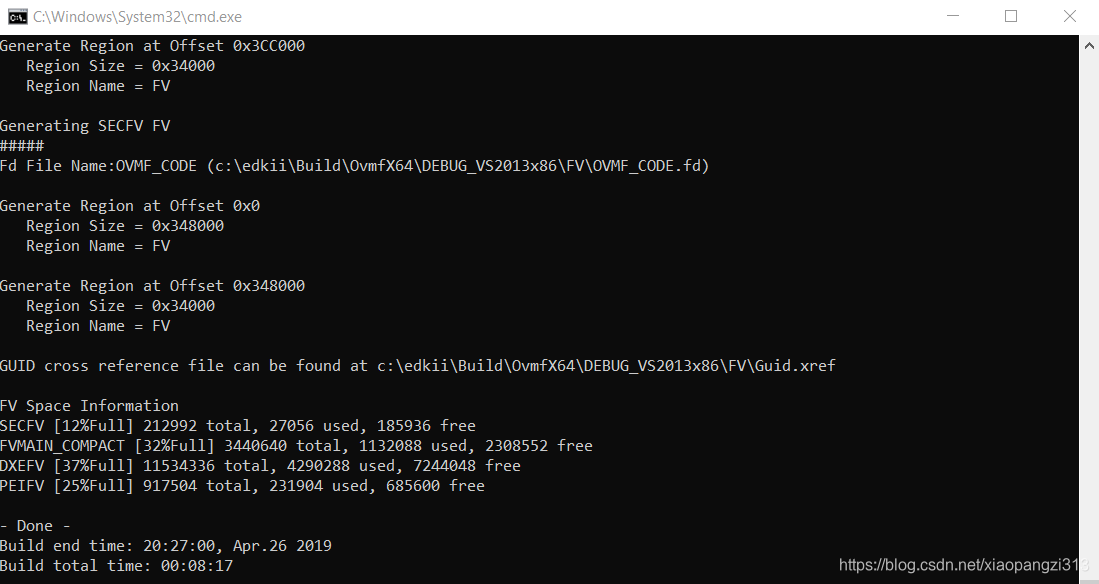
6. 编译 OVMF.FD 固件文件
在edk2目录执行edksetup.bat,

运行结果如下,
为了运行方便,可以将edksetup.bat放入右键菜单,编写以下文本保存为EDK2_Build.reg 并双击运行,
Windows Registry Editor Version 5.00

[HKEY_CLASSES_ROOT\Directory\shell\EDK2_Build]
@="EDK2_Build"
"Icon"="cmd.exe"

[HKEY_CLASSES_ROOT\Directory\shell\EDK2_Build\command]
@="cmd.exe /s /k pushd \"%V\" && edksetup.bat"

[HKEY_CLASSES_ROOT\Directory\Background\shell\EDK2_Build]
@="EDK2_Build"
"Icon"="cmd.exe"

[HKEY_CLASSES_ROOT\Directory\Background\shell\EDK2_Build\command]
@="cmd.exe /s /k pushd \"%V\"  && edksetup.bat"
即可以使用右键菜单运行编译脚本,

查看生成的固件文件,dir C:\edkii\Build\OvmfX64\DEBUG_VS2013x86\FV\*.fd

7. 安装QEMU(X64)虚拟机
下载QEMU并安装,链接:https://pan.baidu.com/s/1aQ7wmQ6bUOInUs94PmAFHA 提取码:csdn
–来自百度网盘超级会员V1的分享
在C盘创建QEMU并进入,拷贝OVMF.FD到当前目录,创建启动脚本setup-qemu-x64.bat
C:\qemu>echo "C:\Program Files\qemu\qemu-system-x86_64.exe" -bios "OVMF.fd" -M "pc" -m 256 -cpu "qemu64" -boot order=dc -serial stdio >> setup-qemu-x64.bat
运行脚本 setup-qemu-x64.bat,

效果如下,
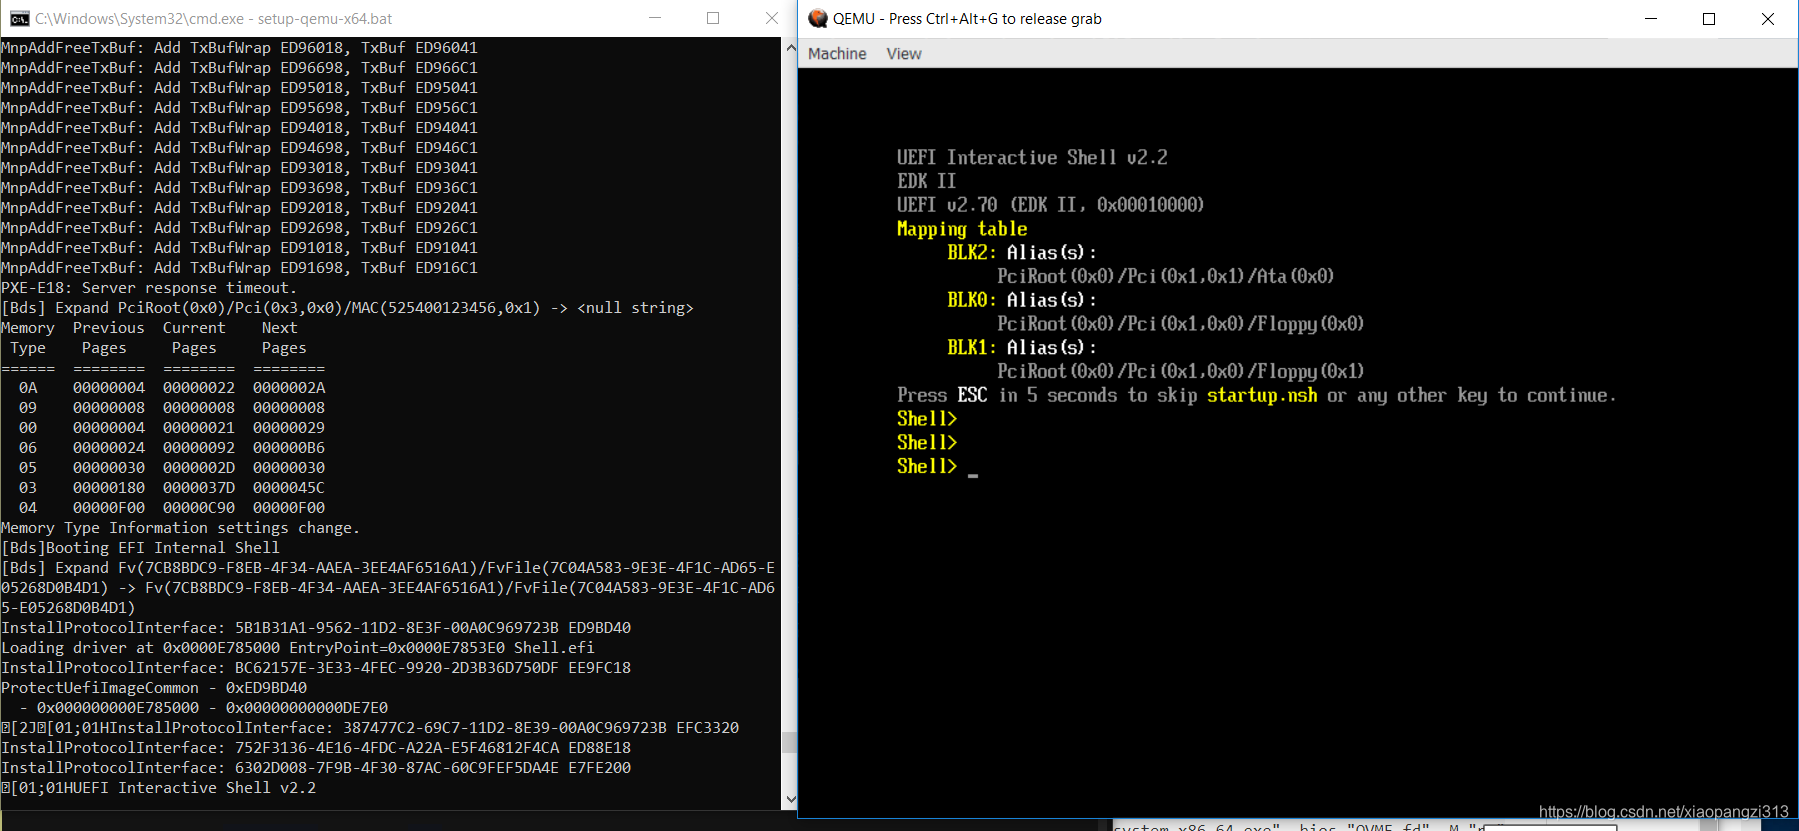
图中,左侧为Console串口输出,右侧为QEMU的shell界面。
二、EDKII Linux(Centos7) 环境搭建
1. 设置软件源
# 备份当前repo文件
cp  /etc/yum.repos.d/CentOS-Base.repo  /etc/yum.repos.d/CentOS-Base.repo.back
# 下载ali cloud centos 源
wget -O /etc/yum.repos.d/CentOS-Base.repo http://mirrors.aliyun.com/repo/Centos-7.repo
# 安装扩展仓库
wget -O /etc/yum.repos.d/epel-7.repo wget http://mirrors.aliyun.com/repo/epel-7.repo
yum clean all
yum makecache
2. 安装编译器、模拟器环境
·yum -y install gcc gcc-c++ git python3 nasm iasl libuuid-devel qemu
#安装GUI
yum groupinstall "GNOME Desktop" "Graphical Administration Tools"
ln -sf /lib/systemd/system/runlevel5.target /etc/systemd/system/default.target
3. 下载UEFI开源代码
git clone https://github.com/tianocore/edk2.git edkii(如果太慢可以sync到自己的gitee账户,如我的gitee, git clone https://gitee.com/xiaopangzi313/edk2.git)
4. 编译UEFI开源代码
# 编译basetools
  make -C /root/edk2/BaseTools/Source/C
# 编译 Ovmf.fd
 ./OvmfPkg/build.sh -D DEBUG_ON_SERIAL_PORT
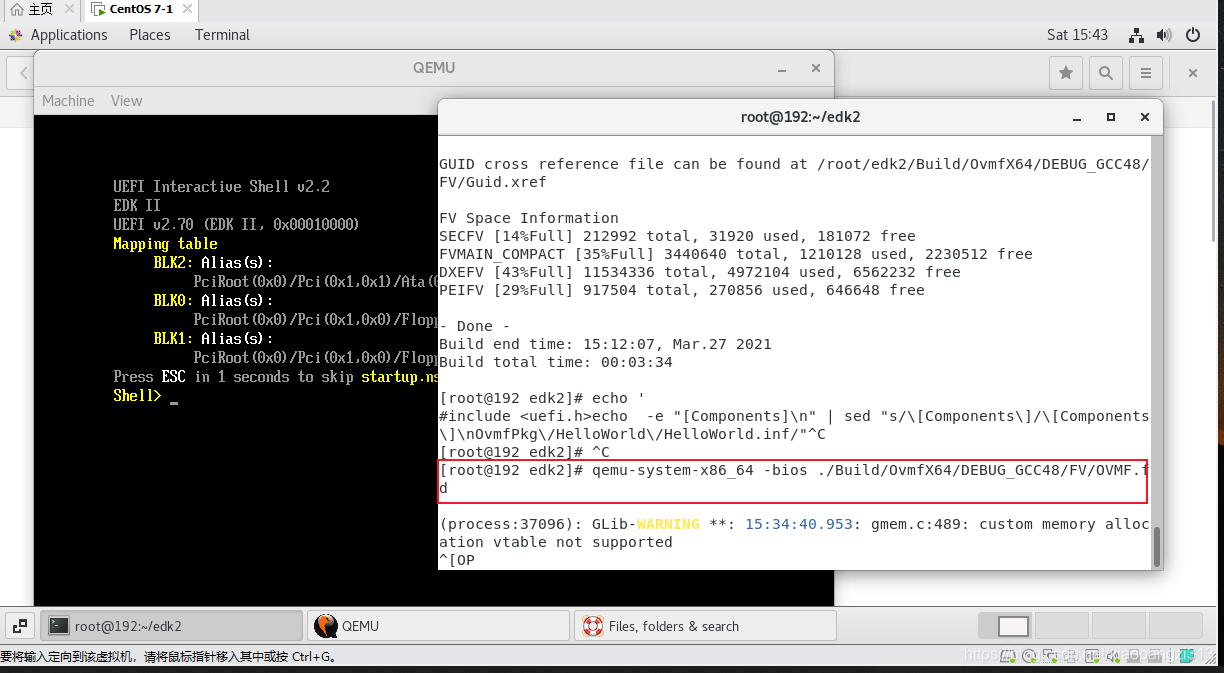
5. 使用QEMU加载Ovmf.fd
qemu-system-x86_64 -bios ./Build/OvmfX64/DEBUG_GCC48/FV/OVMF.fd
PS:
VMware/Vbox console操作不方便,可以尝试使用虚拟串口方式。- 虚拟机设置->硬件>添加->串行端口->使用命名管道->输入
\\.\pipe\com_1 - Centos 下配置grub:
sed 's/quiet/console=ttyS1,9600 loglevel=8/' -i /etc/default/grubgrub2-mkconfig -o /boot/grub2/grub.cfggrub2-mkconfig -o /boot/efi/EFI/centos/grub.cfgreboot
- Putty 配置,serial line设置为
\\.\pipe\com_1,speed设置为9600
效果如下:

- 虚拟机设置->硬件>添加->串行端口->使用命名管道->输入
三、UEFI OVMF 固件 boot Linux
1. 编译Busybox
#安装相关依赖库以及tool
yum -y  install gcc  gcc-c++
yum install -y ncurses ncurses-devel
yum install -y elfutils-libelf-devel openssl-devel dwarves make flex bison
yum install -y glibc-static

#创建工作目录
CSDN=/root/csdn
TOP_BUILD=$CSDN/build
mkdidr -p $TOP_BUILD
cd $CSDN

#下载解压busybox源码
wget  https://busybox.net/downloads/busybox-1.26.2.tar.bz2  --no-check-certificate
tar xjf busybox-1.26.2.tar.bz2

#生成.config
cd $CSDN/busybox-1.26.2
mkdir -pv $TOP_BUILD/obj/busybox-x86
make O=$TOP_BUILD/obj/busybox-x86 defconfig

make O=$TOP_BUILD/obj/busybox-x86 menuconfig
sed -i "s/.*CONFIG_STATIC.*/CONFIG_STATIC=y/" .config
(或者Busybox Settings  ---> Build BusyBox as a static binary (no shared libs).)

cd $TOP_BUILD/obj/busybox-x86
make -j2
make install
编译完成如下:

测试下busybox:

2. 制作initramfs
#创建假的文件系统目录
mkdir -pv $TOP_BUILD/initramfs/x86-busybox
cd $TOP_BUILD/initramfs/x86-busybox
mkdir -pv {bin,dev/tty0,sbin,etc,proc,sys/kernel/debug,usr/{bin,sbin},lib,lib64,mnt/root,root}

#copy 编译生成的busybox
cp -av $TOP_BUILD/obj/busybox-x86/_install/*  $TOP_BUILD/initramfs/x86-busybox
cp -av /dev/{null,console,tty,sda1} $TOP_BUILD/initramfs/x86-busybox/dev/

#创建init文件
cat > $TOP_BUILD/initramfs/x86-busybox/init < EOF
#!/bin/sh
mount -t proc none /proc
mount -t sysfs none /sys
#mount -t debugfs none /sys/kernel/debug
mdev -s
echo -e "\nBoot took $(cut -d' ' -f1 /proc/uptime) seconds\n"
#exec /bin/sh
exec /sbin/init
EOF
chmod +x $TOP_BUILD/initramfs/x86-busybox/init


#创建 ./etc/passwd与 ./etc/group
echo "root::0:0:root:/:/bin/sh" > ./etc/passwd
touch  ./etc/group

#创建 ./etc/inittab
cat > ./etc/inittab << EOF
::sysinit:/etc/rc.d/rcS
::respawn:/sbin/getty -n -l /bin/sh ttyS0 115200
::respawn:/bin/cttyhack /bin/sh
::shutdown:/bin/umount -a -r
::shutdown:/sbin/swapoff -a
::restart:/sbin/init
EOF

#创建 . ./etc/fstab
cat > ./etc/fstab << EOF
proc     /proc    proc     defaults 0 0
sys      /sys     sysfs    defaults 0 0
none     /dev     devtmpfs defaults 0 0
tmpfs    /dev/shm tmpfs    defaults 0 0
none     /dev/pts devpts   defaults 0 0
EOF

#创建 . ./etc/hostname
echo "busybox_csdn" >  ./etc/hostname

#创建  ./etc/rc.d/rcS
mkdir -p ./etc/rc.d/ && touch ./etc/rc.d/rcS

echo '#!/bin/sh
/bin/hostname -F /etc/hostname
/bin/mount /proc               # We need to do this before remounting root
/bin/mount /sys
/bin/mount -o remount,rw /     # Remount read-write
/bin/mount /dev
/bin/mkdir /dev/shm
/bin/mkdir /dev/pts
/bin/mount -a                  # Mount all filesystems in fstab, except those marked with 'noauto'
/sbin/ifconfig lo 127.0.0.1    # Setup loopback interface for network (if you have networking in your kernel)
#/sbin/inetd                    # If you want inetd to run
#/sbin/telnetd                  # If you want standalone telnetd to run -- incompatible with inetd it seems
' > ./etc/rc.d/rcS
chmod +x ./etc/rc.d/rcS

#创建 tty设备文件
mknod ./dev/tty1 c 4 1
mknod ./dev/tty2 c 4 2
mknod ./dev/tty3 c 4 3
mknod ./dev/tty4 c 4 4
ls -l ./dev/tty[0-9]

#打包initramfs
cd $TOP_BUILD/initramfs/x86-busybox
find . -print0 | cpio --null -ov --format=newc 	| gzip -9 > $TOP_BUILD/obj/initramfs-busybox-x86.cpio.gz

3. 制作支持EFI的 Linux 硬盘镜像
# 安装相关的tool
 yum install -y dosfstools
 yum install -y  grub2-efi-x64-modules.noarch
 yum install -y  efibootmgr
# 插入 USB 到PC同时保证被Vmware能识别(或者直接宿主linux)

#对U盘前500MB清零
dd if=/dev/zero of=/dev/sdb bs=1M count=512;
#对U盘(/dev/sdb)进行分区
gdisk /dev/sdb
GPT fdisk (gdisk) version 0.8.10
Partition table scan:
MBR: protective
BSD: not present
APM: not present
GPT: present
Found valid GPT with protective MBR; using GPT.
Command (? for help): p
Disk /dev/sdb: 60062500 sectors, 28.6 GiB
Logical sector size: 512 bytes
Disk identifier (GUID): 2280F128-40B9-44EF-8972-59E8AA2C1DD3
Partition table holds up to 128 entries
First usable sector is 34, last usable sector is 60062466
Partitions will be aligned on 2048-sector boundaries
Total free space is 60062433 sectors (28.6 GiB)
Number Start (sector) End (sector) Size Code Name
Command (? for help): n
Partition number (1-128, default 1):
First sector (34-60062466, default = 2048) or {+-}size{KMGTP}:
Last sector (2048-60062466, default = 60062466) or {+-}size{KMGTP}: 110MiB
Current type is 'Linux filesystem'
Hex code or GUID (L to show codes, Enter = 8300): EF00
Changed type of partition to 'EFI System'
Command (? for help): p
Disk /dev/sdb: 60062500 sectors, 28.6 GiB
Logical sector size: 512 bytes
Disk identifier (GUID): 2280F128-40B9-44EF-8972-59E8AA2C1DD3
Partition table holds up to 128 entries
First usable sector is 34, last usable sector is 60062466
Partitions will be aligned on 2048-sector boundaries
Total free space is 59839200 sectors (28.5 GiB)
Number Start (sector) End (sector) Size Code Name
1 2048 225280 109.0 MiB EF00 EFI System
Command (? for help): n
Partition number (2-128, default 2):
First sector (34-60062466, default = 227328) or {+-}size{KMGTP}:
Last sector (227328-60062466, default = 60062466) or {+-}size{KMGTP}: 400MiB
Current type is 'Linux filesystem'
Hex code or GUID (L to show codes, Enter = 8300): 8300
Changed type of partition to 'Linux filesystem'
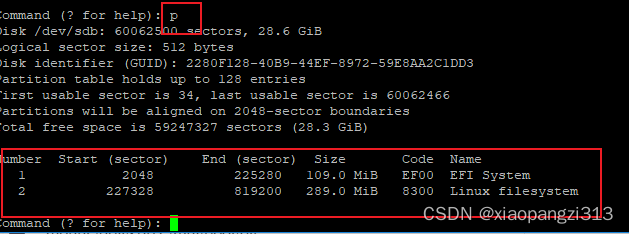
Command (? for help): p
Disk /dev/sdb: 60062500 sectors, 28.6 GiB
Logical sector size: 512 bytes
Disk identifier (GUID): 2280F128-40B9-44EF-8972-59E8AA2C1DD3
Partition table holds up to 128 entries
First usable sector is 34, last usable sector is 60062466
Partitions will be aligned on 2048-sector boundaries
Total free space is 59247327 sectors (28.3 GiB)
Number Start (sector) End (sector) Size Code Name
1 2048 225280 109.0 MiB EF00 EFI System
2 227328 819200 289.0 MiB 8300 Linux filesystem
Command (? for help): w
Final checks complete. About to write GPT data. THIS WILL OVERWRITE EXISTING
PARTITIONS!!
Do you want to proceed? (Y/N): y
OK; writing new GUID partition table (GPT) to /dev/sdb.
Warning: The kernel is still using the old partition table.
The new table will be used at the next reboot.
The operation has completed successfully.
[root@localhost ~]#
#对U盘(/dev/sdb)进行格式化
fdisk -l  /dev/sdb
mkfs.vfat  -F 32 -s 2 /dev/sdb1
mkfs.ext3 /dev/sdb2
#对U盘安装bootloader这里用grub tool,也可以使用LILO
mount /dev/sdb2 /mnt/
mkdir -p /mnt/boot/efi
mkdir -p /mnt/boot/grub
mount /dev/sdb1  /mnt/boot/efi
grub2-install --root-directory=/mnt/   --target=x86_64-efi   /dev/sdb

#创建EFI/BOOT/bootx64.efi,确保UEFI可以boot
mkdir -p  /mnt/boot/efi/EFI/BOOT
cp  /mnt/boot/efi/EFI/centos/grubx64.efi  /mnt/boot/efi/EFI/BOOT/bootx64.efi

# copy 本机的kernel 镜像(也可以自己编译)
cp  /boot/vmlinuz-3.10.0-514.el7.x86_64  /mnt/

#copy上面编译的busybox initramfs
cp   /root/csdn/build/obj/initramfs-busybox-x86.cpio.gz  /mnt/

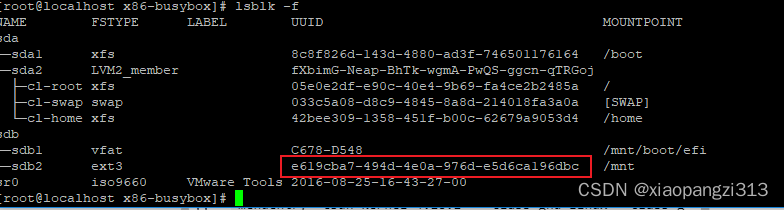
# 获取主分区的UUID用来填充grub.cfg
lsblk -f
# 制作启动菜单
echo 'menuentry 'csdn-kernel-3.10.0-514.el7.x86_64' --class gnu-linux --class gnu --class os {
		insmod gzio
		insmod part_gpt
		search --no-floppy --fs-uuid --set e619cba7-494d-4e0a-976d-e5d6ca196dbc
		echo 'Loading csdn kernel 3.10.0 ...'
		linux  /vmlinuz-3.10.0-514.el7.x86_64  rw init=/bin/sh console=ttyS0,9600n8 console=tty0 consoleblank=0 earlyprintk=ttyS0,9600 kgdboc=kbd,ttyS0 loglevel=7
		echo   'Loading initial ramdisk busybox  ...'
		initrd /initramfs-busybox-x86.cpio.gz
}'  > /mnt/boot/efi/EFI/centos/grub.cfg
#卸载U盘
umount /dev/sdb1
umount /dev/sdb2

# 导出U盘为HardDisk image
dd if=/dev/sdb bs=512 count=819200 of=./csdn_busybox.img
4. 使用OVMF 固件启动 Linux 硬盘镜像
1.`Windows 端启动
chcp 65001 && "C:\Program Files\qemu\qemu-system-x86_64.exe" -bios "OVMF.fd" -M "pc" -m 256 -cpu "qemu64" -boot order=dc -serial stdio -hda "csdn_busybox.img"
press F2 -> uefi shell

退出shell,进入setup, 再进入boot entry


`
2.`Linux端启动
qemu-system-x86_64 -bios ./Build/OvmfX64/DEBUG_GCC48/FV/OVMF.fd -serial stdio -hda /root/csdn_busybox.img

5. 使用OVMF 固件启动 win10硬盘镜像
cmd 中执行如下命令qemu-system-x86_64.exe -bios "OVMF.fd" -M "pc" -m 4096 -cpu "qemu64" -hda E:\iso\win10_xxx.raw -serial stdio (注意:win10 镜像可以通过vmware以及vbox制作)

6. 使用OVMF 固件启动 FWTS硬盘镜像
cmd 中执行如下命令chcp 65001 && "C:\Program Files\qemu\qemu-system-x86_64.exe" -bios "OVMF.fd" -M "pc" -m 4096 -cpu "qemu64" -boot order=dc -serial stdio -hda fwts-live-22.03.00-x86_64.img -usbdevice disk:HDD_BOOT.img (注意:fwts镜像可以从 https://fwts.ubuntu.com/fwts-live/ 下载)

小结:
本章完成了UEFI 开源固件OVMF的编译环境搭建以及使用OVMF 启动UEFI shell / Linux OS (busybox + fwts)/ windows . 后续再会添加OVMF启动ReactOS.
PS:
本文使用的Qemu安装包,OVMF固件以及busybox可以从以下链接下载
qemu+ovmf+busybox
智能推荐
什么是内部类?成员内部类、静态内部类、局部内部类和匿名内部类的区别及作用?_成员内部类和局部内部类的区别-程序员宅基地
文章浏览阅读3.4k次,点赞8次,收藏42次。一、什么是内部类?or 内部类的概念内部类是定义在另一个类中的类;下面类TestB是类TestA的内部类。即内部类对象引用了实例化该内部对象的外围类对象。public class TestA{ class TestB {}}二、 为什么需要内部类?or 内部类有什么作用?1、 内部类方法可以访问该类定义所在的作用域中的数据,包括私有数据。2、内部类可以对同一个包中的其他类隐藏起来。3、 当想要定义一个回调函数且不想编写大量代码时,使用匿名内部类比较便捷。三、 内部类的分类成员内部_成员内部类和局部内部类的区别
分布式系统_分布式系统运维工具-程序员宅基地
文章浏览阅读118次。分布式系统要求拆分分布式思想的实质搭配要求分布式系统要求按照某些特定的规则将项目进行拆分。如果将一个项目的所有模板功能都写到一起,当某个模块出现问题时将直接导致整个服务器出现问题。拆分按照业务拆分为不同的服务器,有效的降低系统架构的耦合性在业务拆分的基础上可按照代码层级进行拆分(view、controller、service、pojo)分布式思想的实质分布式思想的实质是为了系统的..._分布式系统运维工具
用Exce分析l数据极简入门_exce l趋势分析数据量-程序员宅基地
文章浏览阅读174次。1.数据源准备2.数据处理step1:数据表处理应用函数:①VLOOKUP函数; ② CONCATENATE函数终表:step2:数据透视表统计分析(1) 透视表汇总不同渠道用户数, 金额(2)透视表汇总不同日期购买用户数,金额(3)透视表汇总不同用户购买订单数,金额step3:讲第二步结果可视化, 比如, 柱形图(1)不同渠道用户数, 金额(2)不同日期..._exce l趋势分析数据量
宁盾堡垒机双因素认证方案_horizon宁盾双因素配置-程序员宅基地
文章浏览阅读3.3k次。堡垒机可以为企业实现服务器、网络设备、数据库、安全设备等的集中管控和安全可靠运行,帮助IT运维人员提高工作效率。通俗来说,就是用来控制哪些人可以登录哪些资产(事先防范和事中控制),以及录像记录登录资产后做了什么事情(事后溯源)。由于堡垒机内部保存着企业所有的设备资产和权限关系,是企业内部信息安全的重要一环。但目前出现的以下问题产生了很大安全隐患:密码设置过于简单,容易被暴力破解;为方便记忆,设置统一的密码,一旦单点被破,极易引发全面危机。在单一的静态密码验证机制下,登录密码是堡垒机安全的唯一_horizon宁盾双因素配置
谷歌浏览器安装(Win、Linux、离线安装)_chrome linux debian离线安装依赖-程序员宅基地
文章浏览阅读7.7k次,点赞4次,收藏16次。Chrome作为一款挺不错的浏览器,其有着诸多的优良特性,并且支持跨平台。其支持(Windows、Linux、Mac OS X、BSD、Android),在绝大多数情况下,其的安装都很简单,但有时会由于网络原因,无法安装,所以在这里总结下Chrome的安装。Windows下的安装:在线安装:离线安装:Linux下的安装:在线安装:离线安装:..._chrome linux debian离线安装依赖
烤仔TVの尚书房 | 逃离北上广?不如押宝越南“北上广”-程序员宅基地
文章浏览阅读153次。中国发达城市榜单每天都在刷新,但无非是北上广轮流坐庄。北京拥有最顶尖的文化资源,上海是“摩登”的国际化大都市,广州是活力四射的千年商都。GDP和发展潜力是衡量城市的数字指...
随便推点
java spark的使用和配置_使用java调用spark注册进去的程序-程序员宅基地
文章浏览阅读3.3k次。前言spark在java使用比较少,多是scala的用法,我这里介绍一下我在项目中使用的代码配置详细算法的使用请点击我主页列表查看版本jar版本说明spark3.0.1scala2.12这个版本注意和spark版本对应,只是为了引jar包springboot版本2.3.2.RELEASEmaven<!-- spark --> <dependency> <gro_使用java调用spark注册进去的程序
汽车零部件开发工具巨头V公司全套bootloader中UDS协议栈源代码,自己完成底层外设驱动开发后,集成即可使用_uds协议栈 源代码-程序员宅基地
文章浏览阅读4.8k次。汽车零部件开发工具巨头V公司全套bootloader中UDS协议栈源代码,自己完成底层外设驱动开发后,集成即可使用,代码精简高效,大厂出品有量产保证。:139800617636213023darcy169_uds协议栈 源代码
AUTOSAR基础篇之OS(下)_autosar 定义了 5 种多核支持类型-程序员宅基地
文章浏览阅读4.6k次,点赞20次,收藏148次。AUTOSAR基础篇之OS(下)前言首先,请问大家几个小小的问题,你清楚:你知道多核OS在什么场景下使用吗?多核系统OS又是如何协同启动或者关闭的呢?AUTOSAR OS存在哪些功能安全等方面的要求呢?多核OS之间的启动关闭与单核相比又存在哪些异同呢?。。。。。。今天,我们来一起探索并回答这些问题。为了便于大家理解,以下是本文的主题大纲:[外链图片转存失败,源站可能有防盗链机制,建议将图片保存下来直接上传(img-JCXrdI0k-1636287756923)(https://gite_autosar 定义了 5 种多核支持类型
VS报错无法打开自己写的头文件_vs2013打不开自己定义的头文件-程序员宅基地
文章浏览阅读2.2k次,点赞6次,收藏14次。原因:自己写的头文件没有被加入到方案的包含目录中去,无法被检索到,也就无法打开。将自己写的头文件都放入header files。然后在VS界面上,右键方案名,点击属性。将自己头文件夹的目录添加进去。_vs2013打不开自己定义的头文件
【Redis】Redis基础命令集详解_redis命令-程序员宅基地
文章浏览阅读3.3w次,点赞80次,收藏342次。此时,可以将系统中所有用户的 Session 数据全部保存到 Redis 中,用户在提交新的请求后,系统先从Redis 中查找相应的Session 数据,如果存在,则再进行相关操作,否则跳转到登录页面。此时,可以将系统中所有用户的 Session 数据全部保存到 Redis 中,用户在提交新的请求后,系统先从Redis 中查找相应的Session 数据,如果存在,则再进行相关操作,否则跳转到登录页面。当数据量很大时,count 的数量的指定可能会不起作用,Redis 会自动调整每次的遍历数目。_redis命令
URP渲染管线简介-程序员宅基地
文章浏览阅读449次,点赞3次,收藏3次。URP的设计目标是在保持高性能的同时,提供更多的渲染功能和自定义选项。与普通项目相比,会多出Presets文件夹,里面包含着一些设置,包括本色,声音,法线,贴图等设置。全局只有主光源和附加光源,主光源只支持平行光,附加光源数量有限制,主光源和附加光源在一次Pass中可以一起着色。URP:全局只有主光源和附加光源,主光源只支持平行光,附加光源数量有限制,一次Pass可以计算多个光源。可编程渲染管线:渲染策略是可以供程序员定制的,可以定制的有:光照计算和光源,深度测试,摄像机光照烘焙,后期处理策略等等。_urp渲染管线