vscode_neovim(vim enhanced)配置与使用@通过变量$MYVIMRC来修改vim配置文件_vscode neovim-程序员宅基地
文章目录
neovim安装
refs@document
用scoop 安装
-
如果您的网络环境允许,scoop安装时不错的选择
-
通过
nvim可以在终端(powershell)中启动neovim -
(注意不是用
neovim启动,而是nvim)-
    NVIM v0.5.1
~
~                                     Nvim is open source and freely distributable
~                                               https://neovim.io/#chat
~
~                                    type  :help nvim<Enter>       if you are new!
~                                    type  :checkhealth<Enter>     to optimize Nvim
~                                    type  :q<Enter>               to exit
~                                    type  :help<Enter>            for help
~
~                                               Sponsor Vim development!
~                                    type  :help sponsor<Enter>    for information
~
-
scoop查询neovim安装目录
-
PS C:\Users\cxxu> scoop which nvim D:\exes\neovim\bin\nvim.exe -
这里的
~表示用户家目录(%userProfile%)
安装vscode extension
- introduction/download installation
- 您需要在插件中指定对应系统下的neovim可执行文件的目录
插件配置
-
by command palette

- 搜索
neovim path
-
配置时注意区分linux path/windows path
使得配置生效
-
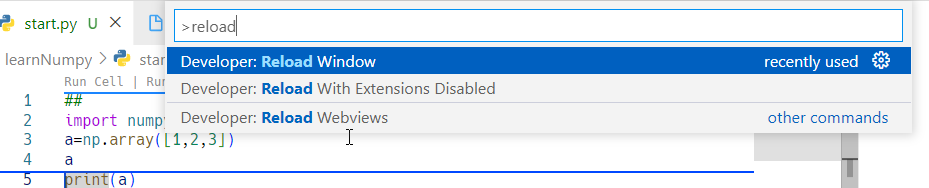
重启窗口
-
ctrl+shift+p:
-
reload window -
-
vimrc 配置文件
-
vimrc 在neovim中的相对应的配置文件是
init.vim(或者是init.lua)-
:help init.vim-
config init.vim init.lua vimrc exrc
      A file that contains initialization commands is generically called
      a "vimrc" or config file.  It can be a Vimscript or Lua file named
      "init.vim" or "init.lua" respectively.  It is an error to use both at
      the same time.  Each line in a "init.vim" is executed as an Ex command
      line.  See also vimrc-intro and base-directories.

      The config file is located at:
              Unix            ~/.config/nvim/init.vim (or init.lua)
              Windows         ~/AppData/Local/nvim/init.vim (or init.lua)
      or if $XDG_CONFIG_HOME is defined:
                              $XDG_CONFIG_HOME/nvim/init.vim (or init.lua)
-
-
-
然而,某些情况下您找不到这个文件,可以手动创建
-
根据help 提示,在
%localAppData%\下创建相应的目录nvim- 并创建文件
init.vim - 这样就可以完成配置
-
windows下重开一个nvim,可以看到效果
配置文件和$MYVIMRC
neovim配置
:help vim.init
 A file that contains initialization commands is generically called
        a "vimrc" or config file.  It can be a Vimscript or Lua file named
        "init.vim" or "init.lua" respectively.  It is an error to use both at
        the same time.  Each line in a "init.vim" is executed as an Ex command
        line.  See also vimrc-intro and base-directories.

        The config file is located at:
                Unix            ~/.config/nvim/init.vim (or init.lua)
                Windows         ~/AppData/Local/nvim/init.vim (or init.lua)
创建init.vim
- for windows
- powershell下可以执行:
new-item -Type File ~/AppData/Local/nvim/init.vim -Force
- powershell下可以执行:
- for linux
touch ~/.config/nvim/init.vim
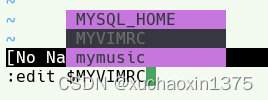
编辑已创建的配置文件
edit $myvimrc(windows下部分大小写)- tab可以补全
vim配置
-
. Execute Ex commands, from environment variables and/or files
        An environment variable is read as one Ex command line, where multiple
        commands must be separated with '|' or "<NL>".
                                                                vimrc exrc
        A file that contains initialization commands is called a "vimrc" file.
        Each line in a vimrc file is executed as an Ex command line.  It is
        sometimes also referred to as "exrc" file.  They are the same type of
        file, but "exrc" is what Vi always used, "vimrc" is a Vim specific
        name.  Also see vimrc-intro.

        Places for your personal initializations:
                Unix            $HOME/.vimrc or $HOME/.vim/vimrc
                MS-Windows      $HOME/_vimrc, $HOME/vimfiles/vimrc
                                or $VIM/_vimrc
                Amiga           s:.vimrc, home:.vimrc, home:vimfiles:vimrc
                                or $VIM/.vimrc
                Haiku           $HOME/config/settings/vim/vimrc

        The files are searched in the order specified above and only the first
        one that is found is read.
:version( for vim)
Compiled by team+vim@tracker.debian.org
Huge version without GUI.  Features included (+) or not (-):
+acl               +file_in_path      +mouse_urxvt       -tag_any_white
+arabic            +find_in_path      +mouse_xterm       -tcl
+autocmd           +float             +multi_byte        +termguicolors
+autochdir         +folding           +multi_lang        +terminal
-autoservername    -footer            -mzscheme          +terminfo
-balloon_eval      +fork()            +netbeans_intg     +termresponse
+balloon_eval_term +gettext           +num64             +textobjects
-browse            -hangul_input      +packages          +textprop
++builtin_terms    +iconv             +path_extra        +timers
+byte_offset       +insert_expand     -perl              +title
+channel           +ipv6              +persistent_undo   -toolbar
+cindent           +job               +popupwin          +user_commands
-clientserver      +jumplist          +postscript        +vartabs
-clipboard         +keymap            +printer           +vertsplit
+cmdline_compl     +lambda            +profile           +vim9script
+cmdline_hist      +langmap           -python            +viminfo
+cmdline_info      +libcall           +python3           +virtualedit
+comments          +linebreak         +quickfix          +visual
+conceal           +lispindent        +reltime           +visualextra
+cryptv            +listcmds          +rightleft         +vreplace
+cscope            +localmap          -ruby              +wildignore
+cursorbind        -lua               +scrollbind        +wildmenu
+cursorshape       +menu              +signs             +windows
+dialog_con        +mksession         +smartindent       +writebackup
+diff              +modify_fname      +sodium            -X11
+digraphs          +mouse             -sound             -xfontset
-dnd               -mouseshape        +spell             -xim
-ebcdic            +mouse_dec         +startuptime       -xpm
+emacs_tags        +mouse_gpm         +statusline        -xsmp
+eval              -mouse_jsbterm     -sun_workshop      -xterm_clipboard
+ex_extra          +mouse_netterm     +syntax            -xterm_save
+extra_search      +mouse_sgr         +tag_binary
-farsi             -mouse_sysmouse    -tag_old_static
   system vimrc file: "$VIM/vimrc"
     user vimrc file: "$HOME/.vimrc"
 2nd user vimrc file: "~/.vim/vimrc"
      user exrc file: "$HOME/.exrc"
       defaults file: "$VIMRUNTIME/defaults.vim"
  fall-back for $VIM: "/usr/share/vim"
Compilation: gcc -c -I. -Iproto -DHAVE_CONFIG_H -Wdate-time -g -O2 -ffile-prefix-map=/build/vim-8W0Acv/vim-8.2.3995=. -flto=auto -ffat-lto-objects -flto=auto -ffat-lto-objects -fstack-protector-strong -Wformat -Werror=format-security -D_REENTRANT -U_FORTIFY_SOURCE -D_FORTIFY_SOURCE=1
Linking: gcc -Wl,-Bsymbolic-functions -flto=auto -ffat-lto-objects -flto=auto -Wl,-z,relro
-Wl,-z,now -Wl,--as-needed -o vim -lm -ltinfo -lselinux -lsodium -lacl -lattr -lgpm -L/usr/lib/python3.10/config-3.10-x86_64-linux-gnu -lpython3.10 -lcrypt -ldl -lm -lm
配置文件信息
   system vimrc file: "$VIM/vimrc"
     user vimrc file: "$HOME/.vimrc"
 2nd user vimrc file: "~/.vim/vimrc"
      user exrc file: "$HOME/.exrc"
       defaults file: "$VIMRUNTIME/defaults.vim"
  fall-back for $VIM: "/usr/share/vim"
编辑配置文件
- 进入到vim普通模式
- 如果要编辑系统范围内的默认vim配置
:edit $VIM/vimrc- 其余配置文件类似操作
配置文件作用域
全局配置文件(linux)
- 为所有用户配置的默认值
- usually by creating
/etc/vimrcor/etc/vim/vimrcvimrc是文件而不是目录!
- Depends on
your versionofvim and linux/unixcentosuse the former one,theubuntuuse the later one
例如:配置所有用户自动打开行号显示
-
配置脚本:
-
cat /etc/vim/vimrc |tail
sudo tee -a /etc/vim/vimrc <<eof
set nu
eof

cat /etc/vim/vimrc |tail
-
用户个人配置文件(linux)
-
检查是否存在个人用户配置文件
ls ~ -al|grep .vim -
ls ~ -al|grep .vim -rw------- 1 cxxu_u22 cxxu_u22 7213 Jan 1 13:55 .viminfo -rw-r--r-- 1 root root 7 Jan 1 13:52 etcvimrc -
如果没有
.vimrc文件,手动创建一个 -
用户的个人配置将覆盖系统的默认配置.
ref docs
使用本地参考文档:
:h vimrc
例如 neovim下执行
 Load user config (execute Ex commands from files, environment, …).
        An environment variable (e.g. $VIMINIT) is read as one Ex command
        line, where multiple commands must be separated with '|' or <NL>.
                                        config init.vim init.lua vimrc exrc
        A file that contains initialization commands is generically called
        a "vimrc" or config file.  It can be a Vimscript or Lua file named
        "init.vim" or "init.lua" respectively.  It is an error to use both at
        the same time.  Each line in a "init.vim" is executed as an Ex command
        line.  See also vimrc-intro and base-directories.

        The config file is located at:
                Unix            ~/.config/nvim/init.vim (or init.lua)
                Windows         ~/AppData/Local/nvim/init.vim (or init.lua)
        or if $XDG_CONFIG_HOME is defined:
                                $XDG_CONFIG_HOME/nvim/init.vim (or init.lua)
                                    If Nvim was started with "-u {file}" then {
    file} is used as the config
        and all initializations until 5. are skipped. $MYVIMRC is not set.
        "nvim -u NORC" can be used to skip these initializations without
        reading a file.  "nvim -u NONE" also skips plugins and syntax
        highlighting.  -u
  If Nvim was started with -es all initializations until 5. are
        skipped.
                                                system-vimrc sysinit.vim
     a. The system vimrc file is read for initializations.  If
        nvim/sysinit.vim file exists in one of $XDG_CONFIG_DIRS, it will be
        used.  Otherwise the system vimrc file is used. The path of this file
        is given by the :version command.  Usually it's "$VIM/sysinit.vim".

                                                VIMINIT EXINIT $MYVIMRC
     b. Locations searched for initializations, in order of preference:
        -  $VIMINIT environment variable (Ex command line).
        -  User config: $XDG_CONFIG_HOME/nvim/init.vim.
        -  Other config: {
    dir}/nvim/init.vim where {
    dir} is any directory
           in $XDG_CONFIG_DIRS.
        -  $EXINIT environment variable (Ex command line).
        $MYVIMRC is set to the first valid location unless it was already
        set or when using $VIMINIT.

     c. If the 'exrc' option is on (which is NOT the default), the current
        directory is searched for two files.  The first that exists is used,
        the others are ignored.
        -  The file ".nvimrc"
        -  The file ".exrc"
编辑$VIMRC效果
-
创建完对应文件后,就有这样的效果
-

在线文档(推荐)
智能推荐
oracle 12c 集群安装后的检查_12c查看crs状态-程序员宅基地
文章浏览阅读1.6k次。安装配置gi、安装数据库软件、dbca建库见下:http://blog.csdn.net/kadwf123/article/details/784299611、检查集群节点及状态:[root@rac2 ~]# olsnodes -srac1 Activerac2 Activerac3 Activerac4 Active[root@rac2 ~]_12c查看crs状态
解决jupyter notebook无法找到虚拟环境的问题_jupyter没有pytorch环境-程序员宅基地
文章浏览阅读1.3w次,点赞45次,收藏99次。我个人用的是anaconda3的一个python集成环境,自带jupyter notebook,但在我打开jupyter notebook界面后,却找不到对应的虚拟环境,原来是jupyter notebook只是通用于下载anaconda时自带的环境,其他环境要想使用必须手动下载一些库:1.首先进入到自己创建的虚拟环境(pytorch是虚拟环境的名字)activate pytorch2.在该环境下下载这个库conda install ipykernelconda install nb__jupyter没有pytorch环境
国内安装scoop的保姆教程_scoop-cn-程序员宅基地
文章浏览阅读5.2k次,点赞19次,收藏28次。选择scoop纯属意外,也是无奈,因为电脑用户被锁了管理员权限,所有exe安装程序都无法安装,只可以用绿色软件,最后被我发现scoop,省去了到处下载XXX绿色版的烦恼,当然scoop里需要管理员权限的软件也跟我无缘了(譬如everything)。推荐添加dorado这个bucket镜像,里面很多中文软件,但是部分国外的软件下载地址在github,可能无法下载。以上两个是官方bucket的国内镜像,所有软件建议优先从这里下载。上面可以看到很多bucket以及软件数。如果官网登陆不了可以试一下以下方式。_scoop-cn
Element ui colorpicker在Vue中的使用_vue el-color-picker-程序员宅基地
文章浏览阅读4.5k次,点赞2次,收藏3次。首先要有一个color-picker组件 <el-color-picker v-model="headcolor"></el-color-picker>在data里面data() { return {headcolor: ’ #278add ’ //这里可以选择一个默认的颜色} }然后在你想要改变颜色的地方用v-bind绑定就好了,例如:这里的:sty..._vue el-color-picker
迅为iTOP-4412精英版之烧写内核移植后的镜像_exynos 4412 刷机-程序员宅基地
文章浏览阅读640次。基于芯片日益增长的问题,所以内核开发者们引入了新的方法,就是在内核中只保留函数,而数据则不包含,由用户(应用程序员)自己把数据按照规定的格式编写,并放在约定的地方,为了不占用过多的内存,还要求数据以根精简的方式编写。boot启动时,传参给内核,告诉内核设备树文件和kernel的位置,内核启动时根据地址去找到设备树文件,再利用专用的编译器去反编译dtb文件,将dtb还原成数据结构,以供驱动的函数去调用。firmware是三星的一个固件的设备信息,因为找不到固件,所以内核启动不成功。_exynos 4412 刷机
Linux系统配置jdk_linux配置jdk-程序员宅基地
文章浏览阅读2w次,点赞24次,收藏42次。Linux系统配置jdkLinux学习教程,Linux入门教程(超详细)_linux配置jdk
随便推点
matlab(4):特殊符号的输入_matlab微米怎么输入-程序员宅基地
文章浏览阅读3.3k次,点赞5次,收藏19次。xlabel('\delta');ylabel('AUC');具体符号的对照表参照下图:_matlab微米怎么输入
C语言程序设计-文件(打开与关闭、顺序、二进制读写)-程序员宅基地
文章浏览阅读119次。顺序读写指的是按照文件中数据的顺序进行读取或写入。对于文本文件,可以使用fgets、fputs、fscanf、fprintf等函数进行顺序读写。在C语言中,对文件的操作通常涉及文件的打开、读写以及关闭。文件的打开使用fopen函数,而关闭则使用fclose函数。在C语言中,可以使用fread和fwrite函数进行二进制读写。 Biaoge 于2024-03-09 23:51发布 阅读量:7 ️文章类型:【 C语言程序设计 】在C语言中,用于打开文件的函数是____,用于关闭文件的函数是____。
Touchdesigner自学笔记之三_touchdesigner怎么让一个模型跟着鼠标移动-程序员宅基地
文章浏览阅读3.4k次,点赞2次,收藏13次。跟随鼠标移动的粒子以grid(SOP)为partical(SOP)的资源模板,调整后连接【Geo组合+point spirit(MAT)】,在连接【feedback组合】适当调整。影响粒子动态的节点【metaball(SOP)+force(SOP)】添加mouse in(CHOP)鼠标位置到metaball的坐标,实现鼠标影响。..._touchdesigner怎么让一个模型跟着鼠标移动
【附源码】基于java的校园停车场管理系统的设计与实现61m0e9计算机毕设SSM_基于java技术的停车场管理系统实现与设计-程序员宅基地
文章浏览阅读178次。项目运行环境配置:Jdk1.8 + Tomcat7.0 + Mysql + HBuilderX(Webstorm也行)+ Eclispe(IntelliJ IDEA,Eclispe,MyEclispe,Sts都支持)。项目技术:Springboot + mybatis + Maven +mysql5.7或8.0+html+css+js等等组成,B/S模式 + Maven管理等等。环境需要1.运行环境:最好是java jdk 1.8,我们在这个平台上运行的。其他版本理论上也可以。_基于java技术的停车场管理系统实现与设计
Android系统播放器MediaPlayer源码分析_android多媒体播放源码分析 时序图-程序员宅基地
文章浏览阅读3.5k次。前言对于MediaPlayer播放器的源码分析内容相对来说比较多,会从Java-&amp;gt;Jni-&amp;gt;C/C++慢慢分析,后面会慢慢更新。另外,博客只作为自己学习记录的一种方式,对于其他的不过多的评论。MediaPlayerDemopublic class MainActivity extends AppCompatActivity implements SurfaceHolder.Cal..._android多媒体播放源码分析 时序图
java 数据结构与算法 ——快速排序法-程序员宅基地
文章浏览阅读2.4k次,点赞41次,收藏13次。java 数据结构与算法 ——快速排序法_快速排序法