caffe中的Solver、SGDSolver、 solver.prototxt 学习笔记_caffe中的sgdsolver-程序员宅基地
技术标签: caffe学习 caffe caffe源码与linux命令学习笔记
1.Solver、SGDSolver
(Solver、SGDSolver类写自于文件:solver.h(c)pp、sgd_solvers.h(c)pp)
class SGDSolver : public Solver<Dtype>
SGDsolver类继承自Solver
2.solver.prototxt
caffe训练命令:
两个例子:
./build/tools/caffe train -solver=examples/mnist/lenet_solver.prototxt./build/tools/caffe train -solver=ysk/solver.prototxt
-solver后面接的是 solver.prototxt,
举个solver.prototxt里内容例子:
这是Alexnet的sovler.prototxt
net: "models/bvlc_reference_caffenet/train_val.prototxt"
test_iter: 1000
test_interval: 1000
base_lr: 0.01
lr_policy: "step"
gamma: 0.1
stepsize: 100000
display: 20
max_iter: 450000
momentum: 0.9
weight_decay: 0.0005
snapshot: 10000
snapshot_prefix: "models/bvlc_reference_caffenet/caffenet_train"
solver_mode: GPU
首先要指出但是caffe默认使用的优化算法是SGD算法,写自SGDSovler类
第1行
net: "models/bvlc_reference_caffenet/train_val.prototxt"指定网络结构的配置文件路径
第2行
test_iter: 1000test_iter * batch_size 是每次测试的图片数。
(1)batchsize是指批大小。即每次训练在训练集中取batchsize个样本训练;
(2)epoch:1个epoch等于使用训练集中的全部样本训练一次;
这里 epoch=batch_size×test_iter
batch_size在train_val.prototxt文件中的数据层可以看到,你会看到TEST和TRAIN阶段的batch_size可能不同。
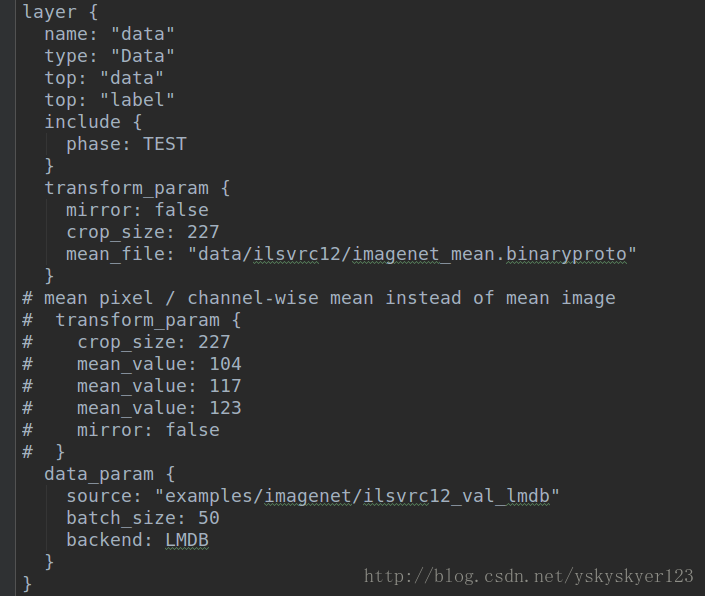
epoch=batch_size×test_iter 体现在caffe源码 ,sovler.cpp的Solver::Test函数,用test_iter个测试网络进行测试,每次都进行前向传播算法(batch_size个图片):
for (int i = 0; i < param_.test_iter(test_net_id); ++i) {
  /* ... */
    Dtype iter_loss;
    const vector<Blob<Dtype>*>& result =
        test_net->Forward(&iter_loss);
   /* ... */

  }
第3行:
test_interval: 1000
意思是每训练迭代1000次,进行一轮测试。
可见于void Solver::Step(int iters) ,Step函数主要用于训练指定的迭代次数,每训练一次,_iter++,当_iter是 test_iterval的倍数时,进行一轮测试,即TestAll()。
 while (iter_ < stop_iter) {
    // zero-init the params
    net_->ClearParamDiffs();
    if (param_.test_interval() && iter_ % param_.test_interval() == 0
        && (iter_ > 0 || param_.test_initialization())
        && Caffe::root_solver()) {
      TestAll();
      if (requested_early_exit_) {
        // Break out of the while loop because stop was requested while testing.
        break;
      }
    }

    /* ... */

    ++iter_;

  }
第4-7行:
base_lr: 0.01
lr_policy: "step"
gamma: 0.1
stepsize: 100000
主要用于控制学习策略,就是learning_rate如何变化。如果说清楚真是太罗嗦了。
caffe.proto里面对于这个的说明:
  // The learning rate decay policy. The currently implemented learning rate
  // policies are as follows:
  //    - fixed: always return base_lr.
  //    - step: return base_lr * gamma ^ (floor(iter / step))
  //    - exp: return base_lr * gamma ^ iter
  //    - inv: return base_lr * (1 + gamma * iter) ^ (- power)
  //    - multistep: similar to step but it allows non uniform steps defined by
  //      stepvalue
  //    - poly: the effective learning rate follows a polynomial decay, to be
  //      zero by the max_iter. return base_lr (1 - iter/max_iter) ^ (power)
  //    - sigmoid: the effective learning rate follows a sigmod decay
  //      return base_lr ( 1/(1 + exp(-gamma * (iter - stepsize))))
  //
  // where base_lr, max_iter, gamma, step, stepvalue and power are defined
  // in the solver parameter protocol buffer, and iter is the current iteration.
stepsize可以理解为一个训练阶段需要迭代的次数.每一次迭代训练的图片数是stepsize×batch_size
step
第8行:
display: 20
是说每迭代20次,显示一次训练相关的信息,诸如lr、loss之类的:

line 9:
max_iter: 450000训练迭代450000次终止
line12 and 13:
snapshot: 10000
snapshot_prefix: "models/bvlc_reference_caffenet/caffenet_train"
是说没迭代1000次,进行1次快照,即会生成一个.caffemodel和一个.solverstate文件,其中snapshow_prefix指定了文件名的前缀。
solver_mode: GPU
solve1r_mode:后填GPU或CPU,是否使用GPU运算。
还有一个iter_size可能没出现,但我估计有的
在void Solver::Step(int iters) 函数中有这么一句话
 for (int i = 0; i < param_.iter_size(); ++i) {
      loss += net_->ForwardBackward();
    }
iter_size*batch_size应该才是一次迭代实际的batchsize,即一次迭代(_iter)真正训练的图片数目。
momentum: 0.9
weight_decay: 0.0005
动量系数以及权重衰减:
权重衰减是一种正则化方法,caffe默认使用的是L2正则化。
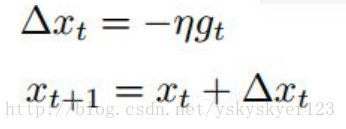
SGD算法更新参数的方式:
1)利用负梯度方向来更新权重W:
2)加入了动量momentum μ后:
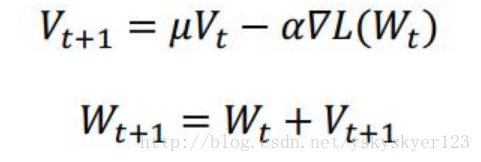
我们这儿的solver.prototxt当然是2)
3.如何实现Alexnet中的参数更新方式:
下面分析solver.pototxt和train_val.prototxt如何实现AlexNet中的参数更新方式,
即:

先得看SGDSolver中的ApplyUpdate(),这个函数在Solver.cpp中被调用,每迭代一次都要调用一次。
template <typename Dtype>
void SGDSolver<Dtype>::ApplyUpdate() {
  CHECK(Caffe::root_solver());
  Dtype rate = GetLearningRate();
  if (this->param_.display() && this->iter_ % this->param_.display() == 0) {
    LOG(INFO) << "Iteration " << this->iter_ << ", lr = " << rate;
  }
  ClipGradients();
  for (int param_id = 0; param_id < this->net_->learnable_params().size();
       ++param_id) {
    Normalize(param_id);
    Regularize(param_id);
    ComputeUpdateValue(param_id, rate);
  }
  this->net_->Update();
}
主要的是做了4件事: Normalize(param_id); Regularize(param_id); ComputeUpdateValue(param_id, rate); this->net_->Update();
即1)归一化、2)正则化、3)计算diff、4)更新data。
1)不是关心的重点
4)this->net_->Update();里做的事情是每个blob都调用自己的update函数,就是用data值减去diff值,blob里的源码是这样:
template <typename Dtype>
void Blob<Dtype>::Update() {
  // We will perform update based on where the data is located.
  switch (data_->head()) {
  case SyncedMemory::HEAD_AT_CPU:
    // perform computation on CPU
    caffe_axpy<Dtype>(count_, Dtype(-1),
        static_cast<const Dtype*>(diff_->cpu_data()),
        static_cast<Dtype*>(data_->mutable_cpu_data()));
    break;
  case SyncedMemory::HEAD_AT_GPU:
  case SyncedMemory::SYNCED:
#ifndef CPU_ONLY
    // perform computation on GPU
    caffe_gpu_axpy<Dtype>(count_, Dtype(-1),
        static_cast<const Dtype*>(diff_->gpu_data()),
        static_cast<Dtype*>(data_->mutable_gpu_data()));
#else
    NO_GPU;
#endif
    break;
  default:
    LOG(FATAL) << "Syncedmem not initialized.";
  }
}
所以2) 3)做的事情是计算diff。
我们主要看这两张图片:
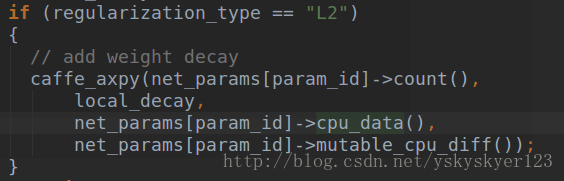
axpy做的事情就是 y=a∗x+y 。
这里用local_decay乘上data值加上原来的diff值赋给diff,现在 diff=local_decay∗data+diff
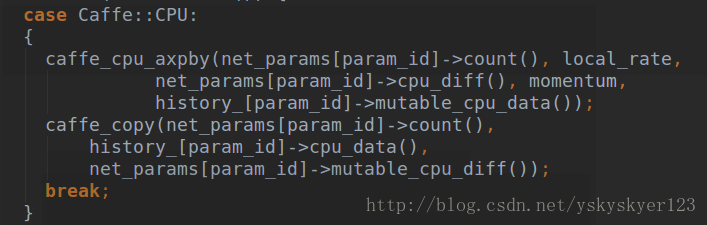
这里第二个函数 y=a∗x+b∗y ,
data=pre_data∗momentum+local_learning_rate∗diff
即 =pre_data∗momentum+local_learning_rate∗local_decay∗data+local_learning_rate∗diff
第三个函数 diff=data ,
即 diff=pre_data∗momentum+local_learning_rate∗local_decay∗data+local_learning_rate∗diff

到这里位置,我们图片中的 Vi+1 就算完了。接下来只需要调用4)this->net_->Update(); (即 Wi+1=Wi+Vi+1 )就可以了。
所以呢 Vi 实际上是 pre_data , ϵ 实际上是 local_learning_rate ,0.0005实际上是 local_decay , Wi 就是 data , <> <script type="math/tex" id="MathJax-Element-21">< ></script>里的就是等号右边的 diff
template <typename Dtype>
void SGDSolver<Dtype>::Regularize(int param_id) {
  const vector<Blob<Dtype>*>& net_params = this->net_->learnable_params();
  const vector<float>& net_params_weight_decay =
      this->net_->params_weight_decay();
  Dtype weight_decay = this->param_.weight_decay();
  string regularization_type = this->param_.regularization_type();
  Dtype local_decay = weight_decay * net_params_weight_decay[param_id];
  switch (Caffe::mode()) {
  case Caffe::CPU: {
    if (local_decay) {
      if (regularization_type == "L2") {
        // add weight decay
        caffe_axpy(net_params[param_id]->count(),
            local_decay,
            net_params[param_id]->cpu_data(),
            net_params[param_id]->mutable_cpu_diff());
      } else if (regularization_type == "L1") {
        caffe_cpu_sign(net_params[param_id]->count(),
            net_params[param_id]->cpu_data(),
            temp_[param_id]->mutable_cpu_data());
        caffe_axpy(net_params[param_id]->count(),
            local_decay,
            temp_[param_id]->cpu_data(),
            net_params[param_id]->mutable_cpu_diff());
      } else {
        LOG(FATAL) << "Unknown regularization type: " << regularization_type;
      }
    }
    break;
  }
  case Caffe::GPU: {
#ifndef CPU_ONLY
    if (local_decay) {
      if (regularization_type == "L2") {
        // add weight decay
        caffe_gpu_axpy(net_params[param_id]->count(),
            local_decay,
            net_params[param_id]->gpu_data(),
            net_params[param_id]->mutable_gpu_diff());
      } else if (regularization_type == "L1") {
        caffe_gpu_sign(net_params[param_id]->count(),
            net_params[param_id]->gpu_data(),
            temp_[param_id]->mutable_gpu_data());
        caffe_gpu_axpy(net_params[param_id]->count(),
            local_decay,
            temp_[param_id]->gpu_data(),
            net_params[param_id]->mutable_gpu_diff());
      } else {
        LOG(FATAL) << "Unknown regularization type: " << regularization_type;
      }
    }
#else
    NO_GPU;
#endif
    break;
  }
  default:
    LOG(FATAL) << "Unknown caffe mode: " << Caffe::mode();
  }
}
template <typename Dtype>
void SGDSolver<Dtype>::ComputeUpdateValue(int param_id, Dtype rate) {
const vector<Blob<Dtype>*>& net_params = this->net_->learnable_params();
const vector<float>& net_params_lr = this->net_->params_lr();
Dtype momentum = this->param_.momentum();
Dtype local_rate = rate * net_params_lr[param_id];
// Compute the update to history, then copy it to the parameter diff.
switch (Caffe::mode()) {
case Caffe::CPU: {
caffe_cpu_axpby(net_params[param_id]->count(), local_rate,
net_params[param_id]->cpu_diff(), momentum,
history_[param_id]->mutable_cpu_data());
caffe_copy(net_params[param_id]->count(),
history_[param_id]->cpu_data(),
net_params[param_id]->mutable_cpu_diff());
break;
}
case Caffe::GPU: {
#ifndef CPU_ONLY
sgd_update_gpu(net_params[param_id]->count(),
net_params[param_id]->mutable_gpu_diff(),
history_[param_id]->mutable_gpu_data(),
momentum, local_rate);
#else
NO_GPU;
#endif
break;
}
default:
LOG(FATAL) << "Unknown caffe mode: " << Caffe::mode();
}
}还得说明:
学习率local_learning_rate的计算方法:
Dtype local_rate = rate * net_params_lr[param_id];
net_params_lr[param_id]是某一层的一个局部lr,而rate是
Dtype SGDSolver::GetLearningRate() 里根据sovler.prototxt设置的参数,
base_lr: 0.01
lr_policy: "step"
gamma: 0.1
stepsize: 100000
计算出的
权重衰减local_decay的计算方法:
 const vector<float>& net_params_weight_decay =
      this->net_->params_weight_decay();
  Dtype weight_decay = this->param_.weight_decay();
  Dtype local_decay = weight_decay * net_params_weight_decay[param_id];
weight_dacay是solver.prototxt中的weight_decay,net_params_weight_decay[param_id]是某一层的权重衰减,比如:
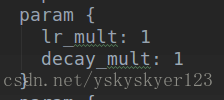
上面是某一层w或者b的学习率和权重衰减。
实际的学习率或者权重衰减是在他们的基础上乘上全局的
智能推荐
while循环&CPU占用率高问题深入分析与解决方案_main函数使用while(1)循环cpu占用99-程序员宅基地
文章浏览阅读3.8k次,点赞9次,收藏28次。直接上一个工作中碰到的问题,另外一个系统开启多线程调用我这边的接口,然后我这边会开启多线程批量查询第三方接口并且返回给调用方。使用的是两三年前别人遗留下来的方法,放到线上后发现确实是可以正常取到结果,但是一旦调用,CPU占用就直接100%(部署环境是win server服务器)。因此查看了下相关的老代码并使用JProfiler查看发现是在某个while循环的时候有问题。具体项目代码就不贴了,类似于下面这段代码。while(flag) {//your code;}这里的flag._main函数使用while(1)循环cpu占用99
【无标题】jetbrains idea shift f6不生效_idea shift +f6快捷键不生效-程序员宅基地
文章浏览阅读347次。idea shift f6 快捷键无效_idea shift +f6快捷键不生效
node.js学习笔记之Node中的核心模块_node模块中有很多核心模块,以下不属于核心模块,使用时需下载的是-程序员宅基地
文章浏览阅读135次。Ecmacript 中没有DOM 和 BOM核心模块Node为JavaScript提供了很多服务器级别,这些API绝大多数都被包装到了一个具名和核心模块中了,例如文件操作的 fs 核心模块 ,http服务构建的http 模块 path 路径操作模块 os 操作系统信息模块// 用来获取机器信息的var os = require('os')// 用来操作路径的var path = require('path')// 获取当前机器的 CPU 信息console.log(os.cpus._node模块中有很多核心模块,以下不属于核心模块,使用时需下载的是
数学建模【SPSS 下载-安装、方差分析与回归分析的SPSS实现(软件概述、方差分析、回归分析)】_化工数学模型数据回归软件-程序员宅基地
文章浏览阅读10w+次,点赞435次,收藏3.4k次。SPSS 22 下载安装过程7.6 方差分析与回归分析的SPSS实现7.6.1 SPSS软件概述1 SPSS版本与安装2 SPSS界面3 SPSS特点4 SPSS数据7.6.2 SPSS与方差分析1 单因素方差分析2 双因素方差分析7.6.3 SPSS与回归分析SPSS回归分析过程牙膏价格问题的回归分析_化工数学模型数据回归软件
利用hutool实现邮件发送功能_hutool发送邮件-程序员宅基地
文章浏览阅读7.5k次。如何利用hutool工具包实现邮件发送功能呢?1、首先引入hutool依赖<dependency> <groupId>cn.hutool</groupId> <artifactId>hutool-all</artifactId> <version>5.7.19</version></dependency>2、编写邮件发送工具类package com.pc.c..._hutool发送邮件
docker安装elasticsearch,elasticsearch-head,kibana,ik分词器_docker安装kibana连接elasticsearch并且elasticsearch有密码-程序员宅基地
文章浏览阅读867次,点赞2次,收藏2次。docker安装elasticsearch,elasticsearch-head,kibana,ik分词器安装方式基本有两种,一种是pull的方式,一种是Dockerfile的方式,由于pull的方式pull下来后还需配置许多东西且不便于复用,个人比较喜欢使用Dockerfile的方式所有docker支持的镜像基本都在https://hub.docker.com/docker的官网上能找到合..._docker安装kibana连接elasticsearch并且elasticsearch有密码
随便推点
Python 攻克移动开发失败!_beeware-程序员宅基地
文章浏览阅读1.3w次,点赞57次,收藏92次。整理 | 郑丽媛出品 | CSDN(ID:CSDNnews)近年来,随着机器学习的兴起,有一门编程语言逐渐变得火热——Python。得益于其针对机器学习提供了大量开源框架和第三方模块,内置..._beeware
Swift4.0_Timer 的基本使用_swift timer 暂停-程序员宅基地
文章浏览阅读7.9k次。//// ViewController.swift// Day_10_Timer//// Created by dongqiangfei on 2018/10/15.// Copyright 2018年 飞飞. All rights reserved.//import UIKitclass ViewController: UIViewController { ..._swift timer 暂停
元素三大等待-程序员宅基地
文章浏览阅读986次,点赞2次,收藏2次。1.硬性等待让当前线程暂停执行,应用场景:代码执行速度太快了,但是UI元素没有立马加载出来,造成两者不同步,这时候就可以让代码等待一下,再去执行找元素的动作线程休眠,强制等待 Thread.sleep(long mills)package com.example.demo;import org.junit.jupiter.api.Test;import org.openqa.selenium.By;import org.openqa.selenium.firefox.Firefox.._元素三大等待
Java软件工程师职位分析_java岗位分析-程序员宅基地
文章浏览阅读3k次,点赞4次,收藏14次。Java软件工程师职位分析_java岗位分析
Java:Unreachable code的解决方法_java unreachable code-程序员宅基地
文章浏览阅读2k次。Java:Unreachable code的解决方法_java unreachable code
标签data-*自定义属性值和根据data属性值查找对应标签_如何根据data-*属性获取对应的标签对象-程序员宅基地
文章浏览阅读1w次。1、html中设置标签data-*的值 标题 11111 222222、点击获取当前标签的data-url的值$('dd').on('click', function() { var urlVal = $(this).data('ur_如何根据data-*属性获取对应的标签对象