安卓JNI--小项目试验计时器_android jni 定时器-程序员宅基地
关于Android Studio 配置JNI的请看文章:
安卓学习–Android studio 1.5 JNI开发初探
安卓JNI–JNI底层C回调Java方法
关于Android Studio导入源码库请看文章:
导入maven源码库
app/build.gradle文件添加库支持
dependencies {
    compile fileTree(dir: 'libs', include: ['*.jar'])
    testCompile 'junit:junit:4.12'
    compile 'com.android.support:appcompat-v7:23.1.1'
    compile 'com.android.support:percent:23.1.1' //百分比库
    compile 'com.bigkoo:pickerview:1.0.3'        //TimePopupWindow库
}
布局XML(使用了百分比布局)
<?xml version="1.0" encoding="utf-8"?>
<android.support.percent.PercentRelativeLayout
xmlns:android="http://schemas.android.com/apk/res/android"
xmlns:app="http://schemas.android.com/apk/res-auto"
xmlns:tools="http://schemas.android.com/tools"
android:layout_width="match_parent"
android:layout_height="match_parent"
tools:context="com.example.lianghuiyong.time.MainActivity">
<android.support.percent.PercentRelativeLayout
android:layout_width="match_parent"
android:layout_height="match_parent"
app:layout_heightPercent = "50%">
<TextView
android:id="@+id/textview"
android:layout_width="wrap_content"
android:layout_height="wrap_content"
android:textSize="30sp"
android:layout_alignParentTop="true"
android:layout_centerHorizontal="true"
app:layout_marginTopPercent = "35%"/>
<Button
android:layout_width="wrap_content"
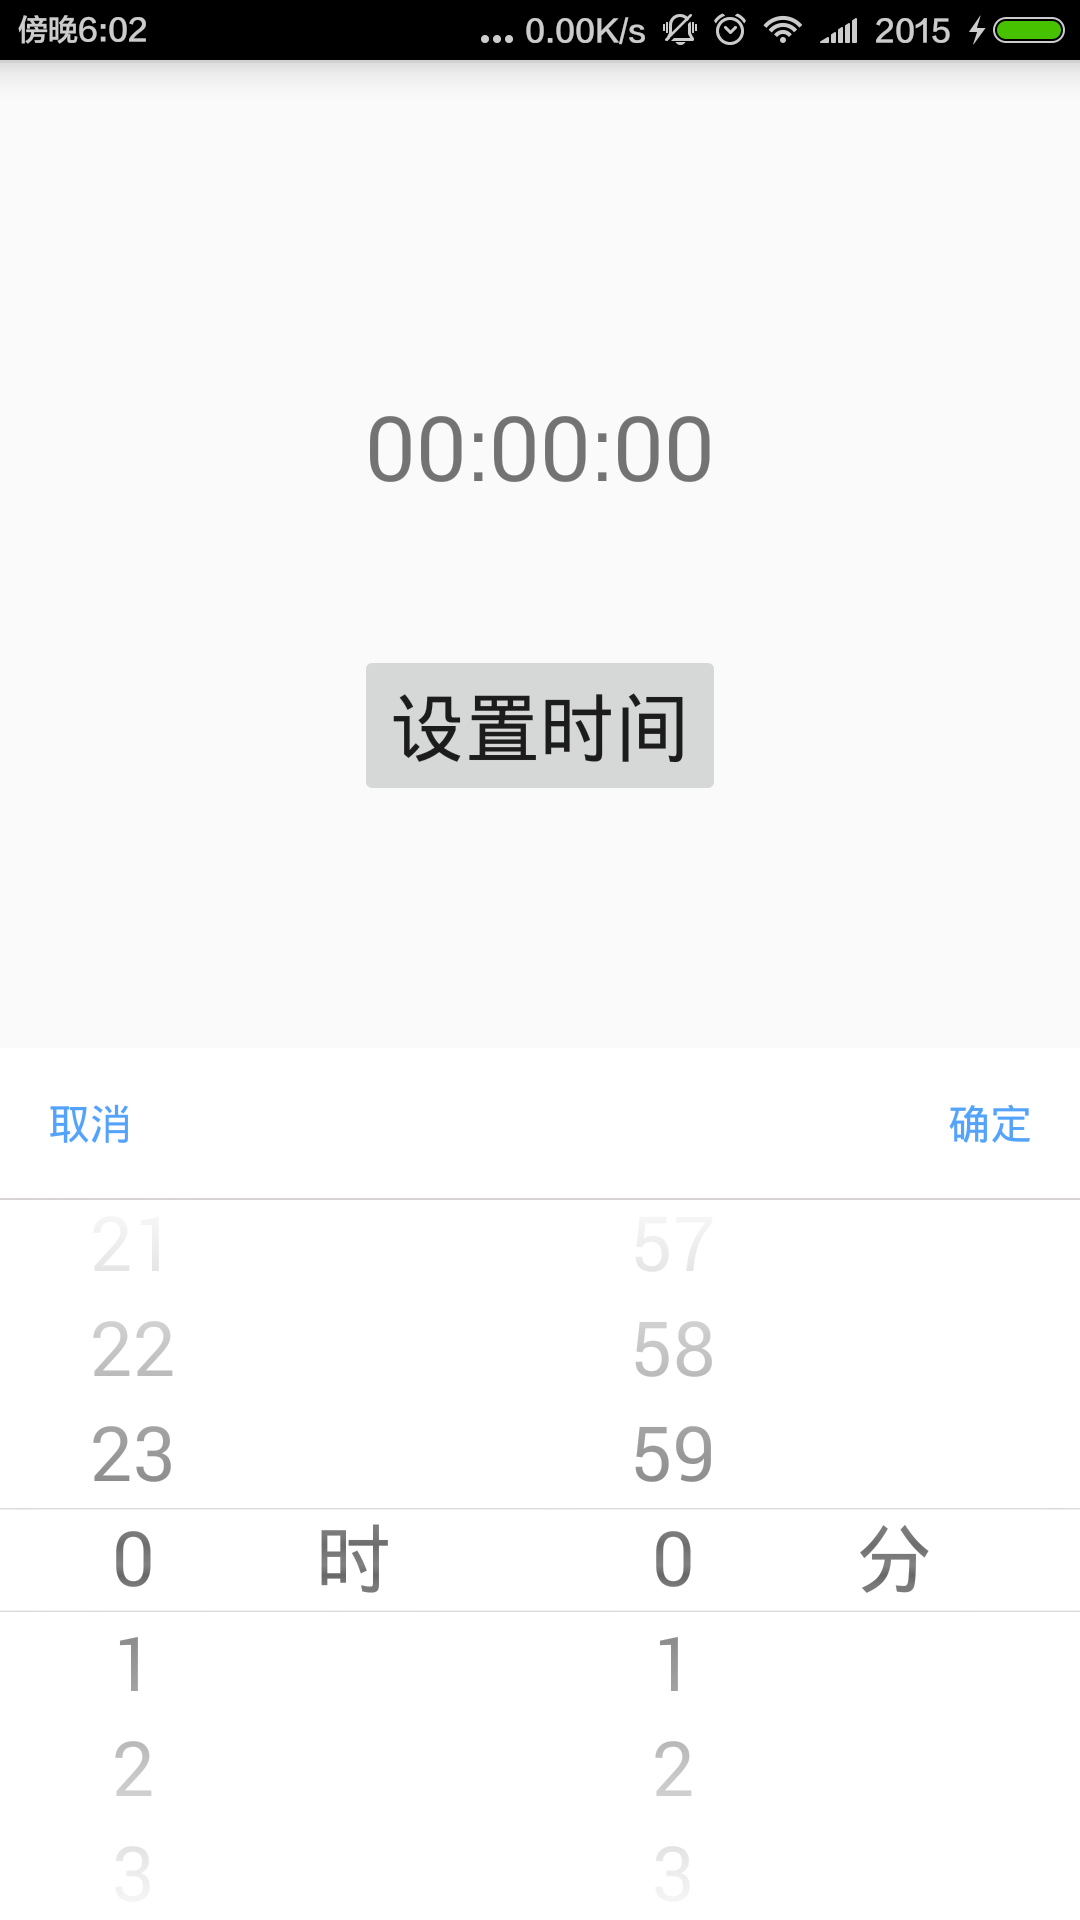
android:layout_height="wrap_content"
android:text="设置时间"
android:id="@+id/button"
android:textSize="25sp"
android:layout_below="@+id/textview"
android:layout_centerHorizontal="true"
app:layout_marginTopPercent="15%" />
</android.support.percent.PercentRelativeLayout>
</android.support.percent.PercentRelativeLayout>MainActivity.java
package com.example.lianghuiyong.time;

import android.os.Bundle;
import android.os.Handler;
import android.os.Message;
import android.support.v7.app.AppCompatActivity;
import android.util.Log;
import android.view.Gravity;
import android.view.View;
import android.widget.Button;
import android.widget.TextView;

import com.bigkoo.pickerview.TimePopupWindow;

import java.util.Calendar;
import java.util.Date;
import java.util.concurrent.ExecutorService;
import java.util.concurrent.Executors;

public class MainActivity extends AppCompatActivity {


    static {
        System.loadLibrary("timecount-jni");
    }
    public native void timecount(int h,int m);

    private int hour = 0;
    private int min  = 0;
    private int sec  = 0;

    private Handler handler =null;
    private TextView textView = null;
    private Button button = null;
    private volatile boolean isstop = false;
    private volatile boolean isstar = true;
    private TimePopupWindow pickerView = null;
    private ExecutorService pool = null;

    @Override
    protected void onCreate(Bundle savedInstanceState) {
        super.onCreate(savedInstanceState);
        setContentView(R.layout.activity_main);

        textView = (TextView)findViewById(R.id.textview);
        button = (Button)findViewById(R.id.button);

        this.Config_PickerView();
        this.HandlerGetData();//handler 更新UI

        button.setOnClickListener(new View.OnClickListener() {
            @Override
            public void onClick(View v) {
                pickerView.showAtLocation(v, Gravity.BOTTOM, 0, 0);
            }
        });
    }


    /*
    * 配置pickerView
    * */
    private void Config_PickerView(){
        pool = Executors.newSingleThreadExecutor();  //采用线程池单一线程方式
        pickerView = new TimePopupWindow(MainActivity.this, TimePopupWindow.Type.HOURS_MINS);
        pickerView.setTime(new Date(2015 - 1900, 12, 10, 0, 0));//设置时间
        pickerView.setCyclic(true); //循环滚动

        //监听pickerView按下确定按钮
        pickerView.setOnTimeSelectListener(new TimePopupWindow.OnTimeSelectListener() {
            @Override
            public void onTimeSelect(Date date) {
                IfThreadSetStop();
                Calendar calendar = Calendar.getInstance();
                calendar.setTime(date);
                final int set_hour = calendar.get(Calendar.HOUR_OF_DAY);
                final int set_min = calendar.get(Calendar.MINUTE);


                pool.execute(new Runnable() {
                    @Override
                    public void run() {
                        Log.d("lhy", "按下确定调用JNI:set_hour = " + set_hour + "; set_min = " + set_min);
                        timecount(set_hour, set_min);
                    }
                });
            }
        });
    }

    //判断线程是不是第一个,如果不是,则把isstop置为false,JNI回调时会结束无限循环
    private void IfThreadSetStop(){
        if (!isstar)
            isstop = true;
        isstar = false;
    }

    /*
    * 通过handle获取msg里的值
    * */
    private void HandlerGetData(){
        handler = new Handler(){
            @Override
            public void handleMessage(Message msg) {
                switch (msg.what){
                    case 1:
                        Bundle bundle = msg.getData();
                        hour = bundle.getInt("hour");
                        min  = bundle.getInt("min");
                        sec  = bundle.getInt("sec");
                        textView.setText(String.format("%02d", hour) + ":" +String.format("%02d", min)  + ":" + String.format("%02d", sec));
                        break;
                }
                super.handleMessage(msg);
            }
        };
        textView.setText(String.format("%02d", hour) + ":" + String.format("%02d", min) + ":" + String.format("%02d", sec));
    }

    /*
    *JNI回调用来传递时间
    * */
    private void MsgSetData(int h,int m,int s){
        Message msg = new Message();
        msg.what = 1;
        Bundle bundle = new Bundle();
        bundle.putInt("hour",h);
        bundle.putInt("min",m);
        bundle.putInt("sec",s);
        msg.setData(bundle);
        handler.sendMessage(msg);
        Log.d("lhy", "JNI sendMessage OK!--" + h + ":" + m + ":" + s);
    }
}
timecount-jni.c
#include <jni.h>
#include <unistd.h>

JNIEXPORT void JNICALL
Java_com_example_lianghuiyong_time_MainActivity_timecount(JNIEnv *env, jobject instance, jint h,
                                                          jint m) {

    // TODO
    jclass mainactivity = (*env)->FindClass(env ,"com/example/lianghuiyong/time/MainActivity");
    jmethodID MsgSetData = (*env)->GetMethodID(env,mainactivity,"MsgSetData","(III)V");

    jfieldID isstopID = (*env)->GetFieldID(env,mainactivity,"isstop","Z");

    volatile jboolean  isstop = NULL;
    isstop= (*env)->GetBooleanField(env,instance,isstopID);

    int s=0;    //初始化秒为0
    //回调Java的MsgSetData方法更新UI
    (*env)->CallVoidMethod(env,instance,MsgSetData,h,m,s);

    while ((!isstop)&&( h>=0 && m>=0 && s>=0)){
        if(  s>0 ){
            --s;
        } else if( m>0 && s==0 ){
            --m;
            s = 59;
        } else if(h>0 && m==0 && s==0 ){
            --h;
            m = 59;
            s = 59;
        }

        sleep(1);

        //回调Java的MsgSetData方法更新UI
        (*env)->CallVoidMethod(env,instance,MsgSetData,h,m,s);
        isstop = (*env)->GetBooleanField(env,instance,isstopID);
    }

    //结束时重置Java属性isstop为false
    (*env)->SetBooleanField(env,instance,isstopID,JNI_FALSE);

    //回收资源
    (*env)->DeleteGlobalRef(env,instance);
}
智能推荐
python中文显示不出来_解决Python词云库wordcloud不显示中文的问题-程序员宅基地
文章浏览阅读2.6k次。解决Python词云库wordcloud不显示中文的问题2018-11-25背景:wordcloud是基于Python开发的词云生成库,功能强大使用简单。github地址:https://github.com/amueller/word_cloudwordcloud默认是不支持显示中文的,中文会被显示成方框。安装:安装命令:pip install wordcloud解决:经过测试发现不支持显示中文..._词云python代码无法输出文字
JVM在线分析-解决问题的工具一(jinfo,jmap,jstack)_jmap 在线分析-程序员宅基地
文章浏览阅读807次。扩展。_jmap 在线分析
台式计算机cpu允许温度,玩游戏cpu温度多少正常(台式电脑夏季CPU一般温度多少)...-程序员宅基地
文章浏览阅读1.1w次。随着炎热夏季的到来,当玩游戏正爽的时候,电脑突然死机了,自动关机了,是不是有想给主机一脚的冲动呢?这个很大的原因是因为CPU温度过高导致的。很多新手玩家可能都有一个疑虑,cpu温度多少以下正常?有些说是60,有些说是70,到底多高CPU温度不会死机呢?首先我们先看看如何查看CPU的温度。下载鲁大师并安装,运行鲁大师软件,即可进入软件界面,并点击温度管理,即可看到电脑各个硬件的温度。鲁大师一般情况下..._台式机玩游戏温度多少正常
小白自学Python日记 Day2-打印打印打印!_puthon打印任务收获-程序员宅基地
文章浏览阅读243次。Day2-打印打印打印!我终于更新了!(哭腔)一、 最简单的打印最最简单的打印语句: print(“打印内容”)注意:python是全英的,符号记得是半角下面是我写的例子:然后进入power shell ,注意:你需要使用cd来进入你保存的例子的文件夹,保存时名字应该取为xxx.py我终于知道为什么文件夹取名都建议取英文了,因为进入的时候是真的很麻烦!如果你没有进入正确的文件夹..._puthon打印任务收获
Docker安装:Errors during downloading metadata for repository ‘appstream‘:_"cenerrors during download metadata for repository-程序员宅基地
文章浏览阅读1k次。centos8问题参考CentOS 8 EOL如何切换源? - 云服务器 ECS - 阿里云_"cenerrors during download metadata for repository \"appstream"
尚硅谷_谷粒学苑-微服务+全栈在线教育实战项目之旅_基于微服务的在线教育平台尚硅谷-程序员宅基地
文章浏览阅读2.7k次,点赞3次,收藏11次。SpringBoot+Maven+MabatisPlusmaven在新建springboot项目引入RELEASE版本出错maven在新建springboot项目引入RELEASE版本出错maven详解maven就是通过pom.xml中的配置,就能够从仓库获取到想要的jar包。仓库分为:本地仓库、第三方仓库(私服)、中央仓库springframework.boot:spring-boot-starter-parent:2.2.1.RELEASE’ not found若出现jar包下载不了只有两_基于微服务的在线教育平台尚硅谷
随便推点
网络学习第六天(路由器、VLAN)_路由和vlan-程序员宅基地
文章浏览阅读316次。路由的概念路由器它称之为网关设备。路由器就是用于连接不同网络的设备路由器是位于OSI模型的第三层。路由器通过路由决定数据的转发。网关的背景:当时每家计算机厂商,用于交换数据的通信程序(协议)和数据描述格式各不相同。因此,就把用于相互转换这些协议和格式的计算机称为网关。路由器与三层交换器的对比路由协议对比路由器的作用:1.路由寻址2.实现不同网络之间相连的功能3.通过路由决定数据的转发,转发策略称为 路由选择。VLAN相关技术什么是VLAN?中文名称叫:虚拟局域网。虚_路由和vlan
设置div背景颜色透明度,内部元素不透明_div设置透明度,里面的内容不透明-程序员宅基地
文章浏览阅读2.8w次,点赞6次,收藏22次。设置div背景颜色透明度,内部元素不透明:.demo{ background-color:rgba(255,255,255,0.15) } 错误方式:.demo{ background-color:#5CACEE;opacity:0.75;} 这样会导致div里面的元素内容和背景颜色一起变透明只针对谷歌浏览器的测试_div设置透明度,里面的内容不透明
Discuz!代码大全-程序员宅基地
文章浏览阅读563次。1.[ u]文字:在文字的位置可以任意加入您需要的字符,显示为下划线效果。2.[ align=center]文字:在文字的位置可以任意加入您需要的字符,center位置center表示居中,left表示居左,right表示居右。5.[ color=red]文字:输入您的颜色代码,在标签的中间插入文字可以实现文字颜色改变。6.[ SIZE=数字]文字:输入您的字体大小,在标签的中间插入文..._discuzcode 大全
iOS NSTimer定时器-程序员宅基地
文章浏览阅读2.6k次。iOS中定时器有三种,分别是NSTimer、CADisplayLink、dispatch_source,下面就分别对这三种计时器进行说明。一、NSTimerNSTimer这种定时器用的比较多,但是特别需要注意释放问题,如果处理不好很容易引起循环引用问题,造成内存泄漏。1.1 NSTimer的创建NSTimer有两种创建方法。方法一:这种方法虽然创建了NSTimer,但是定时器却没有起作用。这种方式创建的NSTimer,需要加入到NSRunLoop中,有NSRunLoop的驱动才会让定时器跑起来。_ios nstimer
Linux常用命令_ls-lmore-程序员宅基地
文章浏览阅读4.8k次,点赞17次,收藏51次。Linux的命令有几百个,对程序员来说,常用的并不多,考虑各位是初学者,先学习本章节前15个命令就可以了,其它的命令以后用到的时候再学习。1、开机 物理机服务器,按下电源开关,就像windows开机一样。 在VMware中点击“开启此虚拟机”。2、登录 启动完成后,输入用户名和密码,一般情况下,不要用root用户..._ls-lmore
MySQL基础命令_mysql -u user-程序员宅基地
文章浏览阅读4.1k次。1.登录MYSQL系统命令打开DOS命令框shengfen,以管理员的身份运行命令1:mysql -u usernae -p password命令2:mysql -u username -p password -h 需要连接的mysql主机名(localhost本地主机名)或是mysql的ip地址(默认为:127.0.0.1)-P 端口号(默认:3306端口)使用其中任意一个就OK,输入命令后DOS命令框得到mysql>就说明已经进入了mysql系统2. 查看mysql当中的._mysql -u user