python自动化(三)web自动化:1.pytest框架讲解+集成allure_python setup method和parametrize-程序员宅基地
一.什么是pytest
我们在编写自动化脚本时,需要一套框架来管理我们的测试用例。这样我们的用例才会更加灵活,pytest就是这么一个框架。
pytest是一个非常成熟的全功能的Python测试框架,主要特点有以下几点:
- 简单灵活,容易上手,文档丰富;
- 支持参数化,可以细粒度地控制要测试的测试用例;
- 能够支持简单的单元测试和复杂的功能测试,还可以用来做selenium/appnium等自动化测试、接口自动化测试(pytest+requests);
- pytest具有很多第三方插件,并且可以自定义扩展,比较好用的如pytest-selenium(集成selenium)、pytest-html(完美html测试报告生成)、pytest-rerunfailures(失败case重复执行)、pytest-xdist(多CPU分发)等;
- 测试用例的skip和xfail处理;
- 可以很好的和CI工具结合,例如jenkins
二.安装pytest
pytest是python的第三方开源库,需要安装后才能使用
pip install pytest
三.pytest识别用例
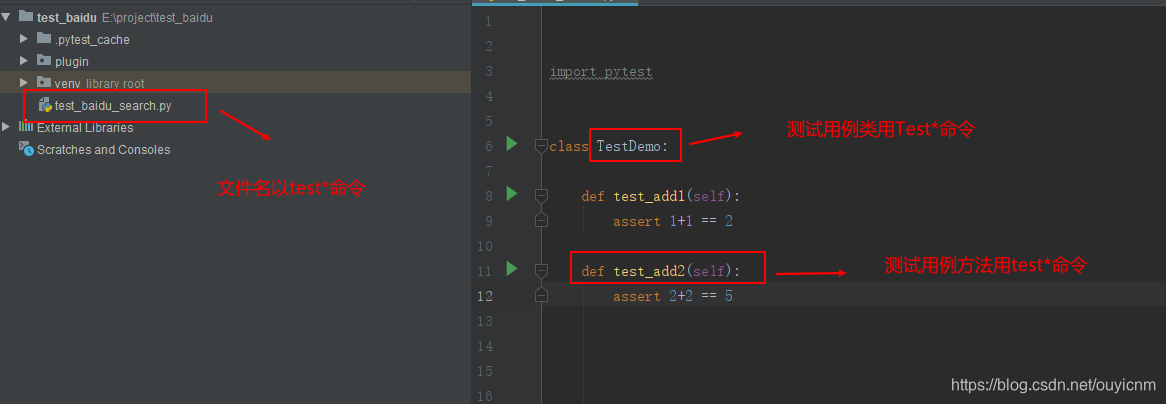
pytest是用来管理我们测试用例的,那么它就需要知道代码中哪些是测试用例。pytest有一套专门的规范来识别用例。
- 识别python文件:我们的python文件以“test*”格式命令,pytest会自动识别为用例文件
- 识别类:我们的类以“Test*”格式命令,pytest会自动识别为用例类
- 函数(方法):我们的函数以“test*”格式命令,pytest会自动识别为用例方法
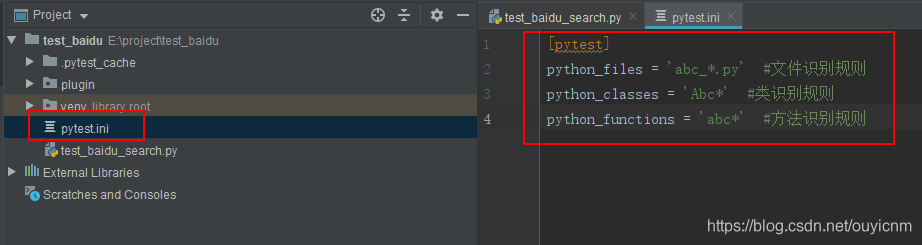
补充:自定义命令规范
pytest匹配用例的规范,我们也可以自己定义。 - 在项目根目录下插件pytest.ini文件
- 在pytest.ini文件中定义匹配规则
四.pytest运行用例的几种方式
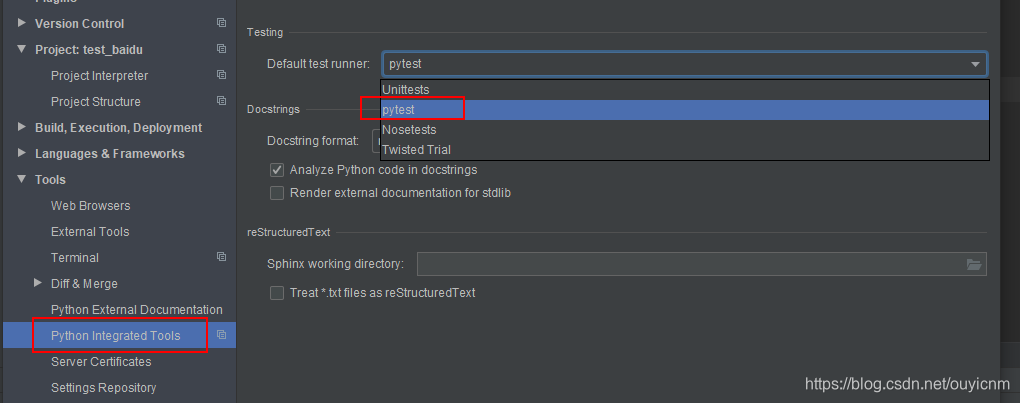
1.pycharm工具中使用pytest运行
第一步:先在pycharm中设置pytest为用例执行器。
File | Settings | Tools | Python Integrated Tools
第二步:使用pytest运行用例
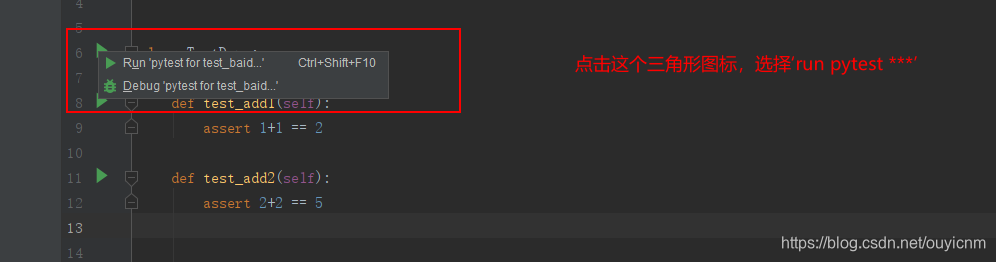
注意:这种方式只能在pycharm开发工具中使用,平时开发过程中使用这种方式会很方便
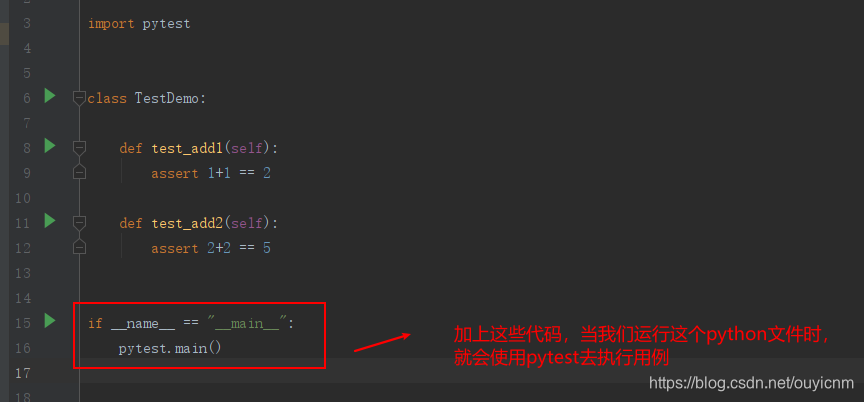
2.在python代码中指定使用pytest运行
3.在终端使用pytest命令运行
python -m pytest test_baidu_search.py
# 因为pytest是python中的一个库,所以前面需要使用python -m来指定pytest
# 后面如果不加test_baidu_search.py这个文件名,则pytest会自动在当前目录下配置所以符合pytest命令规划的文件
五.运行pytest常用参数
- pytest + 测试用例模块路径---------执行对应模块下的测试用例
pytest test_clac.py
# 执行test_clac.py文件下的所有以test开头的方法,以及以Test开头的类,且在类中以test开头的方法。
-
pytest -v + 测试用例模块路径-----执行对应模块下的测试用例,并且打印详细日志
pytest -v test_clac.py -
pytest -s + 测试用例模块路径-----执行对应模块下的测试用例,并且打印控制台消息(及会打印用例中,print的内容)
pytest -s test_clac.py -
pytest -k ‘正则表达式’ + 测试用例模块路径-----执行对应模块下的能被正则表达式匹配到的测试用例
pytest -v -k 'jia' test_clac.py--------执行test_clac.py文件下,用例名称含‘jia’的测试用例,并且打印详细日志 pytest -v -k 'jia or cheng' test_clac.py----执行test_clac.py文件下,用例名称含‘jia’或者含‘cheng’的测试用例,并且打印详细日志 pytest -v -k 'not cheng' test_clac.py------执行test_clac.py文件下,用例名称含‘cheng’以外的所有测试用例,并且打印详细日志 -
pytest test_clac.py --collect-only-----收集test_clac.py下的所有测试用例,但不执行
-
pytest -m add test_clac.py---------执行test_clac.py下的所有有add标签的测试用例
-
pytest -v test_clac.py --junit-xml=./result-----执行test_clac.py下的所有测试用例,别且生成一个xml格式的result文件保存在当前目录下
-
pytest test_clac.py::TestClac::test_jia-----执行test_clac.py下的TestClac类中的test_jia测试用例
五.数据驱动
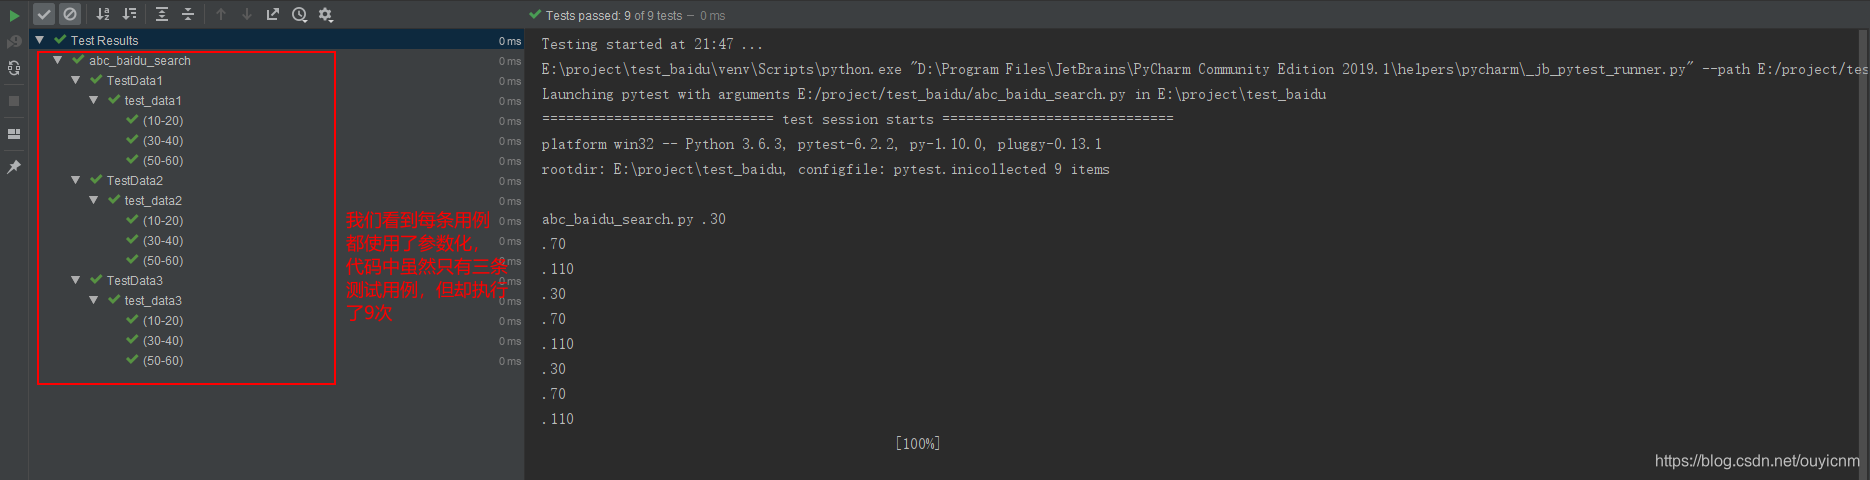
(1)测试数据的参数化
# filename:test_data.py
import pytest

# 方式一:使用string传参
class TestData1():
    @pytest.mark.parametrize("a,b",[(10,20),(30,40),(50,60)])
    def test_data1(self,a,b):
        print(a + b)

# 方式二:使用元组传参
class TestData2():
    @pytest.mark.parametrize(("a","b"),[(10,20),(30,40),(50,60)])
    def test_data2(self,a,b):
        print(a + b)

# 方式三:使用列表传参
class TestData3():
    @pytest.mark.parametrize(["a","b"],[(10,20),(30,40),(50,60)])
    def test_data3(self,a,b):
        print(a + b)

if __name__ == "__main__":
    pytest.main(['-v','-s','test_data.py'])
结合yaml给用例传递数据
方法:
1.将数据写在yaml文件中
2.在测试用例代码中使用yaml
例子:
# filename:data.yaml
-
  - 10
  - 20
-
  - 30
  - 40
-
  - 50
  - 60
# filename:test_data.py
import pytest
import yaml

# 方式一:使用string传参
class TestData1():
    @pytest.mark.parametrize("a,b",yaml.safe_load(open('./data.yaml')))
    def test_data1(self,a,b):
        print(a + b)

# 方式二:使用元组传参
class TestData2():
    @pytest.mark.parametrize(("a","b"),yaml.safe_load(open('./data.yaml')))
    def test_data2(self,a,b):
        print(a + b)

# 方式三:使用列表传参
class TestData3():
    @pytest.mark.parametrize(["a","b"],yaml.safe_load(open('./data.yaml')))
    def test_data3(self,a,b):
        print(a + b)

if __name__ == "__main__":
    pytest.main(['-v','-s','test_data.py'])
读取文件数据方法封装:
我们获取yaml数据的步骤可以抽离出来,封装为一个独立的方法
def get_data_from_yaml(path):
    with open(path,'r') as f:
        data = yaml.safe_load(f)
        return data

class TestCal:
    data = get_data_from_yaml

    @pytest.mark.parametrize('a,b',data(path='./case_data/test_calculatorcase_data.yaml'),ids=['first_case', 'two_case', 'three_case'])
    def test_add(self,a,b):
        assert True

# ids表示给用例取别名,每一组数据对应一条用例,对应一个别名
(2)测试步骤的参数化
可以将测试步骤也以数据的形式传给用例
# 测试代码文件 clac.py
class Clac:
    """创建加减乘除类"""

    def __init__(self,a,b):
        """获取数据"""
        self.a = a
        self.b = b

    def clac_jia(self):
        """加法计算方法"""
        return self.a + self.b

    def clac_jian(self):
    	"""减法计算方法"""
        return self.a - self.b

    def clac_cheng(self):
    	"""乘法计算方法"""
        return self.a * self.b

    def clac_chu(self):
    	"""除法计算方法"""
        return self.a / self.b
# 测试代码
import pytest
from python_yuan.clac import Clac #导入待测试的代码

@pytest.mark.parametrize('step',['jia','jian','cheng','chu'])
def test_step(step):
    a = 10
    b = 20 #实际工作中,测试数据也是参数化的。这里为了方便理解,把数据写死了。
    if step == 'jia':
        result = Clac(a,b).clac_jia()
        except1 = a + b
    elif step == 'jian':
        result = Clac(a,b).clac_jian()
        except1 = a - b
    elif step == 'cheng':
        result = Clac(a,b).clac_cheng()
        except1 = a * b
    elif step == 'chu':
        result = Clac(a,b).clac_chu()
        except1 = a / b
    assert result == except1
六.pytest fixture
1.自带的fixture(setup和teardown)
pytest中有自带的fixture方法,可以实现在测试用例前后完成特定的工作。
使用格式为:
setup_作用域:在测试用例执行前会执行setup中的内容
teardown_作用域:在测试用例执行后会执行teardown中的内容
常见的作用域如下:
- function 定义在类外, 类外的每一个用例都执行
- class 定义在类中,执行类中用例的前后会执行一次
- module 定义在类外,执行模块中用例的前后会执行一次
- session 定义在类外 每个session只运行一次,在自动化测试时,登录步骤可以使用session
- method 定义在类中,类中的每个用例执行的前后会执行一次
- setup/teardown 定义在类外,则类外的每个用例都执行;定义在类中,则类中的每个用例都执行
用例的执行顺序:
session级别 >module级别 >class级别>function级别。
例子:
import pytest #导入pytest

def setup_module():
    """在整个模块用例测试开始前执行"""
    print("----->setup_module")

def teardown_module():
    """在整个模块用例测试结束后执行"""
    print("----->teardown_module")

def setup_function():
    """在每一个外部的用例测试开始前执行"""
    print("----->setup_function")

def teardown_function():
    """在每一个外部的用例测试结束后执行"""
    print("----->teardown_function")

def test_a():
    """以test开头的测试函数"""
    print("----->test_a")
    assert 1 #断言成功

def test_b():
    print('----->test_b')
    assert 'e' in 'et'

class Test_hh:
    def setup_class(self):
        """在整个类中用例测试开始前执行"""
        print("----->setup_class")

    def teardown_class(self):
        """在整个类中用例测试结束后执行"""
        print("----->teardown_class")

    def setup_method(self):
        """在每一个类中的用例测试开始前执行"""
        print("----->setup_method")

    def teardown_method(self):
        """在每一个类中的用例测试结束后执行"""
        print("----->teardown_method")

    def test_c(self):
        print('----->test_c')
        assert 'e' in 'et'

    def test_d(self):
        print('----->test_d')
        assert 'e' in 'et'


if __name__ == "__main__":
    pytest.main(["-s",'-v',"test_abc.py"])
效果如下:

2.自定义fixture
场景:
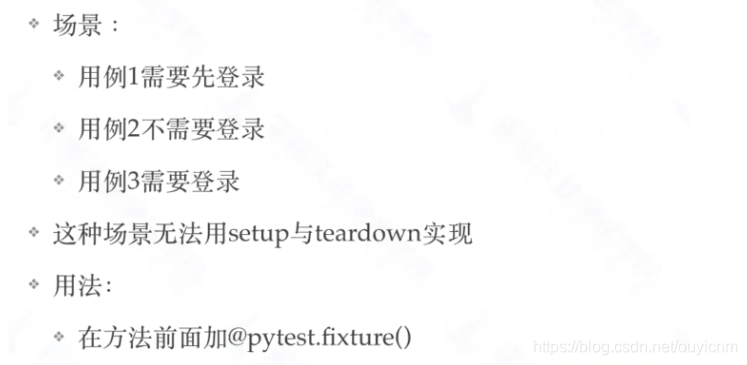
前面讲了setup、teardown可以实现在执行用例前或结束后加入一些操作,但这种都是针对整个脚本全局生效的。
如果有以下场景:用例 1 需要先登录,用例 2 不需要登录,用例 3 需要先登录。很显然无法用 setup 和 teardown 来实现。fixture可以让我们自定义测试用例的前置条件,并且可以跨文件使用。
- 命名方式灵活,不局限于 setup 和teardown 这几个命名
- conftest.py 配置里可以实现数据共享,不需要 import 就能自动找到fixture
- scope=“session” 以实现多个.py 跨文件共享
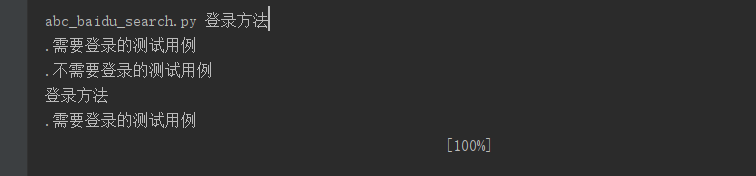
实现自定义setup
# filename:test_login.py
import pytest #导入pytest

@pytest.fixture()
def login():
    """
    给对应的方法添加装饰器@pytest.fixture(),
    然后在需要调用的测试用例方法中传入该方法,即可。
    """
    print("登录方法")

def test_a(login):
    print('需要登录的测试用例')
    assert 1

def test_b():
    print('不需要登录的测试用例')
    assert 1

def test_c(login):
    print('需要登录的测试用例')
    assert 1

if __name__ == "__main__":
    pytest.main(['-v','-s','test_login.py'])
效果如下:
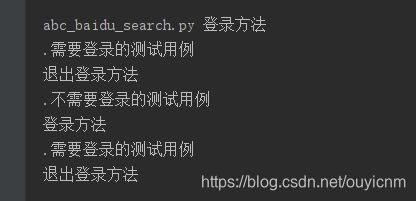
实现自定义teardown
在前面我们定义的fixture方法,只能实现在每个用例开始执行前执行(setup),那么怎么实现每个用例执行完成后执行呢(teardown)
方法:在定义的fixture方法中,可以使用yield进行区分,在yield前面的操作是setup,在yield后面的操作是teardown
import pytest #导入pytest

@pytest.fixture()
def login():
    """
    给对应的方法添加装饰器@pytest.fixture(),
    然后在需要调用的测试用例方法中传入该方法,即可。
    """
    print("登录方法") #setup
    yield

    print('退出登录方法') #teardown


def test_a(login):
    print('需要登录的测试用例')
    assert 1

def test_b():
    print('不需要登录的测试用例')
    assert 1

def test_c(login):
    print('需要登录的测试用例')
    assert 1

if __name__ == "__main__":
    pytest.main(['-v','-s','test_login.py'])
效果如下:
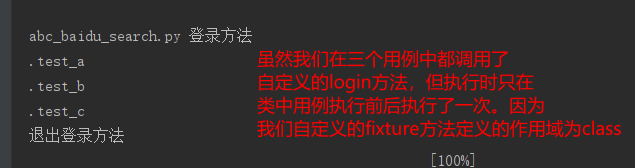
自定义fixture的作用域
使用@pytest.fixture(scope=‘module’)来定义作用域,scope的参数有以下几种
- function 每一个用例都执行,不论是否在类中
- class 每个类执行
- module 每个模块执行(函数形式的用例)
- session 每个session只运行一次,在自动化测试时,登录步骤可以使用该session
import pytest #导入pytest

@pytest.fixture(scope='class')
def login():
    """
    给对应的方法添加装饰器@pytest.fixture(),
    然后在需要调用的测试用例方法中传入该方法,即可。
    """
    print("登录方法") #setup
    yield

    print('退出登录方法') #teardown

class Test_login():

    def test_a(self,login):
        print('test_a')
        assert 1

    def test_b(self,login):
        print('test_b')
        assert 1

    def test_c(self,login):
        print('test_c')
        assert 1

if __name__ == "__main__":
    pytest.main(['-v','-s','test_login.py'])
效果如下:
通过conftest.py文件实现共享fixture
放在conftest.py文件下的fixture可以供整个conftest.py作用域下的用例文件使用,而不需要导入
conftest.py这个文件名是固定的,不可以更改。
使用的时候不需要导入conftest.py,会自动寻找.
演练:
第一步:创建一个conftest.py文件
# filename = conftest.py
#coding=utf-8
import pytest
@pytest.fixture()
def loginss():
    print('开始ss执行用例')
    yield
    print('执行ss用例结束')
第二步:在用例中使用fixture:loginss
import pytest
def test_a(loginss):
     assert True
def test_b(loginss):
     assert True
def test_c():
     assert True
注意conftest.py文件的作用域:
1.conftest.py创建在项目目录下,则项目下的所有用例文件都可共享
2.conftest.py创建在某个带__init__.py文件的包下,则该包下的所有用例文件都可共享
fixture中使用参数
在fixture中使用request.param来获取传进来的参数
import pytest
@pytest.fixture(params=["参数1","参数2"])
def myfixture(request):
    print("执行testPytest里的前置函数,%s" % request.param)
fixture中返回参数
import pytest
@pytest.fixture(params=["参数1","参数2"])
def myfixture(request):
    return request.param

def test_print_param(myfixture):
    print("执行test_two")
    print(myfixture)
    assert 1==1
输出:
PASSED                    [ 50%]执行test_two
参数1
PASSED                    [100%]执行test_two
参数2
注意:
- 对fixture参数化,也会使用例循环执行
- 如果是setup中返回参数,使用yield代替return
- 在用例中使用fixture函数名来获取fixture中返回的参数
七.pytest其他常用用法:
(1)pytest.mark.标记名
可以使用‘pytest.mark.标记名’来给用例添加标记
执行用例时使用’pytest -m 标记名‘来实现执行特殊标记的用例
import pytest

@pytest.mark.demo
@pytest.mark.smoke
def test_a():
     assert True

@pytest.mark.demo
def test_b():
     assert True

@pytest.mark.smoke
def test_c():
     assert True

def test_d():
     assert True
执行用例:
pytest -vs test_code.py -m="demo" # 执行模块下含demo标记的所有用例 ,执行test_a,test_b
pytest -vs test_code.py -m="demo and smoke" # 执行模块下含demo和smoke标记的所有用例 ,执行test_a
pytest -vs test_code.py -m "demo or smoke" # 执行模块下含demo或smoke标记的所有用例 ,执行test_a,test_b,test_c
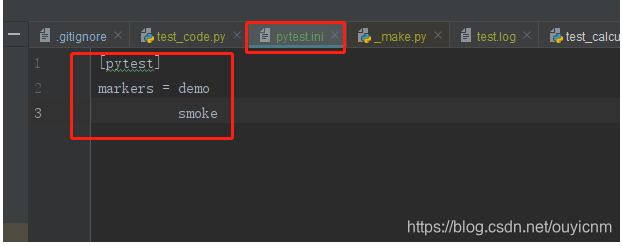
注意:执行时,会报warning错误,可以在项目目录下创建一个pytest.ini文件,然后在pytest.ini文件中配置标记名,来解决该问题
(2)pytest.mark.skip直接跳过用例的执行
我们可以给用例加上装饰器pytest.mark.skip,来跳过该用例的执行。pytest会收集该用例,但不会执行
@pytest.mark.skip(reason='不想执行呢') # reason参数可以写跳过的原因,非必须参数
def test_a():
     assert True

def test_b():
     assert True

def test_c():
     assert True

def test_d():
     assert True
执行结果:
test_code.py::test_a SKIPPED
test_code.py::test_b PASSED
test_code.py::test_c PASSED
test_code.py::test_d PASSED
(3)pytest.mark.skipif()满足条件时,跳过用例
import pytest

@pytest.mark.skipif(1 == 1,reason='不想执行呢') # 满足条件时,跳过用例的执行
def test_a():
     assert True

def test_b():
     assert True

def test_c():
     assert True

def test_d():
     assert True
结果:
test_code.py::test_a SKIPPED
test_code.py::test_b PASSED
test_code.py::test_c PASSED
test_code.py::test_d PASSED
(4)pytest.ini添加配置
pytest.ini文件是pytest的一个配置文件,我们可以在pytest.ini文件中,添加一些常用的配置,比如自定义pytest命令,自定义pytest的匹配规则等
第一步:在项目目录下创建一个pytest.ini文件
第二步:编辑pytest.ini文件
[pytest]
;添加mark标记,防止运行时报wraning
markers = demo
          smoke

;自定义pytest添加命令参数,现在运行pytest命令= ‘pytest -sv’
addopts = -sv

;自定义测试文件命名规则,匹配check或者test开头的文件
python_files = check* test*

;自定义测试类命名规则,匹配Check或者Test开头的类
python_classes = Check* Test*

;自定义测试方法命名规则,匹配check或者test开头的方法
python_functions = test_* check_*
八.pytest实用插件介绍
pytest可以兼容许多插件,来满足它自身无法满足的要求
(1)用例失败后自动重新运行:pytest-rerunfailures
安装插件:
pip install pytest-rerunfailures
使用方法:
pytest test_x.py --reruns=n  #--reruns=n 失败后重运行的次数
pytest -v --reruns 3 --reruns-delay 5 test_abc.py #--reruns-delay 5表示重试时间隔5秒
同时也可以在脚本中指定定义重跑的次数,这个时候在运行的时候,就无需加上 --reruns 这个参数
@pytest.mark.flaky(reruns=6, reruns_delay=2)
    def test_example(self):
        print(3)
        assert random.choice([True, False])
(2)多重校验:pytest-assume
pytest中可以用python的assert断言,也可以写多个断言,但一个失败,后面的断言将不再执行。那么如何让断言失败后,继续往下执行呢
安装插件:
pip install pytest-assume
使用方法:
def test_simple_assume(x, y):
    pytest.assume(x == y)
    pytest.assume(True)
    pytest.assume(False)
(3)分布式并发执行:pytest-xdist
pytest-xdist的出现就是为了让自动化测试用例可以分布式执行,从而节省自动化测试时间
分布式执行用例的设计原则:
- 用例之间是独立的,用例之间没有依赖关系,用例可以完全独立运行【独立运行】
- 用例执行没有顺序,随机顺序都能正常执行【随机执行】
- 每个用例都能重复运行,运行结果不会影响其他用例【不影响其他用例】
安装插件:
pip install pytest-xdist
使用方法:
多cpu并行执行用例,直接加个-n参数即可,后面num参数就是并行数量,比如num设置为3
pytest -n 3
pytest -n auto # 自动识别cpu个数,启动对应进行
(4)控制用例的执行顺序:pytest-ordering
安装插件:
pip install pytest-ordering
使用方法:
import pytest

@pytest.mark.run(order=2)
def test_foo():
    assert True

@pytest.mark.run(order=1)
def test_bar():
    assert True
注意:
1.顺序原理:先安照order数字大小执行所有添加了order的测试用例,在按照用例的先后顺序执行所有没有添加order的用例
2.尽量不要让测试用例有顺序,尽量不要让测试用例有依赖!
(5)hook(钩子)函数定制和扩展插件【了解】
官网:https://docs.pytest.org/en/latest/_modules/_pytest/hookspec.html
pytest_collection_modifyitems
Pytest在收集完所有测试用例后调用该钩子方法。我们可以定制化功能实现:
- 自定义用例执行顺序
- 解决编码问题(中文测试用例名称)
- 自动添加标签
例如:
conftest.py里面:
添加:
def pytest_collection_modifyitems(session, config, items):
    print(type(items)) # items是一个列表,包含所有的pytest收集到的用例
    items.reverse()
    for item in items:
        item.name = item.name.encode('utf-8').decode('unicode-escape') # 设置用例名字的编码方式
        item._nodeid = item.nodeid.encode('utf-8').decode('unicode-escape') # 设置用例ID的编码方式

        # 根据用例名字来自动添加mark标记
        if "add" in item._nodeid:
            item.add_marker(pytest.mark.add)
        if "div" in item._nodeid:
            item.add_marker(pytest.mark.div)
hook中包含很多函数,主要是用来定制特殊场景的。我们一般使用pytest_collection_modifyitems来解决编码问题。如果有需要定制更多内容的需求,可以查阅官网学习
八.allure测试报告
allure是一套非常强大的测试报告插件,pytest可以很轻松的集成allure
1.安装:
linux:
方法一: sudo apt-get install allure(网络问题不一定成功)
方法二:https://repo1.maven.org/maven2/io/qameta/allure/allure-commandline/2.13.3/
下载allure的zip包;
安装jdk:sudo apt install openjdk-8-jdk-headless
添加软连接(配置环境变量):ln -s /root/allure-2.13.3/bin/allure /usr/bin/allure
windows:https://repo1.maven.org/maven2/io/qameta/allure/allure-commandline/2.13.3/
下载allure的zip包,安装jdk1.8,然后配置jdk和allure环境变量即可。
总结:allure安装就是解压zip包,配置到环境变量即可。需要安装jdk
2.python中使用:
第一步:需要安装allure-pytest
第二步:结合allure,pytest执行测试用例:
pytest test_clac.py --alluredir ./allure-result # 会创建一个./allure-result文件夹,里面有许多测试数据的json文件
第三步:读取json文件,生成测试报告
allure generate ./allure-result # 会创建一个allure-report文件,里面有html格式的测试报告
allure generate ./allure-result -o ./allure-report --clean
#  -o ./allure-report:  指定测试报告存放的位置
# --clean  :  清除./allure-result老的json数据,不然生成的报告会有原来的数据
第四步:打开测试报告
allure open allure-report/ #去open整个文件夹,会在本地启动一个web服务,通过访问这个服务,可以查看测试报告
3.allure常用方法
(1)feature,story,step的使用

登录例子:(feature和story,step)
import allure
from selenium import webdriver

@allure.feature('登录模块')
class TestLogin:
    @allure.story('登录成功')
    def test_login_success(self):
        with allure.step('输入用户名'):
            print('输入用户名')
        with allure.step('输入密码'):
            print('输入密码')
        with allure.step('点击登录'):
            print('点击登录')
        assert True

    @allure.story('用户名错误')
    def test_login_username_failed(self):
        with allure.step('输入用户名'):
            print('输入用户名')
        with allure.step('输入密码'):
            print('输入密码')
        with allure.step('点击登录'):
            print('点击登录')
        assert  True

    @allure.story('密码错误')
    def test_login_passwd_failed(self):
        with allure.step('输入用户名'):
            print('输入用户名')
        with allure.step('输入密码'):
            print('输入密码')
        with allure.step('点击登录'):
            print('点击登录')
        assert True

@allure.feature('搜索模块')
class TestSearch:
    @allure.story('精确匹配')
    def test_precise_search(self):
        assert  True

    @allure.story('模糊匹配')
    def test_dim_search(self):
        assert True
在终端执行代码:
1.pytest -vs test_code.py --alluredir=report/testreport2 --allure-features=登录模模块  --allure-stories=用户名错误,密码错误
# pytest -vs test_code.py》》》》执行测试用例文件
# --alluredir=report/testreport2》》》生成初始初始报告,报告位置./alluredir=report/testreport2目录
# --allure-features=登录模模块  --allure-stories=用户名错误,密码错误 》》》只执行登录模块下的‘用户名错误和密码错误’两条测试用例
2.allure generate report/testreport2 --clean
# 解析report/testreport2的初始报告文件,并生成html报告保存在allure-report目录下,如果allure-report目录下已经有之前的报告了,则需要加参数--clean将其清除掉
3.allure open allure-report
# 打开测试报告,会生成一个服务地址,使用浏览器访问即可查看报告
报告如下:
我们定义的feature,story,step在报告中都有展示
总结:
feature一般用来标识大的功能模块,对应class
stroy一般用来标识各个子功能,对应function
step一般用在用例步骤中,用来描述用例执行时的具体操作步骤
(2)sevearity来设置用例级别
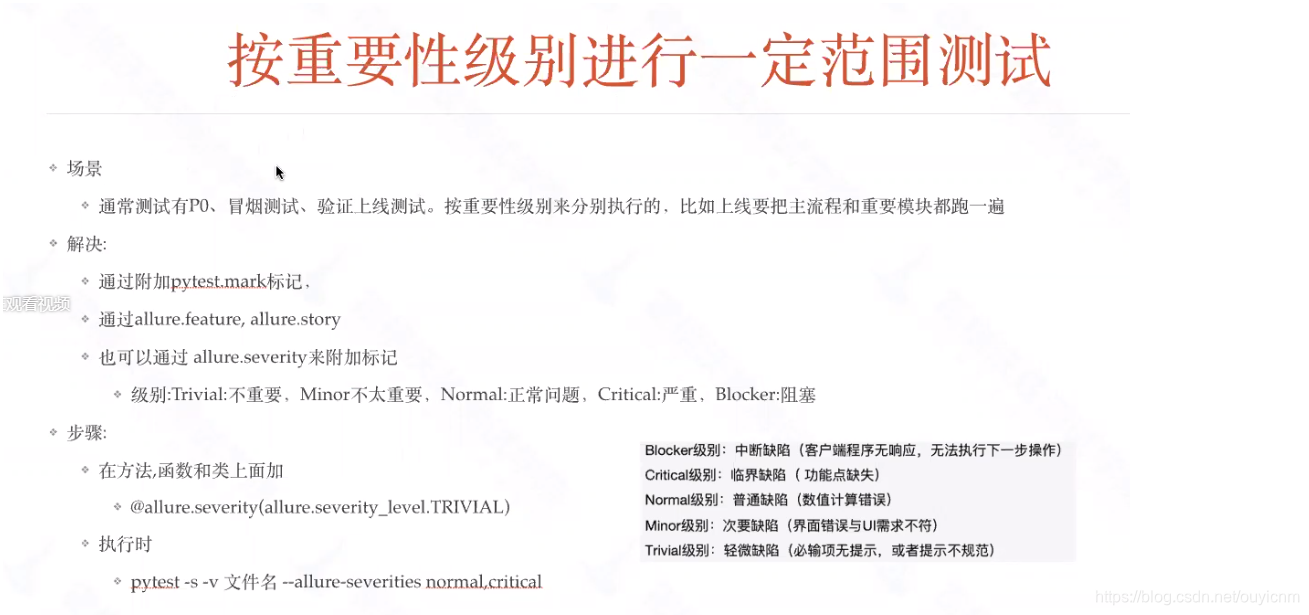
severity例子:
@allure.sevearity(allure.severity_level.NORMAL)
def test_a():
    assert True

@allure.severity(allure.severity_level.MINOR)
def test_b():
    assert True

@allure.severity(allure.severity_level.TRIVIAL)
def test_c():
    assert True

def test_d():
    assert True

@allure.severity(allure.severity_level.NORMAL)
class Test_h:

    @allure.severity(allure.severity_level.MINOR)
    def test_e(self):
        assert True

    @allure.severity(allure.severity_level.TRIVIAL)
    def test_f(self):
        assert True

    def test_g(self):
        assert True

class Test_i:
    def test_j(self):
        assert True
执行用例:
pytest -vs test_code.py --alluredir=report/testreport --allure-severities=normal,minor
# --allure-severities=normal,minor表示执行normal和minor级别的用例
# 执行了test_a,test_b,test_e,test_g四条用例
筛选规则:
1.对于类外的用例:
- 含选中级别标记的用例执行
- 含未选中级别标记或者未添加级别标记的用例不执行
2.对于含选中级别标记的类:
- 会执行类下的未添加级别标记和添加了选中的级别标记的用例
3.对于含未选中级别标记的类或者未添加标记的类:
- 会执行类下的含选中级别标记的用例
- 类下的含未选中级别标记和未添加级别标记的用例不执行
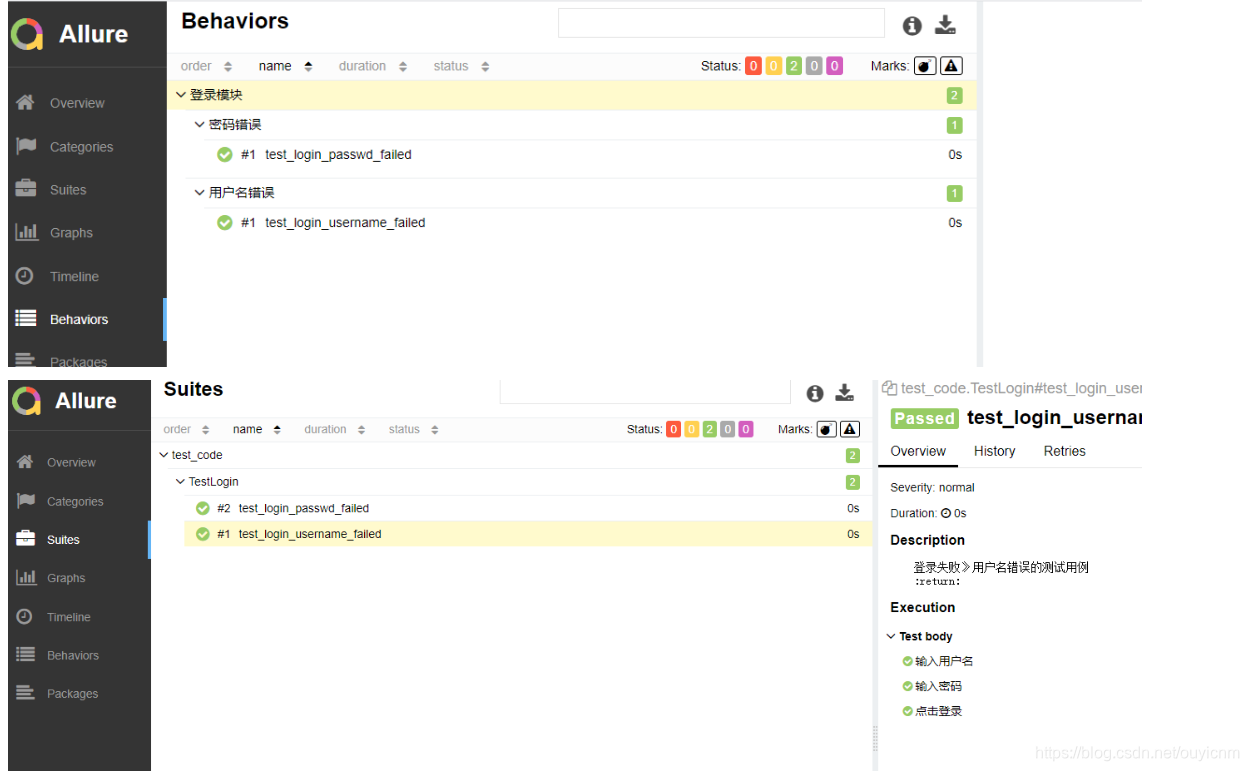
(3)title设置用例名称
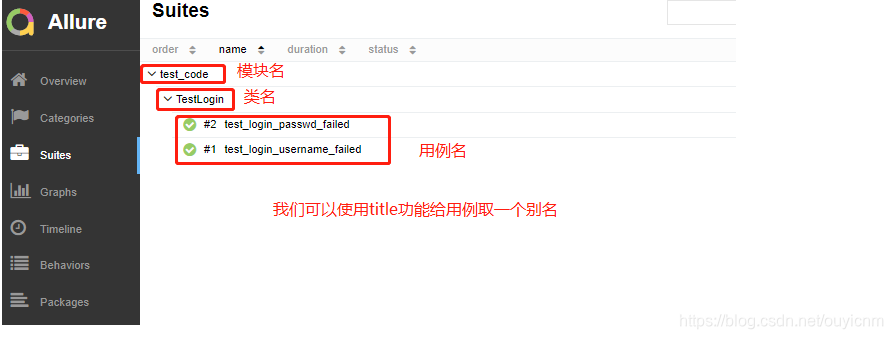
title例子:
@allure.feature('登录模块')
class TestLogin:
    @allure.title('登录成功用例')
    @allure.story('登录成功')
    def test_login_success(self):
        """
        登录成功测试用例
        :return:
        """
        assert True

    @allure.title('用户名错误用例')
    @allure.story('用户名错误')
    def test_login_username_failed(self):
        """
        登录失败》用户名错误的测试用例
        :return:
        """
        assert  True

    @allure.title('密码错误用例')
    @allure.story('密码错误')
    def test_login_passwd_failed(self):
        """
        登录失败》密码错误的测试用例
        :return:
        """
        assert True
执行用例:
pytest -vs test_code.py --alluredir=report/testreport3
allure generate report/testreport3 --clean
allure open allure-report
结果:
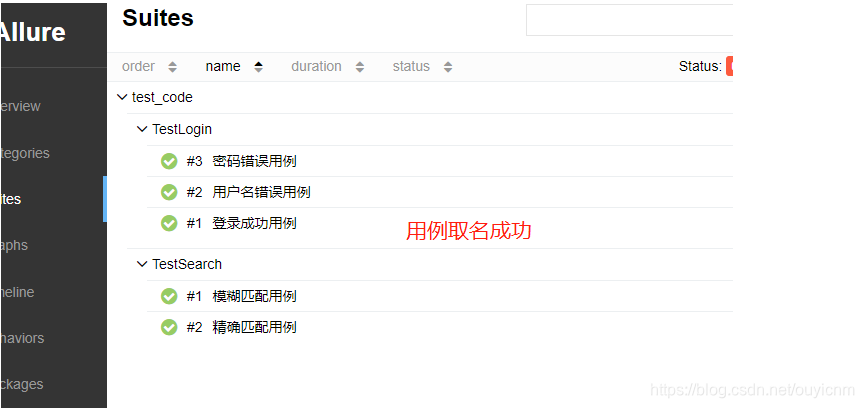
总结:allure.title只能修饰函数,及只能用来给用例取别名。对class类无效
(4)attach在用例中添加文字,html代码,图片,视频等
我们可以使用allure的attach来实现在用例中添加文字,html代码,图片,视频等。
attach例子:
def test_text():
    try:
        assert False
    except Exception as e:
        allure.attach(body='<body>啊哦,用例执行失败了</body>',name='错误提示') # 两个参数,body是要添加的内容,name是取的别名
        allure.attach(body='这是错误日志',name="错误日志") # 两个参数,body是要添加的内容,name是取的别名
        allure.attach.file(source='C:/Users/Administrator.DESKTOP-7PKNCLF/Pictures/Saved Pictures/喵咪.jpg',
                           name="失败截图",
                           attachment_type=allure.attachment_type.JPG)

        allure.attach.file(source='E:/测试开发/06 Python语言基础√/6 python模块.ts',
        				   name='失败视频',
                           attachment_type=allure.attachment_type.MP4)
        raise e
# 三个参数,source是要添加的内容,name是取的别名,attachment_type是要保存为的文件类型
结果:
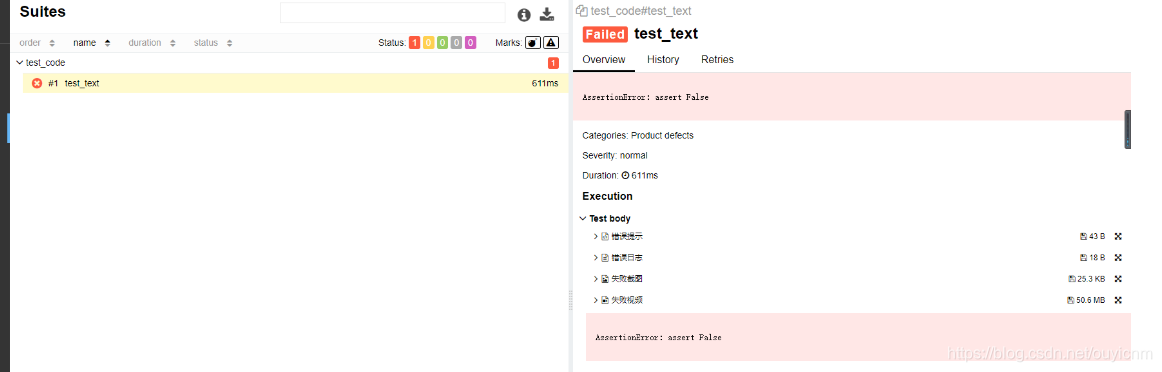
总结:当用例运行失败时,我们可以使用attach来添加错误日志,截图等到测试报告中
(5)testcase在报告中添加url连接
testcase例子:
@allure.testcase('www.baidu.com')
def test_text():
     assert True
结果:

总结:
以上就是pytest的常用方法了,使用这些方法我们可以非常方便的管理我们的测试用例。其实pytest是从unittest基础上封装出来的,所以unittest的用法pytest也都是支持的。不过pytest比unittest更加灵活,功能更加强大。因此强烈推荐使用pytest来管理你的自动化测试用例。

智能推荐
c# 调用c++ lib静态库_c#调用lib-程序员宅基地
文章浏览阅读2w次,点赞7次,收藏51次。四个步骤1.创建C++ Win32项目动态库dll 2.在Win32项目动态库中添加 外部依赖项 lib头文件和lib库3.导出C接口4.c#调用c++动态库开始你的表演...①创建一个空白的解决方案,在解决方案中添加 Visual C++ , Win32 项目空白解决方案的创建:添加Visual C++ , Win32 项目这......_c#调用lib
deepin/ubuntu安装苹方字体-程序员宅基地
文章浏览阅读4.6k次。苹方字体是苹果系统上的黑体,挺好看的。注重颜值的网站都会使用,例如知乎:font-family: -apple-system, BlinkMacSystemFont, Helvetica Neue, PingFang SC, Microsoft YaHei, Source Han Sans SC, Noto Sans CJK SC, W..._ubuntu pingfang
html表单常见操作汇总_html表单的处理程序有那些-程序员宅基地
文章浏览阅读159次。表单表单概述表单标签表单域按钮控件demo表单标签表单标签基本语法结构<form action="处理数据程序的url地址“ method=”get|post“ name="表单名称”></form><!--action,当提交表单时,向何处发送表单中的数据,地址可以是相对地址也可以是绝对地址--><!--method将表单中的数据传送给服务器处理,get方式直接显示在url地址中,数据可以被缓存,且长度有限制;而post方式数据隐藏传输,_html表单的处理程序有那些
PHP设置谷歌验证器(Google Authenticator)实现操作二步验证_php otp 验证器-程序员宅基地
文章浏览阅读1.2k次。使用说明:开启Google的登陆二步验证(即Google Authenticator服务)后用户登陆时需要输入额外由手机客户端生成的一次性密码。实现Google Authenticator功能需要服务器端和客户端的支持。服务器端负责密钥的生成、验证一次性密码是否正确。客户端记录密钥后生成一次性密码。下载谷歌验证类库文件放到项目合适位置(我这边放在项目Vender下面)https://github.com/PHPGangsta/GoogleAuthenticatorPHP代码示例://引入谷_php otp 验证器
【Python】matplotlib.plot画图横坐标混乱及间隔处理_matplotlib更改横轴间距-程序员宅基地
文章浏览阅读4.3k次,点赞5次,收藏11次。matplotlib.plot画图横坐标混乱及间隔处理_matplotlib更改横轴间距
docker — 容器存储_docker 保存容器-程序员宅基地
文章浏览阅读2.2k次。①Storage driver 处理各镜像层及容器层的处理细节,实现了多层数据的堆叠,为用户 提供了多层数据合并后的统一视图②所有 Storage driver 都使用可堆叠图像层和写时复制(CoW)策略③docker info 命令可查看当系统上的 storage driver主要用于测试目的,不建议用于生成环境。_docker 保存容器
随便推点
网络拓扑结构_网络拓扑csdn-程序员宅基地
文章浏览阅读834次,点赞27次,收藏13次。网络拓扑结构是指计算机网络中各组件(如计算机、服务器、打印机、路由器、交换机等设备)及其连接线路在物理布局或逻辑构型上的排列形式。这种布局不仅描述了设备间的实际物理连接方式,也决定了数据在网络中流动的路径和方式。不同的网络拓扑结构影响着网络的性能、可靠性、可扩展性及管理维护的难易程度。_网络拓扑csdn
JS重写Date函数,兼容IOS系统_date.prototype 将所有 ios-程序员宅基地
文章浏览阅读1.8k次,点赞5次,收藏8次。IOS系统Date的坑要创建一个指定时间的new Date对象时,通常的做法是:new Date("2020-09-21 11:11:00")这行代码在 PC 端和安卓端都是正常的,而在 iOS 端则会提示 Invalid Date 无效日期。在IOS年月日中间的横岗许换成斜杠,也就是new Date("2020/09/21 11:11:00")通常为了兼容IOS的这个坑,需要做一些额外的特殊处理,笔者在开发的时候经常会忘了兼容IOS系统。所以就想试着重写Date函数,一劳永逸,避免每次ne_date.prototype 将所有 ios
如何将EXCEL表导入plsql数据库中-程序员宅基地
文章浏览阅读5.3k次。方法一:用PLSQL Developer工具。 1 在PLSQL Developer的sql window里输入select * from test for update; 2 按F8执行 3 打开锁, 再按一下加号. 鼠标点到第一列的列头,使全列成选中状态,然后粘贴,最后commit提交即可。(前提..._excel导入pl/sql
Git常用命令速查手册-程序员宅基地
文章浏览阅读83次。Git常用命令速查手册1、初始化仓库git init2、将文件添加到仓库git add 文件名 # 将工作区的某个文件添加到暂存区 git add -u # 添加所有被tracked文件中被修改或删除的文件信息到暂存区,不处理untracked的文件git add -A # 添加所有被tracked文件中被修改或删除的文件信息到暂存区,包括untracked的文件...
分享119个ASP.NET源码总有一个是你想要的_千博二手车源码v2023 build 1120-程序员宅基地
文章浏览阅读202次。分享119个ASP.NET源码总有一个是你想要的_千博二手车源码v2023 build 1120
【C++缺省函数】 空类默认产生的6个类成员函数_空类默认产生哪些类成员函数-程序员宅基地
文章浏览阅读1.8k次。版权声明:转载请注明出处 http://blog.csdn.net/irean_lau。目录(?)[+]1、缺省构造函数。2、缺省拷贝构造函数。3、 缺省析构函数。4、缺省赋值运算符。5、缺省取址运算符。6、 缺省取址运算符 const。[cpp] view plain copy_空类默认产生哪些类成员函数